AX1539
Users can manage their plan file tasks in the Web Client by using the built-in process web pages. These pages provide a means for users to review and complete their active tasks, and view details about a plan file in the process.
The process web pages are most commonly used when your plan files are form-enabled and the Web Client is the primary means of access for your end users.
Several properties of the process web pages are configurable to meet the needs of your plan file process. These properties can be configured on the Web Configuration tab of the plan file process definition.
Web Client users can use the Process Tasks page to view and complete their tasks for a specified process. You can optionally customize the page title, and you can optionally configure the number of days that a task is considered new or due soon.
Page Title
By default, the page title is ProcessName Action Required. For example, if the process display name is Capital Requests, the page title will be Capital Requests Action Required.
You can customize this text as desired using the Page Title box. Note that you cannot edit the default text—you must define the full title text if you want to customize any part of it. The following variables can be used in the title text:
| Variable | Description |
|---|---|
|
{ProcessName} |
The name of the process (display name if defined, process name if not). |
|
{FileGroupName} |
The name of the file group for the plan file process. |
Task Status Configuration
You can optionally configure the number of days that a process task is considered new or due soon. These settings are used as follows:
- The Process Summary component for Axiom forms uses these settings to determine which tasks display in the "New Tasks" and "Tasks Due Soon" sections of the component.
- The Process Tasks page uses these settings to determine which tasks display when the page view is set to New items or Due soon.
By default, both items are set to 2 days. To change this, edit the number of days in the applicable setting.
| Item | Description |
|---|---|
|
A task is considered 'new' for X day(s) after a step is started |
If this is set to 2 days and the step is started on 7/1/2016, then the task will be considered new on 7/1 and 7/2. |
|
A task is considered 'due soon' for X day(s) before the due date |
If this is set to 2 days and the task is due on 7/5/2016, then the task will be considered due soon for the 2 days before the due date (7/3 and 7/4), as well as the due date itself (7/5). On 7/6 it will be considered overdue. |
Web Client users can use the Process Routing page to view the process status of the plan file and to open the plan file. Step owners, administrators, and process owners can also complete the current task for the plan file from this page. You can control the visibility of the routing page, and you can optionally customize some of the text used on the page.
| Item | Description |
|---|---|
|
Make routing page visible to anyone with read access to the plan file |
Specifies whether a user with read-only access to a plan file can access the Process Routing page. By default this option is enabled, which means that a user with read-only access to the plan file can view the routing page for that plan file at any time. Step ownership in and of itself does not grant a user access to this page. However, step ownership can "elevate" a user to having at least read-only access to the plan file and therefore gain access to the page while the user is step owner. If this option is disabled, then the Process Routing page is only available to administrators and process owners. |
|
Open Plan File Link Text |
Defines the link text for the hyperlink that displays in the top right-hand corner of the Process Routing page. Users can open the related plan file from the page using this hyperlink. By default, the text for this hyperlink is open plan file. If desired, you can customize this text using Open Plan File Link Text box. Whatever you type into this field will display as the hyperlink text. |
|
Page Subheader |
Defines the subheader text for the Process Routing page. You can use the default text or optionally customize it. See the following section for more details. |
Customizing the page subheader
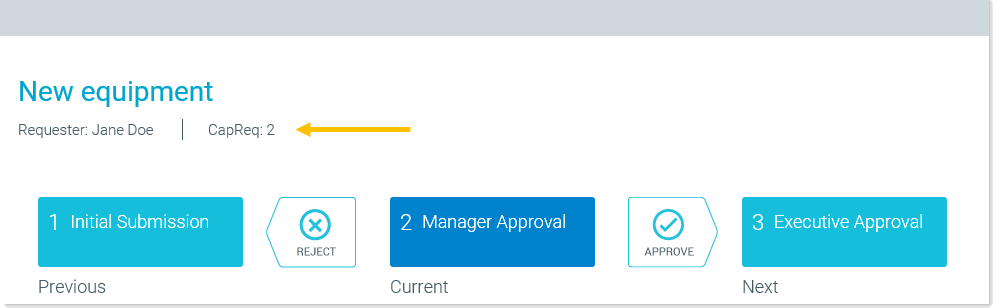
The description of the plan code / plan file always displays as the header text at the very top of the page. However, the subheader text underneath it can be customized. By default, the subheader text displays the following information.
- The name of the user who initiated the process for the plan file, with the label Requester: UserName
- The plan code, with the label ColumnName: Code
The following screenshot shows example header and subheader text for the routing page:
You can customize this text as desired using the Page Subheader box. Note that you cannot edit the default text—you must define the full subheader text if you want to customize any part of it. The following variables can be used in the subheader text:
| Variable | Description |
|---|---|
|
{PlanCode} |
The plan code for the current task. For example: 100. |
|
{PlanCodeDescription} |
The description of the current plan code. The description is taken from the designated description column(s) for the plan code table. |
|
{PlanCodeDisplayName} |
The full name (dimension and code) of the current plan code. For example: Dept 100. |
|
{Separator} |
Inserts a separator line. The separator line is horizontal when used in the information panel, and vertical when used in the subheader of the routing page. |
| {ColumnValue:ColumnName} |
Return a value from a specified column, for the current plan file. The column can be any column from the plan code table, or from a table that the plan code table links to. For example, imagine that you want to display the assigned region for the current plan code, and Region is a column in the plan code table. You can specify When you select Column Value from the Insert Variable list, you will be prompted to select a column. The variable will then be inserted using the correct syntax for the selected column. |
|
{ProcessInitiator} |
The user who initiated the process for the plan file. This variable is primarily intended to be used with on-demand file groups, where the process initiator is typically the user who initially created the plan file. |
As you type into the Page Subheader box, the Preview box shows a preview of how the content will look in the routing page subheader. Variable values will display in the preview as <ColumnName value>. These variables cannot be resolved until they have a plan code to look up the values for.
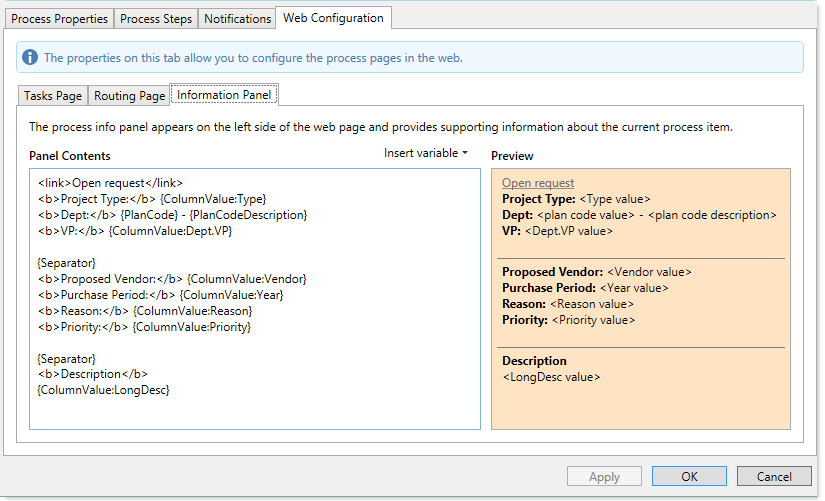
You can configure an information panel for plan files, which users can view when looking at the Process Routing page for the plan file. The panel can contain information about the plan file, as well as information from the plan code table and related tables. It can also contain a link to open the plan file. The intended purpose of the panel is to provide users with a snapshot of the information they may need to decide what to do with the plan file task.
You can configure the information panel contents by typing into the Panel Contents box. You can use special tags to format the content, and you can insert process variables to retrieve information from the process and from the plan code table (and related tables).
-
To create a link to the plan file, use the
linktag as follows:<link>LinkText</link>. This text will automatically be resolved as a hyperlink to the current plan file when the panel is viewed. For example:<link>Open request</link>
This will render as a hyperlink using the text Open request.
If the plan file is forms-enabled, then it will open in the Web Client. Otherwise, the link will launch the Desktop Client (to the client that was last-used by the user, Excel or Windows) and open the spreadsheet plan file.
-
To apply bold text, use the
btag as follows:<b>Text</b>.
The following variables are available for use in the information panel. To insert a variable, you can type the variable in the text directly, or use the Insert variable menu.
| Variable | Description |
|---|---|
|
{PlanCode} |
The plan code for the current task. For example: 100. |
|
{PlanCodeDescription} |
The description of the current plan code. The description is taken from the designated description column(s) for the plan code table. |
|
{PlanCodeDisplayName} |
The full name (dimension and code) of the current plan code. For example: Dept 100. |
|
{Separator} |
Inserts a separator line. The separator line is horizontal when used in the information panel, and vertical when used in the subheader of the routing page. |
| {ColumnValue:ColumnName} |
Return a value from a specified column, for the current plan file. The column can be any column from the plan code table, or from a table that the plan code table links to. For example, imagine that you want to display the assigned region for the current plan code, and Region is a column in the plan code table. You can specify When you select Column Value from the Insert Variable list, you will be prompted to select a column. The variable will then be inserted using the correct syntax for the selected column. |
|
{ProcessInitiator} |
The user who initiated the process for the plan file. This variable is primarily intended to be used with on-demand file groups, where the process initiator is typically the user who initially created the plan file. |
As you type into the Panel Contents box, the Preview box shows a preview of how the content will look in the information panel. Variable values will display in the preview as <ColumnName value>. These variables cannot be resolved until they have a plan code to look up the values for.
The following screenshot shows an example configured information panel:
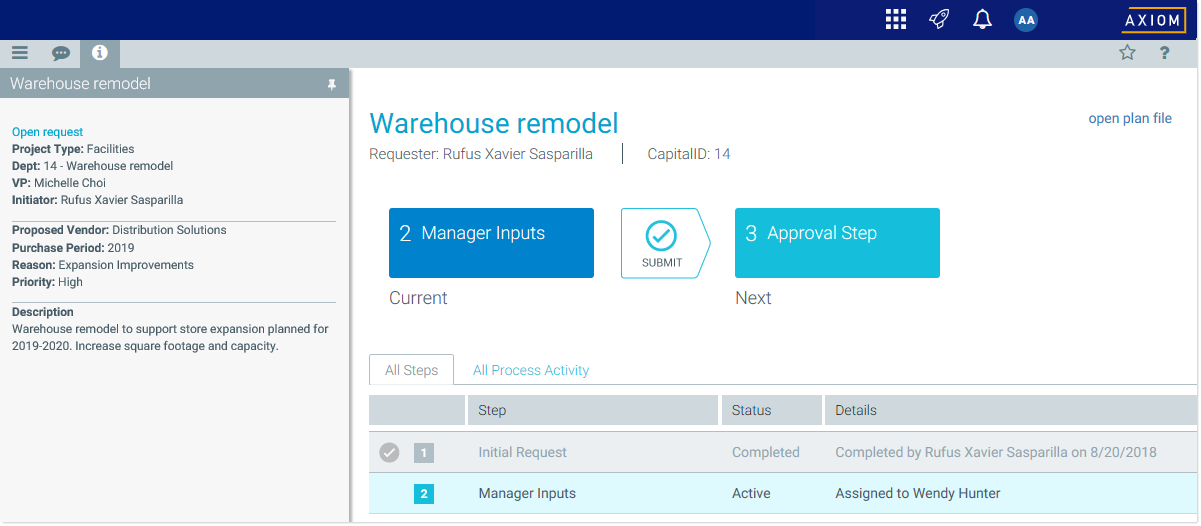
This panel would display as follows in the Process Routing page:
The Time in Step page of the Web Client provides reporting on the average time plan files spent in each step of the process. If desired, you can set up refresh variables to filter this report, so that you can see the time in step filtered by groupings in the plan code table.
To enable filtering, create a file group utility or a report file with a RefreshVariables data source, and define the variables to be used with the Time in Step report. Then, select this file as the Time in Step Variables Report.
When the Time in Step page is accessed, Axiom Software will read the variables from the designated file, and present them in the Filters panel (just like when using refresh variables with Axiom forms). The user's selected values for the variables will be applied as filters to the Time in Step report.
Refresh variables work as follows in this context:
-
The only supported refresh variable type is ComboBox, using either a table column in the plan code table, or a ComboBox data source. All other variable types will be ignored.
-
If you are using a column in the plan code table, Axiom Software takes the selected value for the refresh variable and applies it to the web page as a filter. For example, if the plan code table has a column such as RequestType, and the user selects Type1, then Axiom Software applies a filter of
RequestType='Type1'. The web page is then filtered to only show the results for plan files that have a request type of Type1. -
If you are using a ComboBox data source, the
[Value]column for the data source must contain valid filter criteria statements based on the plan code table. The selected filter is applied to the web page "as is". The[Label]column of the data source can contain "user friendly" text instead of the full filter statement. - All other refresh variable settings can be used in this context, such as dependent variables or group names. Keep in mind that if you configure a variable as required, then once a user selects a value for that variable and applies it, they will not be able to clear the variable and return to the unfiltered state of the report without reloading the page.
The variables file can use Axiom queries, data lookups, and Axiom functions to define the variable properties or to populate the ComboBox data source. When the file is accessed by the web page, any "refresh on open" queries are executed and formulas are calculated before the variables are read from the file and presented in the Filters panel. When a user applies the variable values, the file is refreshed and calculated again before the final selected values are applied as filters to the web page. The file should not contain any queries or other features that are not necessary to the configuration of the refresh variables.
