AX1596
You can optionally configure various display settings for the Plan File Directory web page. You can configure the following on a per file group basis:
- The header text that displays on the top of the page
- Which columns are included in the directory, and certain attributes about those columns—including which column contains the links to the corresponding plan files
- Which column is used to sort the directory
- Whether users can filter the directory based on refresh variable selections
- The text for the "add new file" button (on-demand file groups only)
These settings are defined in the file group properties. Only administrators and users with one of the following security permissions can edit file group properties: Administer File Groups and Modify File Group.
To access the Plan File Directory properties:
- On the Axiom tab, in the Administration group, click Manage > File Groups.
-
Navigate to the file group that you want to edit, then right-click the file group and select Edit.
TIP: You can also do this from the file group node in the Explorer task pane.
Most of the properties that affect the Plan File Directory page are defined on the Web Configuration tab, in the Plan File Directory sub-tab. After making and saving any changes to the file group properties, you must reload the web page to see the effects of these changes.
Customizing the directory header text
You can optionally customize the header text that displays at the top of the Plan File Directory web page. By default, the header text is the display name of the file group.
To customize the header, type the desired text into the Directory Header Text box on the Plan File Directory tab. If you later want to revert back to using the default text, you can clear the contents of this box.
You can use file group variables such as {FileGroupYear} in the header text. You must manually type any variable that you want to use, enclosed in curly brackets—there is no helper tool available to insert these variables for you.
Configuring the display columns for the directory
You can optionally configure the columns that display in the directory, as well as certain attributes about those columns. You can specify which columns are searchable, which are frozen for scrolling, and the column width. You can also customize the header text for the column.
IMPORTANT: The display column properties determine which column contains links to the plan files. By default, no column contains these links. If you do not enable Link to Plan File for at least one column, then users cannot open plan files using the Plan File Directory page.
The current display columns are listed in the Display Columns box on the Plan File Directory tab. By default, the key column of the plan code tableThe table that contains the list of plan codes for a file group. Generally, each code in the table will have a plan file for developing plan data. is included, as well as any designated description columns. You can include any column from the plan code table, from a data table that directly looks up to the plan code table, or from a reference table that the plan code table looks up to.
You can also include various Plan File Columns. The Attachments column in this section enables attachment management for plan files from the directory. The column displays the current number of attachments for the plan file. Users can click this number to access the File Attachments dialog for the plan file. This is the same dialog used by the File Attachments command in Axiom forms, allowing users to upload, view, edit, and delete attachments (according to user permissions). The Attachments column only displays in the directory if plan file attachments are enabled for the file group.
To configure which columns are included and in what order, click Select Columns. In the Select Columns dialog:
- To add a column, select the column in the left-hand pane of the dialog and then click Add to move it to the Selected Columns box.
- To remove a column, select the column in the Selected Columns box and then click Remove.
- To change the order of a column, select the column in the Selected Columns box and then click Up or Down to move it to the desired location.
Display attributes for each column are configured after the column has been added to the Display Columns box. To configure the display attributes for a column, select the column in the list and then click Edit Column. You can edit the following display properties:
| Item | Description |
|---|---|
|
Header |
The header text for the column. By default, this is the column name. You can customize this text if desired. If the column is not on the plan code table, the fully qualified name is used by default. For example, if the plan code table is Dept, then if you add the |
|
Width |
The width of the column. By default, all display columns use the same width. If desired, you can enter a different width in pixels. If you want to go back to using the default width, you can clear this field. |
|
Column Alignment |
The alignment of the column values. By default, the alignment is set to Default and determined as follows:
If desired, you can override this behavior and specify the alignment as Left, Right, or Center. If you change the alignment and then you later want to return to the default behavior, specify Default. NOTE: The alignment only affects the values in the column. Column header text is always left-aligned. |
|
Searchable |
Specifies whether the column is searchable on the web page, using the search box on the top of the page. Select this check box if you want the contents of this column to be included in the search. If no columns are flagged as searchable, then the search uses the frozen columns. NOTE: This option is only available for columns on reference tables. |
|
Frozen |
Specifies whether the column is "frozen" on the page for scrolling purposes. Select this check box if you want this column to remain fixed on the left-hand side of the screen when the user scrolls to the side. |
|
Link to Plan File |
Specifies whether the values in this column contain hyperlinks to the corresponding plan files. Users can use these hyperlinks to open their plan files. This must be enabled on at least one column in order to allow users to open plan files from the Plan File Directory. Typically this option is enabled for the key column (such as Dept) or for another column that holds identifying values for plan files. For example, if the file group is an on-demand file group, you may be using an alternate key column that contains meaningful codes for each plan file, and you may be using that column instead of the identity column as the primary identifier for plan files. NOTE: This option is not available for the Attachments column. The values in the Attachments column contain hyperlinks to the File Attachments dialog. |
|
Custom Formatting |
If the column values are numeric—meaning column data types of Integer (all types) or Numeric—then you can optionally define a custom display format for the values. To define a display format, enter a valid Excel formatting string. These strings can be obtained as follows:
For example, this is the formatting string for a Currency format that shows the negative numbers in parentheses: Colors (such as red font for negative numbers) are not supported. Additionally, text replacement strings are only supported for zero values. Other advanced or unusual formats may not display as expected, so be sure to verify the column display. If you do not define a custom display format, then the default formatting for the column's specified numeric type will be used. |
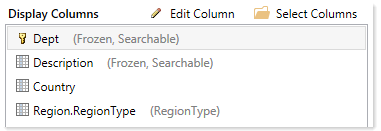
If you edit the attributes for a column, some of these changes display in parentheses after the column name in the Display Columns box. This is so that you can see certain attributes at a glance without having to open the Edit Columns dialog for each column. For example, in the following screenshot you can easily see which columns are searchable.
Defining the sort column for the directory
You can optionally configure the column used to initially sort the directory. The user can change the sort by clicking on the column header of any column displayed in the directory.
The current sort column is displayed in the Initial Sort Column box on the Plan File Directory tab. By default, the directory is sorted by the key column of the plan code tableThe table that contains the list of plan codes for a file group. Generally, each code in the table will have a plan file for developing plan data., in ascending order. You can select any column in the plan code table, or in a reference table that the plan code table looks up to.
To configure the sort column, click Select. Then in the Column Chooser dialog, select the column that you want to use to sort the directory.
Defining refresh variables for the directory
You can optionally set up refresh variables for the directory, so that users can filter the plan files shown in the directory based on these predefined variables.
To enable filtering for the directory, do the following:
- Create a file group utility file with a RefreshVariables data source, and define the variables to be used with the directory.
- Then, designate this file as the Refresh Variable Workbook for the file group.
When the Plan File Directory page is accessed, Axiom Software reads the variables from the designated file, and presents them in the Filters panel (just like when using refresh variables with Axiom forms). The user's selected values for the variables are applied as filters to the directory.
Refresh variables work as follows in this context:
-
The only supported refresh variable type is ComboBox, using either a table column in the plan code table, or a ComboBox data source. All other variable types will be ignored.
-
If you are using a column in the plan code table, Axiom Software takes the selected value for the refresh variable and applies it to the web page as a filter. For example, if the plan code table has a column such as RequestType, and the user selects Type1, then Axiom Software applies a filter of
RequestType='Type1'. The web page is then filtered to only show the results for plan files that have a request type of Type1. -
If you are using a ComboBox data source, the
[Value]column for the data source must contain valid filter criteria statements based on the plan code table. The selected filter is applied to the web page "as is". The[Label]column of the data source can contain "user friendly" text instead of the full filter statement. - All other refresh variable settings can be used in this context, such as dependent variables or group names. Keep in mind that if you configure a variable as required, then once a user selects a value for that variable and applies it, they will not be able to clear the variable and return to the unfiltered state of the report without reloading the page.
The variables file can use Axiom queries, data lookups, and Axiom functions to define the variable properties or to populate the ComboBox data source. When the file is accessed by the web page, any "refresh on open" queries are executed and formulas are calculated before the variables are read from the file and presented in the Filters panel. When a user applies the variable values, the file is refreshed and calculated again before the final selected values are applied as filters to the web page. The file should not contain any queries or other features that are not necessary to the configuration of the refresh variables.
For example, the following variables could be defined in the utility file:

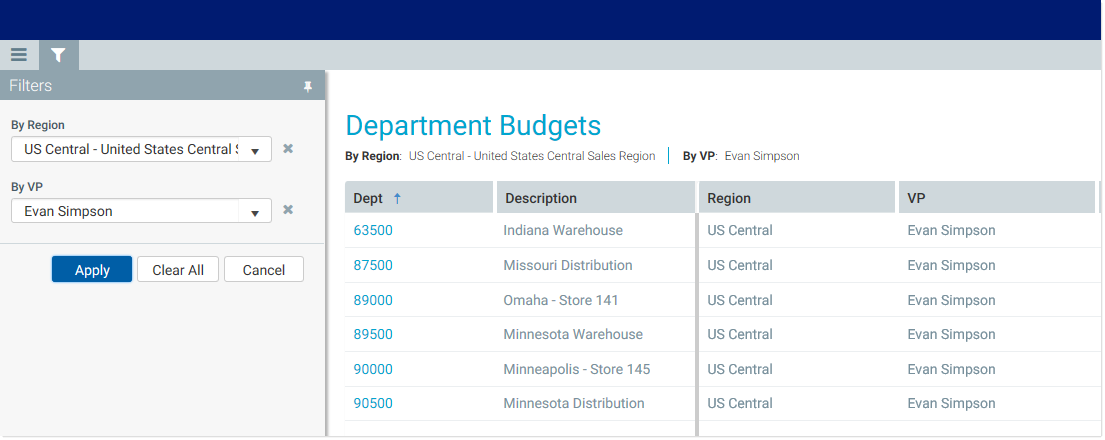
When a user views the Plan File Directory page, they can use the Filters panel to filter the list by the variables:
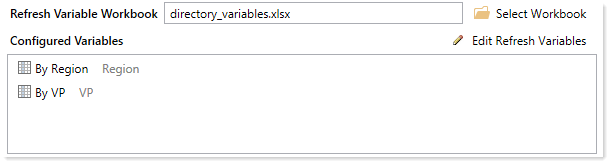
To designate a file as the Refresh Variable Workbook, click Select Workbook on the Plan File Directory tab. You can select any utility file for the file group. Once a file has been selected, the variables defined in that file display in the Configured Variables box for your reference. If you want to edit the refresh variables, clicking Edit Refresh Variables opens the file.
Defining text for the "add new file" button
If the file group is an on-demand file group, the Plan File Directory page contains a button for users to create new plan files. This button is only present if an Add File Form has been specified on the Options tab of the file group properties. When the user clicks the button, the designated form opens so that the user can create a new plan file.
You can customize the text that displays next to this button, by using the Add File Message field on the Options tab of the file group properties. This text is used in the Open Plan Files dialog for the Desktop Client, and in the directory pages for the Web Client.
