AX1035
You can set up an Axiom form to allow users to create new plan files for an on-demand file group. You might do this so that users can create new plan files using the Web Client environment, or you may want to use the Axiom form as an alternative "dialog" for plan file creation within the Desktop ClientGeneral term for using either the Excel Client or the Windows Client, both of which are installed to the user's desktop..
Requirements and limitations
The Add Plan File command for use in Axiom forms supports creating new on-demand plan files based on a template (either the default template for the file group, or an entry in the designated template column). It is also possible to use the Add Plan File command to clone an existing plan file, but only when the form is used as a Clone File Form within the Excel Client or Windows Client (see Using an Axiom form as an "add file" dialog in the Desktop Client below).
Setting up new plan file creation in an Axiom form
To allow users to create new plan files from an Axiom form, you use a Button component that is configured to run the Add Plan File command.
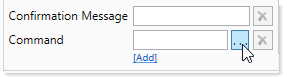
To start off, add a Button component to the Axiom form canvas and then configure the button properties as desired. You will probably want the display text to be something like "Create New Capital Request" or "Create New Strategic Plan" (or whatever plan type the file group is for). You can then configure the Command for the component as follows:
-
In the component properties, click the [...] button to the right of the Command box.
-
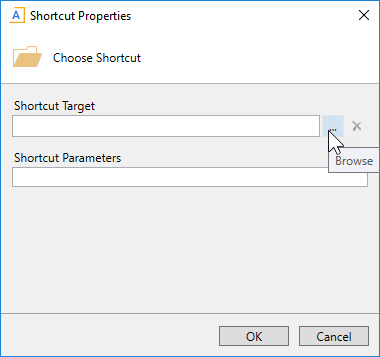
In the Shortcut Properties dialog, click the [...] button to the right of the Shortcut Target box.
-
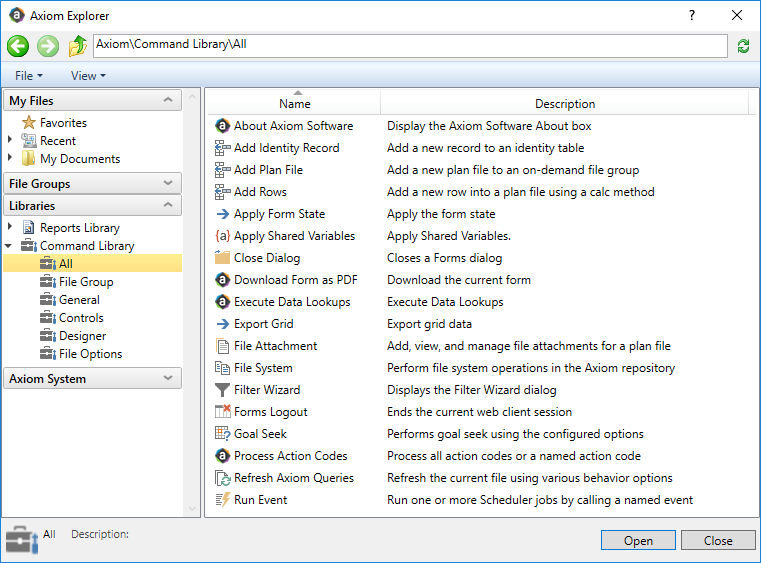
In the Axiom Explorer dialog, select Command Library > All, then select the Add Plan File command. Click Open.
In the Shortcut Properties dialog, the Add Plan File command is now listed as the shortcut target, and the relevant shortcut parameters are now available.
-
In the Shortcut Parameters, complete the following settings:
Item Description File Group
Select the on-demand file group for which you want users to be able to create new plan files. A file group alias can also be used.
NOTE: If the source file for the Axiom form is a file group utility, then it is strongly recommended to use the Use Current File Group option instead of selecting a specific file group. The button will dynamically use the file group that the utility file belongs to. This is especially useful when cloning the file group, so that the cloned utility file automatically points to the new file group.
Open plan file after creation
This option is selected by default, which means that when a new plan file is created, it will automatically be opened.
You might clear this check box if end users do not need to work with the new plan files they have created. For example, end users might use the Axiom form to simply submit an initial request (the new plan file), which is then reviewed by a different user before any further work is done.
Use new browser window for new plan file
Select this option if you want the new plan file to open in a new browser window (or tab, depending on the browser settings) instead of opening in the current window.
This option only applies when the new plan file is form-enabled, and when the command is being used from within a browser (as opposed to a form dialog within the Desktop Client).
Processing step
Optional. Specify the desired Processing Step for the command. By default, this is set to Form - After Processing, which means that the command will be performed after the entire form update process is complete.
If desired, you can specify a different processing step for the command. For more information, see Timing of command execution and Axiom form update process.
NOTE: If the command is configured to execute at an earlier processing step, the actions of adding the new record and creating the plan file will occur at the specified processing step. However, if the command is configured to open the new plan file after creation, that action will continue to occur at the After Processing step.
Optional target cell for new record ID
Optional. Specify a target cell in the source file to place the ID of the new record after it has been created. For example:
Info!A1. If a target cell is specified, then the source file will be calculated after the value is placed in the cell.You might use this if you want to first create the new record / plan file, then reference that new record number in a save-to-database process to a different table.
-
If you need to populate columns in the plan code table when the new record for the plan file is created, you can do this using the Default values section.
-
Enter the column name in the left-hand box. This represents the column in the plan code table that you want to populate when creating a new record. Do not use the fully-qualified column name—for example, enter
Dept, notCapitalID.Dept. -
Enter the value for the column in the right-hand box. You can enter a "hard-coded" value, or you can enter a cell reference in brackets to read the value from that cell. See the following section Collecting starting values from an Axiom form for more information on how to use the cell references with form components.
-
If you need more rows to define additional default values, click the plus icon
 .
.
These values will be saved to the plan code table when the new record is created. At minimum, you must include all alternate key columns (if any) and the designated Template column (if applicable to the file group). You can include any other columns (including validated columns) as desired. If you do not include a validated column, then that column must have a valid default value defined in its column properties, and that value will be used when the record is created.
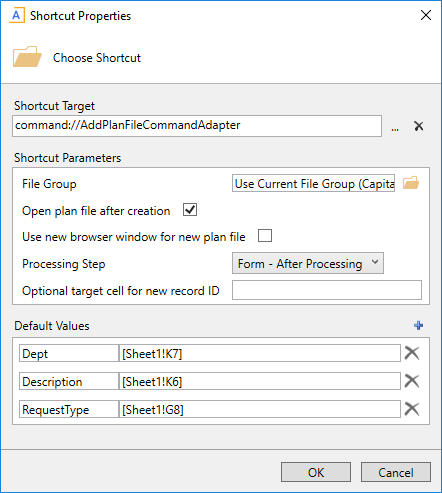
Example Shortcut Properties dialog
-
-
Once you have finished configuring the Shortcut Properties, click OK to close the dialog and return to the component properties.
When the Axiom forms user clicks the Button component, Axiom Software first creates the new record in the plan code table, and then creates the new plan file. After the plan file is created, the behavior depends on the Open plan file after creation setting:
-
If Open plan file after creation is disabled, then a message displays to the user to inform them that the plan file was created.
-
If Open plan file after creation is enabled, then the new plan file is opened. Note the following:
-
If the new plan file is not form-enabled, then it will be opened as a spreadsheet in the Desktop Client. If the current form is open in the Web Client, and the Desktop Client is not installed on the current machine (or if the form is open on a device that does not support the Desktop Client), then the new plan file cannot be opened. If this situation is likely to occur in your environment, it is best to disable Open plan file after creation.
-
If the new plan file is form-enabled, then it will open according to the option Use new browser window for new plan file. If this option is disabled and the current form is open in the Web Client, the new plan file will open in the current window (replacing the current form contents). If this option is disabled and the current form is open as a dialog in the Windows Client, then the new plan file will open as a web tab in the Windows Client instead of in the browser.
-
Collecting starting values from an Axiom form
You can set up the Axiom form to collect starting values from the user, and then use those values when creating the new record in the plan code table for the new plan file. For more information on why you might want to do this, see Collecting values for the plan code table when creating an on-demand plan file.
To do this, you must set up the Axiom form as follows:
-
Place one or more interactive components in the Axiom form to collect the input from the user. For example, you might use a Text Box or Combo Box component, or you might use content tags within a Formatted Grid component.
-
When configuring the Default Values section for the Add Plan File command, you should designate a cell reference in brackets as the value. Axiom Software will read the value from the designated cell.
If the component that you are using to collect the user input is a Formatted Grid component, then the cell reference in the Default Values section can simply point to the target cell of the content tag. For example, if the grid contains a Select tag where the target cell is A15 on sheet Values, then you enter [Values!A15] in the Default Values.
If you are using a different interactive component, such as a Text Box component, then you should use an indirect cell reference for the interactive property of the component, so that the value is written to and read from a cell in another sheet. For example, for the Text property of the text box, you can enter [Values!A15]. This means that the text box value will be written to and read from that cell, instead of the Text cell on the Form Control Sheet. You would then also enter [Values!A15] in the Default Values. You should use this indirect behavior instead of referencing a cell on the Form Control Sheet directly, because any time a new component is added to or deleted from the form, that cell reference may change.
See the screenshot in the previous section for an example of the Default Values section with bracketed cell references.
Using an Axiom form as an "add file" dialog in the Desktop Client
If users are creating new plan files from within the Excel Client or the Windows Client, you can opt to use an Axiom form as the "input dialog" for collecting starting values for the plan code table (an Add File Form), instead of using the default dialog. For more information, see Configuring a file group as an on-demand file group.
If your form will be used as an Add File Form in the Desktop Client, the following additional design considerations apply:
-
Set the Canvas Size of the form (width x height) to a dialog-appropriate size. A good starting point is 700 x 400. The maximum height is 800 for a form dialog; if the form is larger than that then a scroll bar will be present.
-
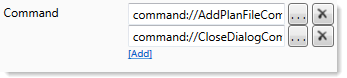
If you want the dialog to automatically close after the new plan file is created and opened, then you should add a Close Dialog command to the same Button component that is configured with the Add Plan File command. For more information, see Using multiple commands on a button and Configuring close options for a form dialog.
If the Close Dialog command is not present on the button, then the user must manually dismiss the dialog after creating the plan file.
-
It is recommended to include a separate "Cancel" button that is configured with the Close Dialog command. This allows the user to close the dialog without creating a new plan file. The user can also click the X button at the top right-hand corner of the dialog to cancel, but providing a separate Cancel button provides a more typical user experience.
-
It is recommended to use a file group utility as the source file for the form, instead of a report file. File group utilities are part of the file group, which means that the file can be copied when cloning the file group, and the target file group for the Add Plan File command can be dynamically updated (using the Use Current File Group option).
-
If desired, you can define a form title (in the Form Properties) and this title will display as the dialog title. If no form title is defined, the title of the dialog will be Add New Record.
-
If the form is being used as a Clone File Form, you can return the ID of the plan file being cloned and then use that ID in formulas for the purposes of setting default values for the new plan file. To return the plan file ID, use the reserved key of
SourceIDin a GetFormState function. For example:=GetFormState("SourceID")
This would return 43 if the automatically generated ID value for the plan file being cloned is 43.
The SourceID value is passed to the Clone File Form when a user clicks Clone Selected Item in the Open Plan Files dialog.
