Manage CFWC data and processes
Use this page to manage CFWC (Cash Flow / Working Capital) data and processes.
On the Treasury Cash Management page, click Administration > Cash Flow / Working Capital to access the following features:
- Import files
- Manage settings
- Configure Description Miner
- Run Description Miner
- Enable Budget Integration
- Set up Exclusion Rules
- Filter records
-
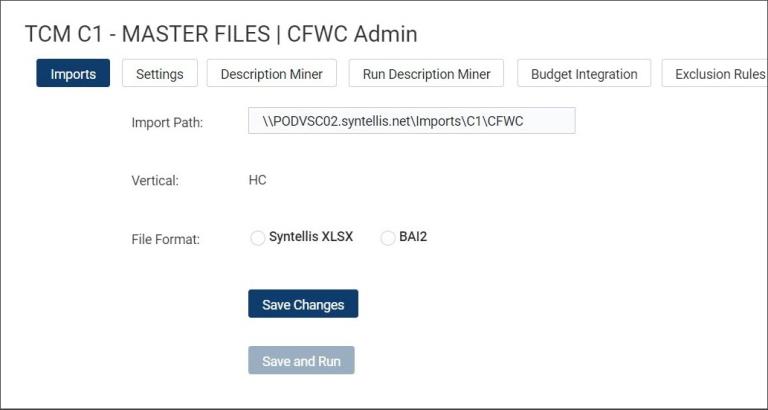
On the Treasury Cash Management page, click Administration > Cash Flow / Working Capital.
-
Click Imports.
-
Enter a path for the CFWC (Cash Flow/Working Capital) file in the Import Path field.
-
Select a format for the import file (Syntellis XLSX or BAI2).
-
Click one of the save options:
-
To save this configuration to use with an automated import or save it to run later, click Save Changes.
-
To save this configuration and run the import immediately, click Save and Run.
-
NOTE: You can set up this import to run automatically in the Axiom scheduler. See either the "Automated CFWC BAI2 Data Integration" or "Automated CFWC XLSX Data Integration" job (depending on which file format you selected) in the Scheduler to set up an automated import schedule.
-
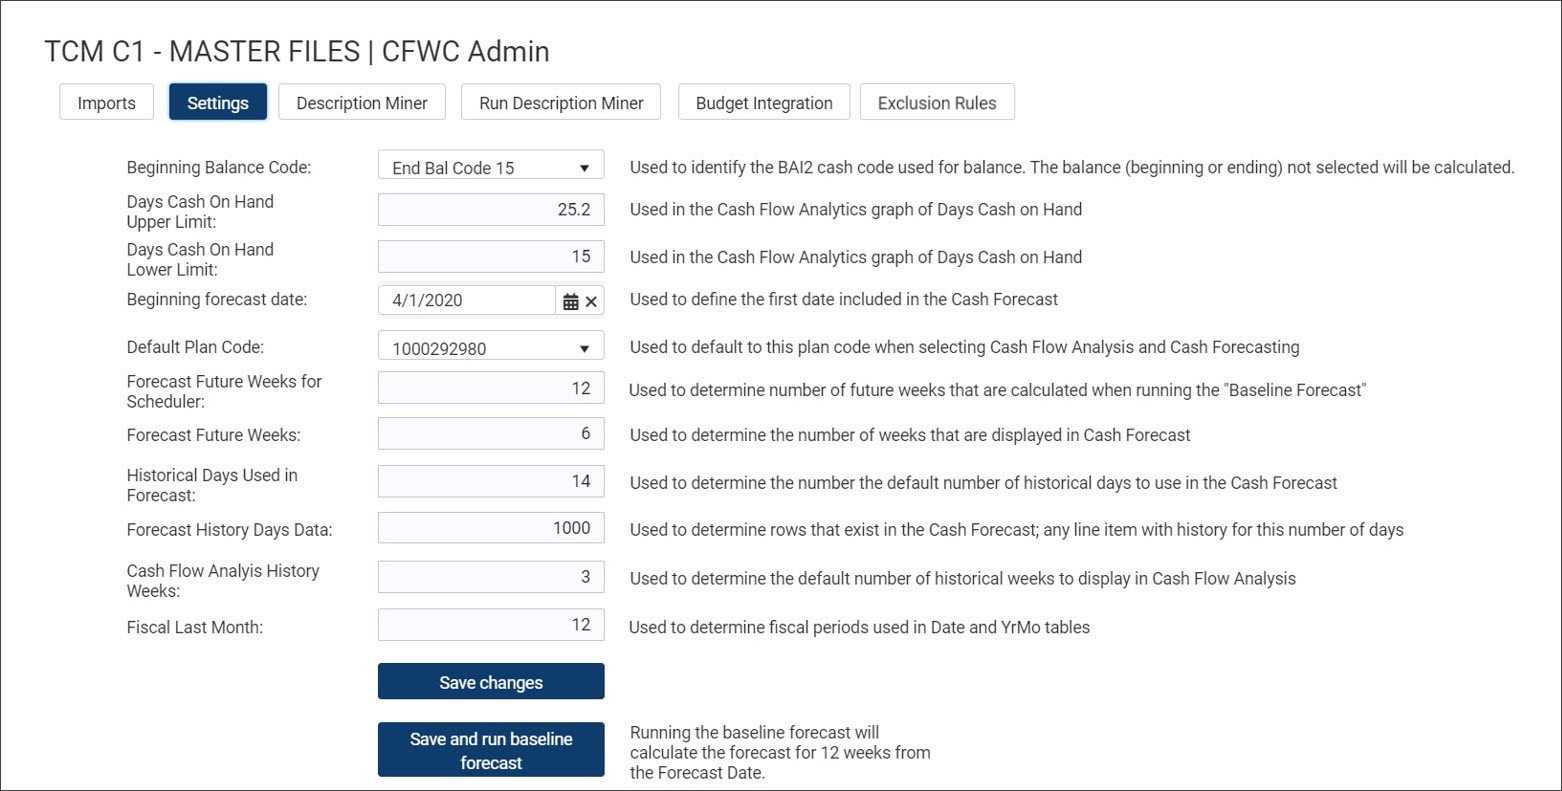
On the Treasury Cash Management page, click Administration > Cash Flow / Working Capital.
-
Click Settings.
-
Select the applicable code from the Beginning Balance Code drop-down menu.
-
Enter the applicable number in the Days Cash on Hand Upper Limit field, to be used on the Cash Flow Analytics page.
-
Enter the applicable number in the Days Cash on Hand Lower Limit field, to be used on the Cash Flow Analytics page.
-
Enter or select a Beginning forecast date to be used on the Cash Forecast page.
-
Select the Default Plan Code to be used by default on the Cash Forecast and Cash Flow Analytics pages.
-
Enter the number of future weeks to calculate in the Axiom scheduler.
-
Enter the number of future weeks to calculate on the Cash Forecast page.
-
Enter the number of historical days to calculate on the Cash Forecast page.
-
Enter the number of Forecast History Days Data to calculate the number of rows displayed on the Cash Forecast page.
-
Enter the number of historical weeks to calculate the number of rows displayed on the Cash Flow Analytics page.
-
Enter the two-digit month to determine the Fiscal Last Month (for example, 12 = December).
-
To save your information, click Save changes.
-
To calculate the forecast for six weeks from the specified forecast date, click Save and run baseline forecast.
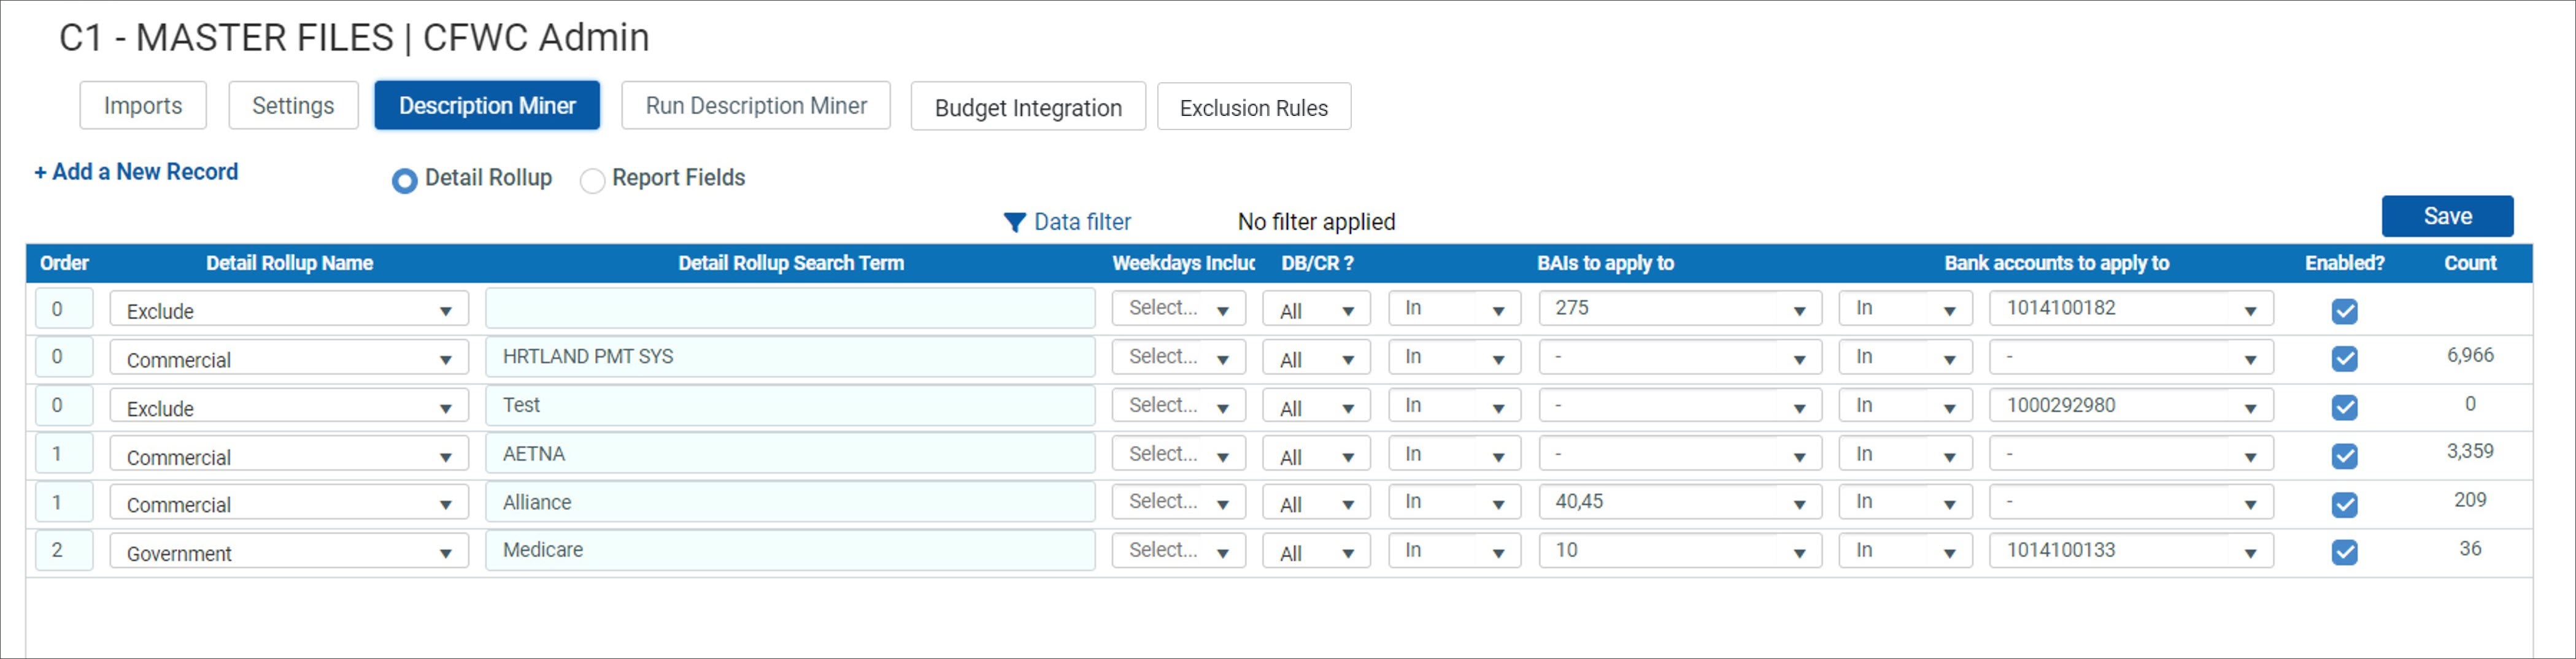
For each imported transaction, you can search the Description field to identify similar transactions and group them into a Detail Rollup field. Grouping similar transactions enhances forecasting and reporting capabilities.
To define Detail Rollups from imported transactions:
-
On the Treasury Cash Management page, click Administration > Cash Flow/Working Capital.
-
Click Description Miner.
-
Select the Detail Rollup option.
-
Click Add a New Record to set up a new method to extract data from a transaction. A new blank, additional record is added to the bottom of the table.
-
Enter the Order number to indicate the order in which the rules are applied.
-
Click the applicable field in the Detail Rollup Name drop-down menu.
-
Enter search text for the Detail Rollup Search Term field. Any transaction that contains the search text in the Description field is assigned to the respective detail rollup.
-
To filter specific days of the week, select the applicable weekday (or All) in the Weekdays Included field. All weekdays are included by default.
-
To filter only debits or credits, select the applicable transaction type in the DB/CR? drop-down menu. All transaction types are included by default.
-
To filter certain Bank Administration Institute (BAI) codes, select the applicable code in the BAIs to apply to drop-down menu.
-
To filter certain bank accounts, select the applicable account in the Bank accounts to apply drop-down menu.
-
Select the Enabled checkbox to verify the rule is applied. Clear the Enabled checkbox to save the rule but disable it.
NOTE: The number in the Count column indicates the number of instances the rule identified.
-
Click Save to save any changes and added records.
-
Click OK to confirm the saved data.
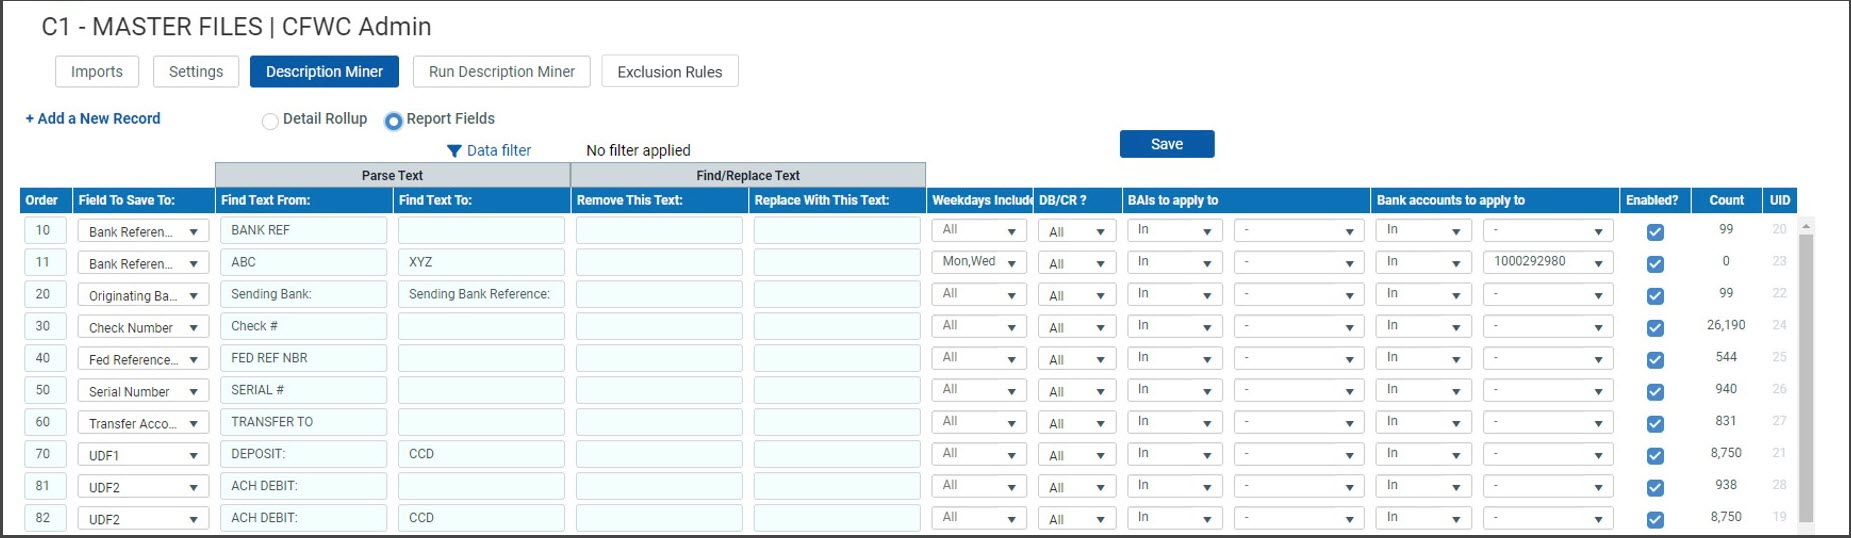
Use the Description Miner feature to define reportable fields with defined rules (based on search terms) and extract any text from the transaction data found in the BAI2 information (Description field) in the Cash Flow/Working Capital (CFWC) table.
TO create or edit an existing record:
-
On the Treasury Cash Management page, click Administration > Cash Flow/Working Capital.
-
Click Description Miner.
-
Select the Report Fields option.
-
Click Add a New Record to create a new record and define the rules for that new record.
-
Click the applicable field in the Field to Save to: drop-down menu by selecting a standard or a user-defined field (UDF) name.
-
In the Parse Text columns, enter the text to capture/extract from (the starting position) in the Find Text From field, and then enter the text to capture/extract to (the ending position) in the Find Text To field. All content in between these columns is extracted and saved to the report field defined in the rule.
Example:
To capture the bank name from each transaction, enter Sending Bank and Sending Bank Reference. (The from and to search terms vary by bank. Review your transaction data to verify that you entered the correct search terms.)
-
In the Find/Replace Text columns, enter the text you want to remove in the Remove This Text field, and then enter the preferred text in the Replace With This Text field (or leave it blank to remove extra characters).
Example:
To remove a “space hyphen space,” enter [ - ] in the Remove This Text field, and then leave the Replace With This Text field blank. This action removes the separating hyphen and surrounding spaces from the extracted data.
-
To filter certain days of the week, select the applicable weekday (or All) in the Weekdays Included field.
-
To filter only debits or credits, select the applicable transaction type in the DB/CR? drop-down menu.
-
To filter certain Bank Administration Institute (BAI) codes, select the applicable code in the BAIs to apply to drop-down menu.
-
To filter certain bank accounts, select the applicable account in the Bank accounts to apply drop-down menu.
-
Select the Enabled checkbox to verify the rule is applied. Clear the Enabled checkbox to save the rule but disable it.
NOTE: The number in the Count column indicates the number of transactions the rule identified as meeting the defined rules for that specific record.
NOTE: The number in the UID column provides a Unique ID number that is used in the database.
-
Click Save to save any changes and/or added records.
-
Click OK to confirm the saved data.
Apply the rules to your existing data using Description Miner:
- On the Treasury Cash Management page, click Administration > Cash Flow / Working Capital.
-
Click Run Description Miner.

-
Select the date range in the Start date and End date fields.
-
Click Run Description Miner.
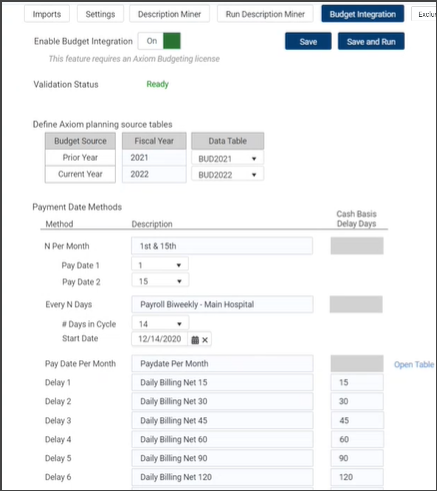
The Enable Budget Integration option is a toggle switch field. When the OFF status is selected, the fields on the Budget Integration are not available for editing.
-
On the Treasury Cash Management page, click Administration > Cash Flow/Working Capital.
-
Click Budget Integration.
-
Click Enable Budget Integration.
NOTE: The Budget Integration feature requires an Axiom Budgeting License.
-
Verify that the Validation Status indicates Ready. If the status is Error, a message identifies the dimension tables that do not contain valid budget integration mappings. The message also indicates the number of records that do not contain valid budget integration mappings.
-
Select the applicable years in the Data Table drop-down menus in the Define Axiom planning source tables section.
-
Under Payment Data Methods, enter a description for the N Per Month, such as "1st & 15th" to indicate which days of each month a payment is received for that budget data.
-
Select the first Pay Date 1 in the drop-down menu to indicate the date of the first payment.
-
Select the first Pay Date 2 in the drop-down menu to indicate the date of the second payment.
-
Enter a description for Every N Days, such as "Payroll Biweekly - Main Hospital" to indicate the frequency of payments for a certain account.
-
Select the # Days in Cycle from the drop-down menu.
-
Select the Start Date to begin tracking that payment.
-
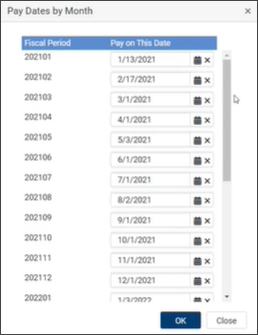
Enter a description for Pay Date Per Month.
-
Click Open Table to open the Pay Dates by Month window and indicate the payment dates.
-
Select the date in the Pay on This Date field for each fiscal period.
-
Click OK to save changes.
-
-
Enter a description for Delay 1 and so on.
-
Enter the number of Cash Basis Delay Days to correspond with the Delay description to indicate when payment is expected to be posted to the bank account.
-
Click one of the save options:
-
To use this configuration with an automated import or save it to run later, click Save Changes.
-
To save this configuration and run the import immediately, click Save and Run.
-
Set up Exclusion Rules
You can refine your search to exclude certain transactions from the Working Capital Dashboard, Cash Flow Report, and Cash Forecast by creating a rule that excludes a transaction when predetermined criteria are met. Treasury Cash Management provides two ways to exclude transactions:
-
Set up exclusion rules, as instructed in this section.
-
Indicate exclusions in the Detail Drill window within the Cash Flow Report.
-
On the Treasury Cash Management page, click Administration > Cash Flow/Working Capital.
-
Click Exclusion Rules.
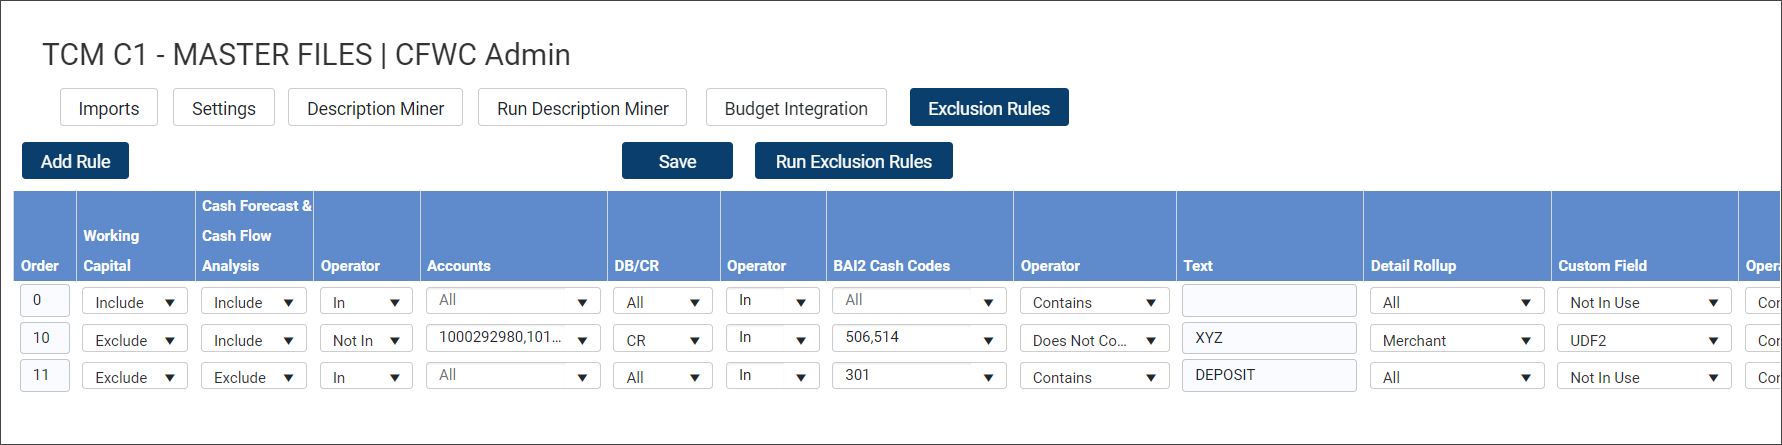
NOTE: The number in the Transaction Count column indicates the number of transactions that conform to the rule's criteria. Click the numbered link to view details of the transactions.
NOTE: The number in the Order column indicates the order each rule is prioritized.
-
To set up a new rule and its criteria, click Add New Rule.
-
Select Include, Exclude, or Ignore in the Working Capital drop-down list. (Include is selected by default.) Transactions that meet all criteria for the rule follow the setting to be included in or excluded from the Working Capital report.
-
Select Include, Exclude, or Ignore in the Cash Forecast & Cash Flow Analysis drop-down list. (Include is selected by default.) Transactions that meet all criteria for the rule follow the setting to be included in or excluded from the Cash Forecast & Cash Flow Analysis reports.
- Select In and the account number from the Bank Accounts drop-down list. Select Not In to exclude a specific bank account.
- Select In and the code from the BAI Cash Codes drop-down list. Select Not In to exclude a specific BAI cash code.
- Select Debit, Credit, or All in the DB/CR field to include either or all transaction types in your rule's criteria.
-
Select Contains or Does not contain, and then enter the exact description in the Description from the BAI2 file fields for your rule's criteria.
-
Select the Detail Rollup to include or exclude in your rule's criteria.
NOTE: Criteria for all of these fields must be met to follow the created rule. (The "and" is implied; for example, the account, BAI cash code, and Detail Rollup all must match the indicated field to included/excluded as indicated in the rule.)
- To include Reportable Fields:
- Select the applicable field (designated in Administration > Cash Flow/Working Capital > Description Miner) from the Select Field drop-down list.
- Select the applicable condition (Include or Exclude) in the drop-down menu under Field Values.
- Enter the search text under Field Values.
- To indicate a date range for your rule:
- Select the Enable Dates checkbox.
- Enter a Start Date and End Date for your Transaction Data Range.
- To include transactions within a designated amount, select the condition (greater than, equal to, not equal to, less than) for the Flow Amount and the dollar amount.
- Select which days from which to draw transactions in the Weekdays Included drop-down list.
- Select the Override Manual Changes checkbox to prioritize the rule over the settings in Detail Drill window within the Cash Flow Report.
- Select the Enabled checkbox to enable that row's rule.
-
Click one of the save options:
-
To save the exclusion rules, click Save.
-
To save and run the exclusion rules immediately, click Run Exclusion Rules.
-
-
On the Treasury Cash Management page, click Administration > Cash Flow/Working Capital.
-
Click Description Miner.
-
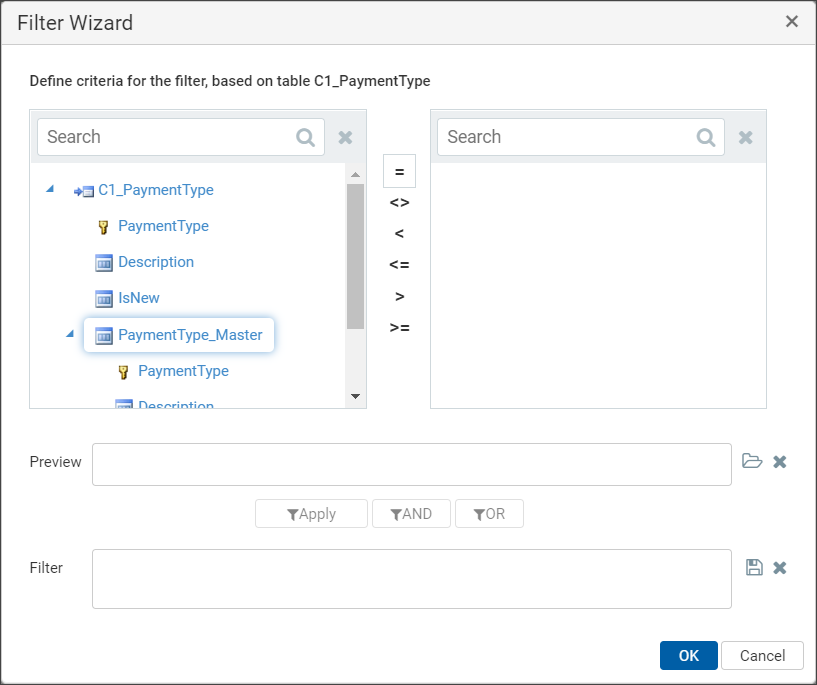
At the top of the page, click Data filter, which opens the Filter Wizard.
-
On the Filter Wizard, enter and select criteria.
-
Click OK to apply the filter or Cancel to close the Filter Wizard.
