Installing the Axiom Application Server
Use the Axiom Software Manager to install the Axiom Application Server. The following requirements apply to the Axiom Application Server installation:
- You must have administrator rights on the server to run the installation.
- A signed Axiom certificate must be present on the server to run the installation.
- During the installation, you will be prompted for a valid Axiom license file, as well as the connection information for the Axiom database. The installation cannot be completed without this information.
- The server must have Internet access in order to successfully complete the installation. This access is necessary to validate the Kaufman Hall signed publisher certificate to be used for ClickOnce installations of the client. If it is not possible to enable Internet access to the server, additional workarounds are available, as detailed in this Microsoft Support article.
NOTE: Once you enter the installation screens, there is no Cancel button. To cancel an installation, move to a different location within the Axiom Financial Institutions Suite Software Manager, or close the Software Manager.
To install the Axiom Application Server:
-
Navigate to the location on the server where you have saved the Axiom Software Manager, and then double-click
AxiomSoftwareManager.exe. For more information, see Axiom Financial Institutions Suite Software Manager. -
From the Home screen of the Software Manager, click Manage Software.
TIP: You can also click Installation Manager > Manage Software Packages on the menu bar.
-
On the Installation Manager screen, under Install new software package, click Application Server.

IMPORTANT: If you do not see this option, then the server does not have a signed Axiom certificate. See Installing the Axiom certificate.
The Axiom Application Server Installer begins. The installation is performed within the Software Manager—a separate installer program is not launched. While using the installer, do not use the menu to move to other locations in the Software Manager, unless you want to cancel the installation.
-
On the License Agreement screen, click I accept and then click Next.
-
On the IIS Configuration screen, complete the following settings and then click Next:

-
On the Installation Folder screen, specify the location where the Axiom files will be installed, and then click Next.
By default, the installation location is
C:\Inetpub\wwwroot\Axiom(where Axiom is the default virtual directory name). This location should not be changed (except to account for differences in the virtual directory name). -
On the System Database Connection screen, configure the connection from the application server to the Axiom database, and then click Next.
To configure the connection string, complete the following settings:
Item Description Server Name The server name of the SQL database server that hosts the Axiom database. Failover Partner
Optional. The server name of the database server to be used in failover situations. This only applies to Axiom Cloud systems; otherwise it should be left blank. Database Name The name of the database for Axiom.
Login The login name for the Axiom database.
Password The password for the Axiom database.
NOTE: The last-entered password will be remembered when using the one-click upgrade, but the password must be typed in when performing new installations or repairs of existing installations.
This is the same database information that was used when creating or restoring the Axiom database (Creating or restoring the database).
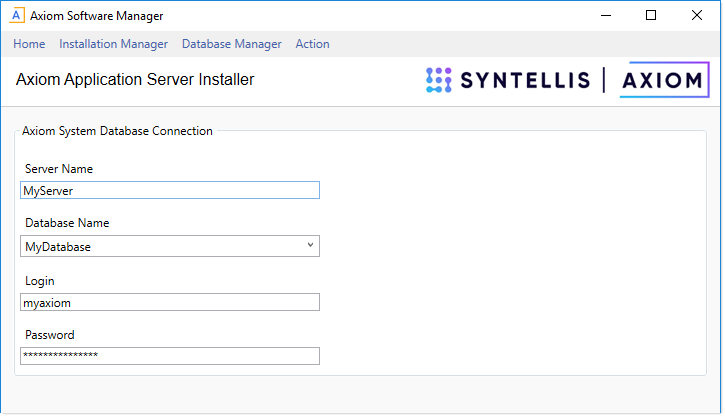
This information must be provided in order to continue with the install. The connection information can be changed later by using the Configure Connections page of the Software Manager.
-
On the License File screen, upload your Axiom license file, and then click Next.
Click Choose license file to import, then navigate to the location where you have saved the license file provided by Axiom. Once you have uploaded the file, the license details display on this screen, as shown in the following screenshot.
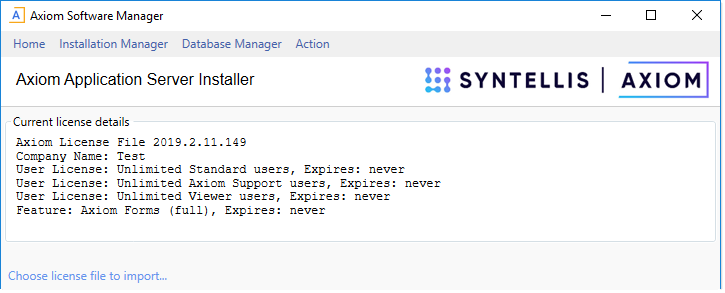
A valid license file must be provided in order to continue with the install. The license file can be updated later by using the License Manager page of the Software Manager. You can also update your license using the administration features of the Axiom Web Client.
-
On the Application Server URI screen, specify the URI to the application server, and then click Next.
By default, the Application Server URI is
http://<servername>/Axiom. If you changed the web site or the virtual directory name in the prior screen, then you must update this URI to match.In most cases you will leave the Axiom IPC Message Hub URI blank, so that it uses the default URI (the application server URI).
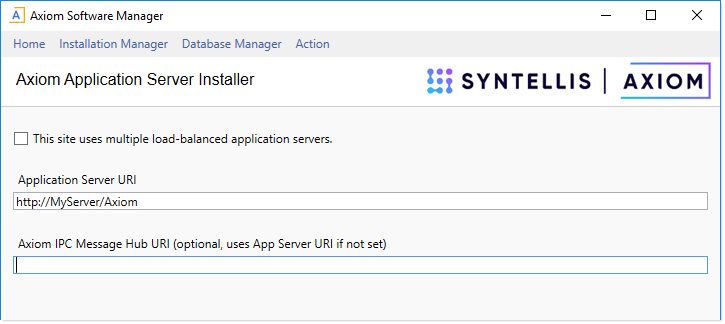
Example Application Server URI screen
NOTE: The option This site uses multiple load-balanced application servers is provided for legacy configurations. You should not enable this option unless instructed to by Axiom Support.
Configuring SSL
If you selected Require SSL on the previous installation screen, then the URI is in HTTPS format by default. If you want to use SSL for the Axiom virtual directory but not require SSL for the web site, then you can manually change the URI to use HTTPS. This will configure the virtual directory to support SSL in a mixed-mode environment.
-
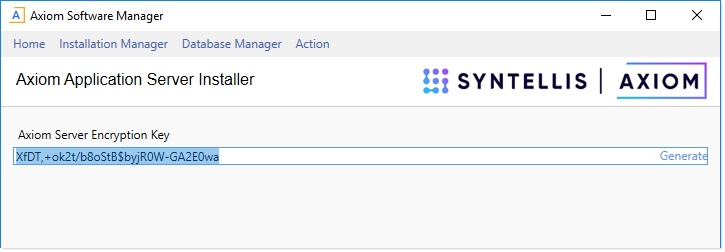
On the Axiom Server Encryption Key screen, enter an encryption key and then click Next.
The encryption key is for security purposes. It is used by the Axiom Application Server to authenticate requests from the Axiom Scheduler Service. There are two options to specify the key:
-
Click Generate to randomly generate an encryption key. If you generate a key, be sure to copy and paste the key to a temporary location so that you can use it when you subsequently install the Axiom Scheduler Service. Once you have used the key in your application server installation and your Scheduler service installation, it will be remembered by the installer so you have no further need to save the key.
NOTE: If you move your cursor out of the encryption key field, the key will become masked (meaning it displays as asterisks). You can place your cursor back in the field to read the key.
-
Alternatively, you can type in your own key. Axiom does not enforce any rules on the key string. If you choose to use your own key, it is your responsibility to ensure that the key is of an adequate strength for your organization's security requirements.
-
-
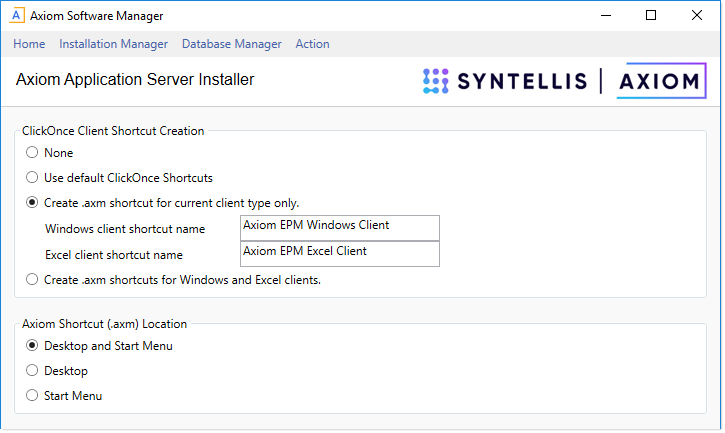
On the ClickOnce Client Shortcut screen, complete the following settings and then click Next.
These settings determine whether and where shortcuts will be created on client workstations when using the ClickOnce installer to install the Axiom Financial Institutions Suite Windows Client and Axiom Financial Institutions Suite Excel Client.
Item Description ClickOnce Client Shortcut Creation Select one of the following:
- None: No shortcuts will be created on client workstations.
-
Use default ClickOnce Shortcuts: One shortcut will be created on the client workstation, which launches the last-launched client version (Excel Client or Windows Client). If a user wants to launch the other client version, they must use the Web Client to switch back and forth.
-
Create .axm shortcut for current client type only (Default): An AXM shortcut will be created when you install/launch a particular client type (Excel Client or Windows Client). Users who only use one client type will only see the shortcut for that type. The other shortcut will only be created if you launch the other client type. If desired, you can change the default name for each shortcut.
- Create .axm shortcuts for Windows and Excel clients: AXM shortcuts will be created for both client types when a user installs the Axiom client. If desired, you can change the default name for each shortcut.
Axiom Shortcut Location If the prior option is set to anything other than None, then select one of the following options to specify where the client shortcuts will be created:
- Desktop and Start Menu (Default)
- Desktop
- Start Menu
In very controlled IT environments, users may not have permission to create desktop shortcuts, therefore causing the installation to fail. In these environments you can select Start Menu so that users are able to complete the installation and still have access to a shortcut.
NOTE: AXM shortcuts are special Axiom files that can be used to launch specific client versions using the ClickOnce protocol. From a user's perspective the shortcut is the same, except that AXM shortcuts are not automatically removed if the client program is uninstalled. ClickOnce shortcuts are automatically removed when the client is uninstalled.
-
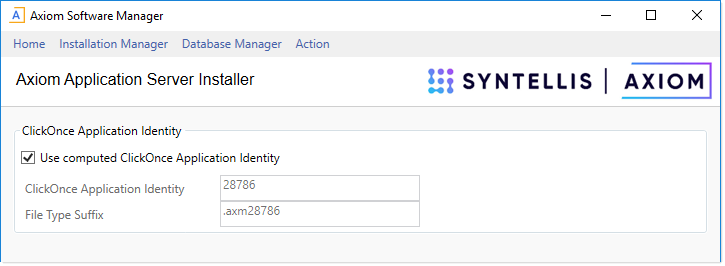
On the ClickOnce Application Identity screen, specify the identity code for this particular Axiom installation, and then click Next.
The ClickOnce Application Identity is used to uniquely identify this particular Axiom installation for purposes of future client updates and for launching this installation via AXM shortcut. You can leave the default settings to use the automatically-computed number for the identity (recommended), or you can clear the check box and enter a number. (If you manually enter a number, you should put the same number on the file type suffix.) You can also choose to disable use of the identity, but this is not recommended.
-
On the Default Proxy Configuration screen, specify whether to allow use of the default proxy when accessing the Axiom Application Server, and then click Next.
If Disable use of the default proxy for application server access is selected (the default behavior), then users cannot use the default proxy to access the application server. In most environments this will improve performance.
However, in some environments disabling proxy access may prevent clients from being able to access the application server. For these environments, the check box should be cleared to allow use of the default proxy.
-
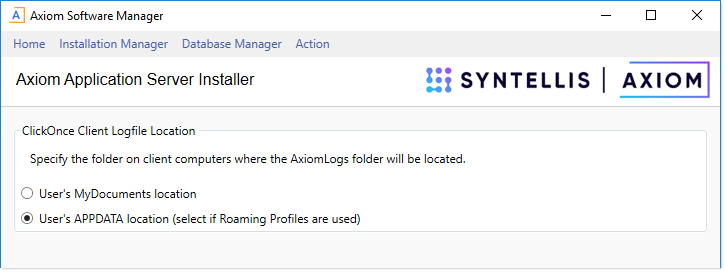
On the ClickOnce Client Logfile Location screen, specify the location where the AxiomLogs folder will be created on client machines, and then click Next.
By default, the folder is created in the user's APPDATA folder. If desired, you can change the location to the user's My Documents folder.
-
On the Enable Windows Authentication screen, choose whether to enable Windows Authentication, and then click Next.
If you want to use Windows Authentication, then leave the Enable Windows Authentication option checked and complete the following settings. If you do not want to use Windows Authentication, then clear the check box. For more information, see Authentication methods.
Item Description Allowed domains
The recognized domains for Windows Authentication.
Enter one or more domain names. Separate multiple domain names with commas. Users will be authenticated against the specified domains.
If selected, then the installation will allow use of the Active Directory Import Scheduler task to import and synchronize Active Directory users into Axiom security.
Selecting this option simply enables the ability to use the Scheduler task. You must set up the Scheduler task within a system and schedule it for execution in order to import and synchronize users. If this option is not selected, then the Scheduler task can be configured but it will not execute.
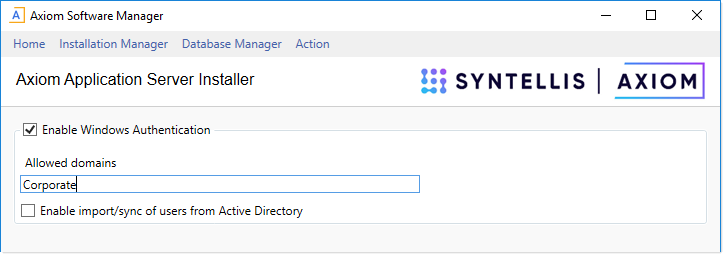
NOTE: You can change these settings for the installation later by using Installation Manager > Configure Authentication Methods.
-
On the Enable LDAP Authentication screen, choose whether to enable LDAP Authentication, and then click Next.
If you want to use LDAP Authentication, select Enable LDAP Authentication and then complete the following settings. For more information, see Authentication methods.
Item Description LDAP server connection string The connection string for the LDAP directory that you want to authenticate users against.
LDAP connection user name The user identity under which the application server will access the LDAP directory, for the purposes of passing user credentials for authentication.
LDAP connection password The password for the designated user name.
Allowed suffixes
Recognized suffixes for use with LDAP authentication, such as:
@mydomain.local.Including the @ sign in the suffix is optional (if it is omitted, it will be automatically included when submitting credentials for authentication). If needed, separate multiple suffixes with commas.
NOTE: You can change these settings for the installation later by using Installation Manager > Configure Authentication Methods.
-
On the SAML Authentication screen, click Next.
SAML Authentication is not supported for use with on-premise installations. It is only present in the installer for legacy installations.
-
On the OpenID Authentication screen, choose whether to enable OpenID Authentication, and then click Next.
If you want to use OpenID Authentication, select Use OpenID for user authentication and then complete the following settings.
Item Description OpenID provider API client ID
The client ID for the OpenID provider.
OpenID provider API client secret
The client secret for the OpenID provider.
For example, if using Google OpenID Connect, the client ID and client secret can be obtained from the Google Developers Console, within the project you are using for authentication.
NOTE: Additional setup is required to fully enable the OpenID Authentication. For more information, see Authentication methods and contact Axiom Support for assistance as needed.
-
On the Ready to install screen, click Install to begin the installation.
A status bar displays the progress of the installation. When the installation is complete, click Done to exit the installer. You are returned to the Installation Manager screen, where you can see the details of the newly installed application server.
