AX1029
You can create scenarios for a file group to perform scenario planning. Each file group can have any number of scenarios.
When you create a file group scenario, you create a copy of the source file group as well as the necessary tables to hold the scenario data. This scenario "copy" remains associated with the source file group, but otherwise provides normal (although limited) file group functionality. You can perform actions such as modifying the scenario drivers, and then processing plan files to save the scenario data to the database. You can then compare the data between the source file group and the scenario in a report.
Before creating a new scenario, you should do the following:
-
Decide on a scenario name and table suffix to identify the scenario in relation to its source file group. By default, the system uses scenario names such as "FileGroupName (V1)" to identify scenarios (where V1 is the scenario name). You can change this name when creating the scenario, but you should choose something that is short and descriptive. For more information, see About scenarios.
-
Make sure all the writeable table variables for the file group are configured as needed to result in the necessary tables for the scenario. A "writeable table variable" means a table variable where Allow file group to save data to this table is enabled. For more information, see Setting up table variables for scenario creation.
NOTE: Only administrators and users with one of the following security permissions can create new scenarios: Administer File Groups (for all file groups) or Modify File Group (for specific file groups). If new data tables will be created as part of the process, the user must also have the Administer Tables permission. The user should also have permissions to all relevant documents such as driver files, to effectively use the created scenario.
To create a scenario for a file group:
-
On the Axiom tab, in the File Groups group, click the arrow next to the file group name to bring up the file group menu, then click Scenarios > New Scenario.

TIP: You can also create scenarios within Axiom Explorer and the Explorer task pane, by right-clicking the Scenarios node under a file group and selecting Create Scenario.
The Create Scenario dialog opens. This wizard will guide you through the process of creating a scenario.
-
On the first screen, complete the following items and then click Next.
Item Description Scenario Name
The name of the scenario. By default, the scenario name uses the format V#, where V1 is the first scenario for the file group, V2 is the second, and so on. You can change the name if desired.
The scenario name is appended to the source file group name and the display name to identify the scenario. It is also used to create table subfolders to hold the scenario tables. The scenario name cannot be changed after the scenario is created.
Table Suffix
The suffix to apply to writeable table variables associated with this file group. By default, the suffix uses the same format as the default scenario name, with an underscore: _V#. You can change this suffix if desired.
The suffix will be used to create unique tables to hold the data for this scenario. The suffix is limited to 5 characters.
For more information on how scenario names and table suffixes are used, see About scenarios.
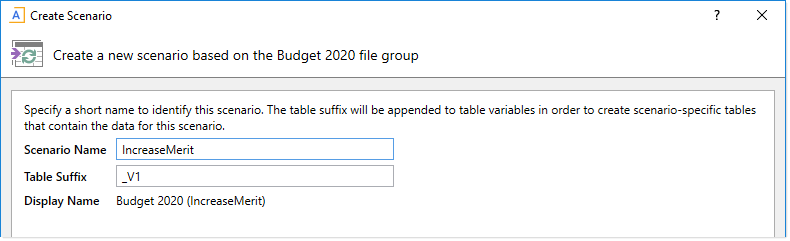
Example scenario names
-
On the Configure file group variables screen, review the general file group variables and make changes as necessary.
If planning assumptions have been set up as file group variables, you may want to change those values for use in the new scenario. For example, you may have a variable for PayrollEscalator that defines a percentage increase for salaries, and you want to change this value in the scenario.
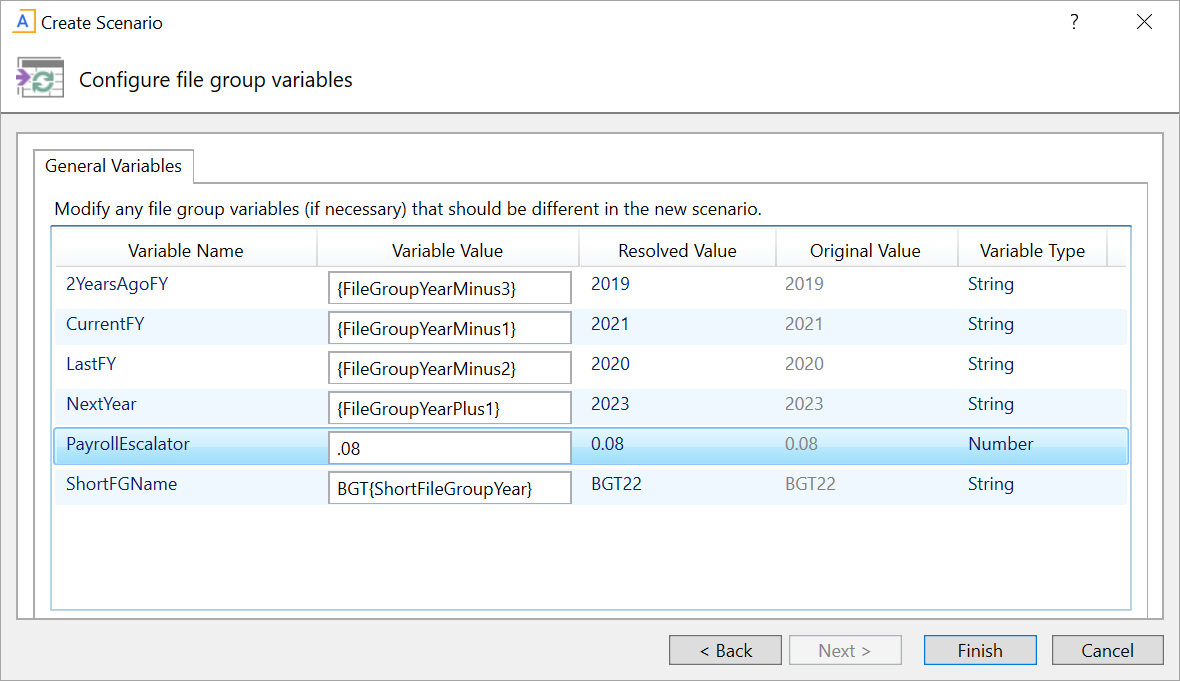
Example file group variables
-
Click Finish to create the scenario.
-
If any of the writeable table variables for the scenario resolve to existing data tables instead of new tables, a warning message displays and lists the tables. Review this list to make sure that the scenario should reference these original tables instead of creating new ones. Click OK to continue, or Cancel to stop the scenario creation. If any of these tables should instead be copied for use in the scenario, then you must edit the properties of the table variable to change its scenario cloning behavior. For more information, see Setting up table variables for scenario creation.
-
A confirmation message displays to inform you of the new tables that Axiom will automatically create as part of the scenario creation process. Review this list to ensure that new tables are being created as you expect. Click OK to continue, or Cancel to stop the scenario creation. If any of these tables should not be copied for use in the scenario, then you must edit the properties of the table variable to change its scenario cloning behavior. For more information, see Setting up table variables for scenario creation.
-
After the scenario has been created, a confirmation dialog informs you that the scenario was created successfully. From this dialog, you can choose to launch any of the following items, or click OK to close the confirmation dialog.
-
Configure scenario: Opens the Edit Scenario dialog so that you can edit any of the file group settings for the new scenario. By default, the scenario inherited all settings that were not addressed in the Create Scenario dialog from the original file group. For more information, see File group properties.
-
Manage Driver documents and tables: Opens the Manage Drivers dialog so that you can view driver properties for the new scenario and open driver files for editing. You may want to edit some driver values before performing Process Plan Files on the new file group.
-
Process Plan Files: Opens the Process Plan Files dialog so that you can process plan files for the new scenario. If you made all necessary assumption changes via file group variables, then you may be ready to process plan files immediately after creating the new scenario.
These links are provided as a convenience, so that you can jump right into performing the next step for your scenario. You can access all of these features later using the normal menu paths.
Scenario creation process
Axiom does the following to create the new scenario:
-
The file group scenario is created by copying the existing file group. All files in the file group except process definitions and plan file attachments are copied. Security is also copied from the source file group to the scenario (see below for more information).
NOTE: File group settings are copied in a similar manner as when cloning a file group. However, if the source file group is assigned to a category, the scenario will not be assigned to that category.
-
For any table variables where the default or configured scenario cloning behavior results in new tables, those tables are created by cloning the original table. For example, BGT2022_v1 is created by cloning BGT2022.
Newly created tables are placed in scenario-specific sub-folders. For example, if BGT2022 is located in
\Budget\Data, then BGT2022_v1 is located in\Budget\Data\V1(where V1 is the scenario name). -
The driver files for the scenario are processed. This means that the driver files are opened, calculated, and saved. The save includes both a save-to-database and a file save. Axiom queries and data lookups are only run if they are set to refresh on open.
If the driver files use Save Type 3 to create document reference tables, this process should result in a new set of driver tables for the scenario (ideally, using new table names as defined by the table variables).
Scenario security considerations
Once the scenario has been created, keep in mind the following security considerations:
-
When the scenario is created, security settings are automatically copied from the source file group to the scenario. However, by default the scenario will not display on the Axiom ribbon tab or in the Explorer task pane, so the only users who can access it are administrators, and users with the Administer File Groups permission or the Modify File Group permission (for the source file group). If you want other users to be able to access the scenario, you must edit the Axiom ribbon tab (or another custom task pane or ribbon tab) to add the scenario.
-
When new data and reference tables are copied for the scenario, they belong to the same table type as the original table and therefore inherit the table type security permissions. If the original table has table-specific security permissions defined, those permissions are copied to the new table. You can adjust this access if necessary.
-
New document reference tables are treated as normal, meaning that all users have full read access via the Everyone role. You can adjust this access if necessary.
Creating a scenario using Scheduler
If desired, you can create a scenario using Scheduler instead of creating it interactively in the Desktop Client General term for using either the Excel Client or the Windows Client, both of which are installed to the user's desktop.. By using Scheduler, you can schedule the creation for off-hours and leverage server-side processing. This may be preferable if the file group contains many files to be copied, or if many tables will be created for the scenario.
To create a scenario using Scheduler, create a job that uses the Execute Command Adapter task, and configure the task to use the Create File Group Scenario command.

Example Scheduler job to create a scenario
When you use the command, you can define a scenario name and a table suffix, and you can pass in values for file group variables. For example, if the file group uses a variable like PayrollEscalator, you can pass in a value for that escalator to be used in the scenario. Scheduler job variables can also be used to define the values for any of these fields.
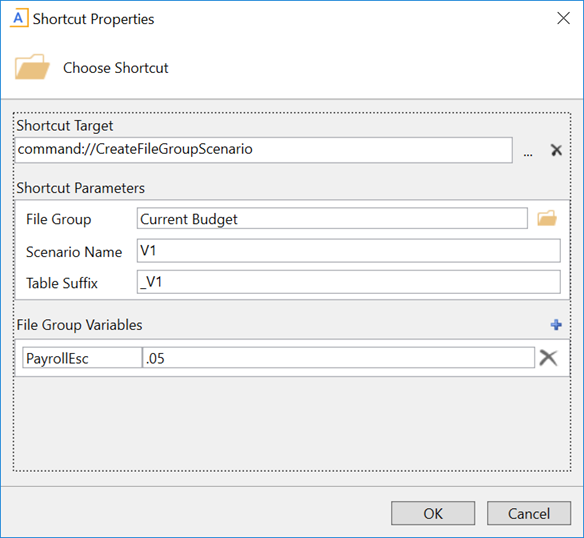
Example shortcut properties for Create File Group Scenario command
For more information on the command, see Create File Group Scenario command.
