AX1829
fixed row structures for web reports
Fixed row structures can be used to define data sections for a web report, including section headers, data rows, subtotals, and totals. Fixed row structures are defined separately so that you can reuse them with different web reports, and so that you can update the row structure in one place and have the changes propagate to all reports that reference the structure.
Fixed row structures can be used with "custom" web reports created in the Report Builder, and with web report templates provided by installed Axiom Financial Institutions Suite products. The fixed row structure defines the data sections in the report, while the web report defines other report properties such as the data columns, filters, and drilling options.
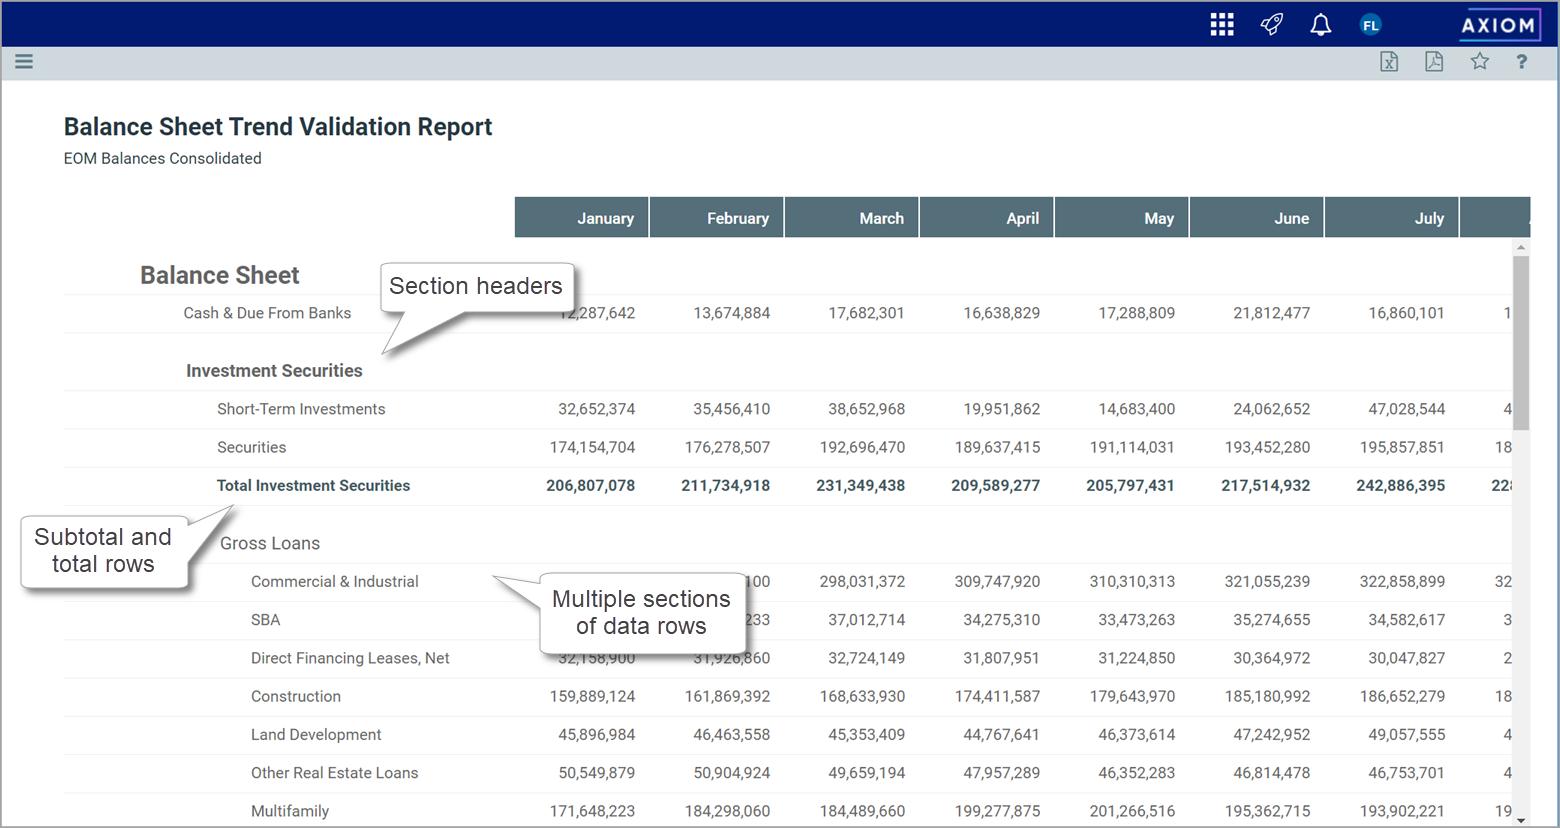
Example report using a fixed row structure
You can define as many different fixed row structures as you need. A row structure can be used with any web report where the structure's row dimensions are compatible with the report's columns, filters, drilling options, and any other report property that impacts queried data. Row structures can be created, edited, and deleted using the Report Center.
To access the Report Center:
-
Click the menu icon
 in the Global Navigation Bar The blue bar across the top of pages in the Web Client. The Global Navigation Bar provides access to system-wide features.. From the Area menu, select Report Center.
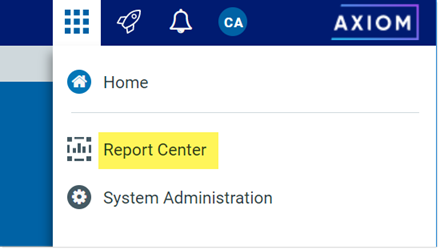
NOTE: Fixed row structures are not file-based—they are stored directly in the database. There is no file type or library folder for fixed row structures, and you cannot see them in Axiom Explorer. The only place to view and manage fixed row structures is using the Report Center.
You can create new row structures as needed for use in web reports.
In order to create a fixed row structure, you must be an administrator or have the Create Web Reports security permission. If you do not have permission to create web reports, then the option to create a new fixed row structure will not be available from the Create button in the Report Center. If you do not have access to any report creation options, then the Create button is hidden entirely.
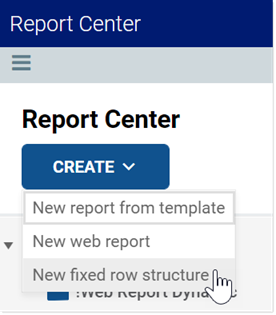
To create a new row structure:
-
In the Report Center, click Create > New fixed row structure.
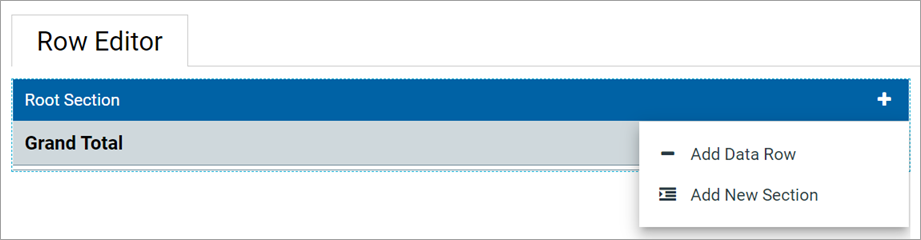
The row structure editor opens in a new browser tab, showing a new blank row structure. The row structure starts with just a top-level section header and a grand total row.
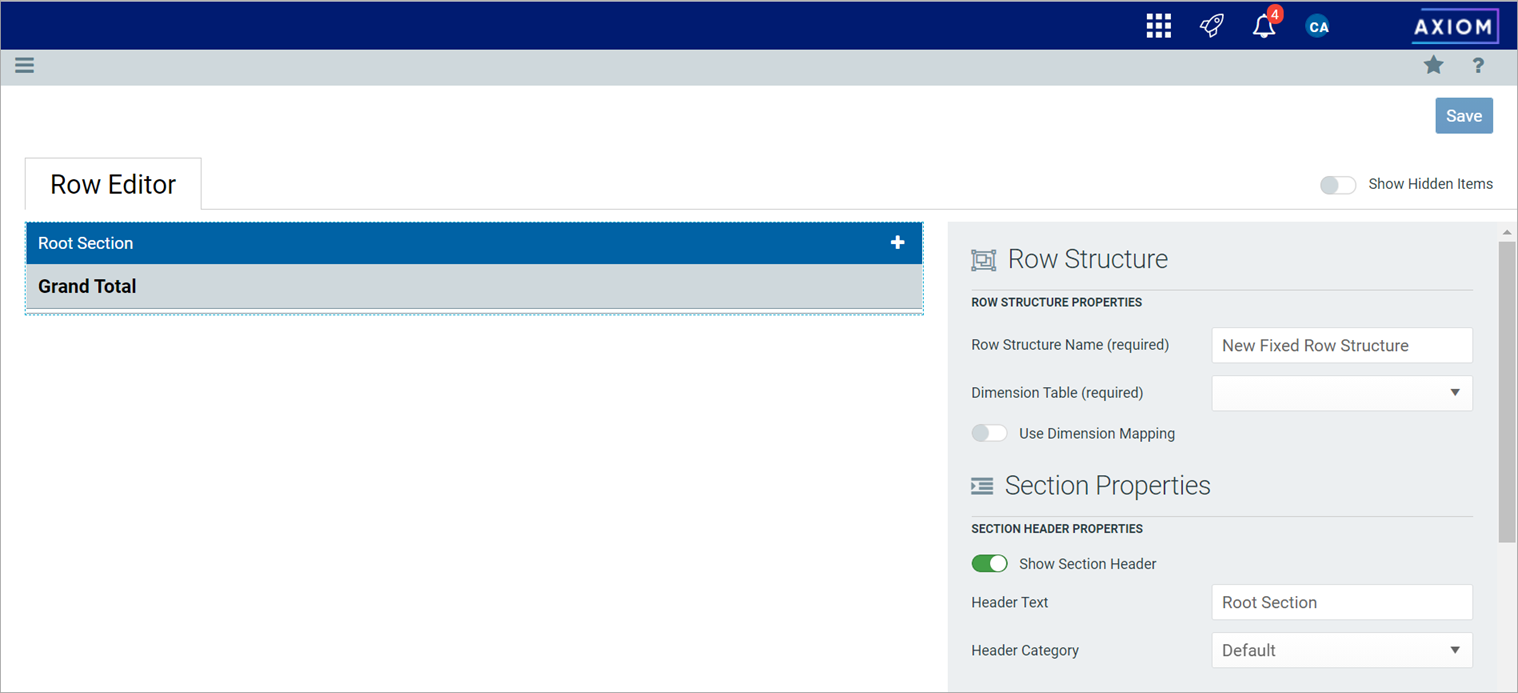
Example new blank row structure
-
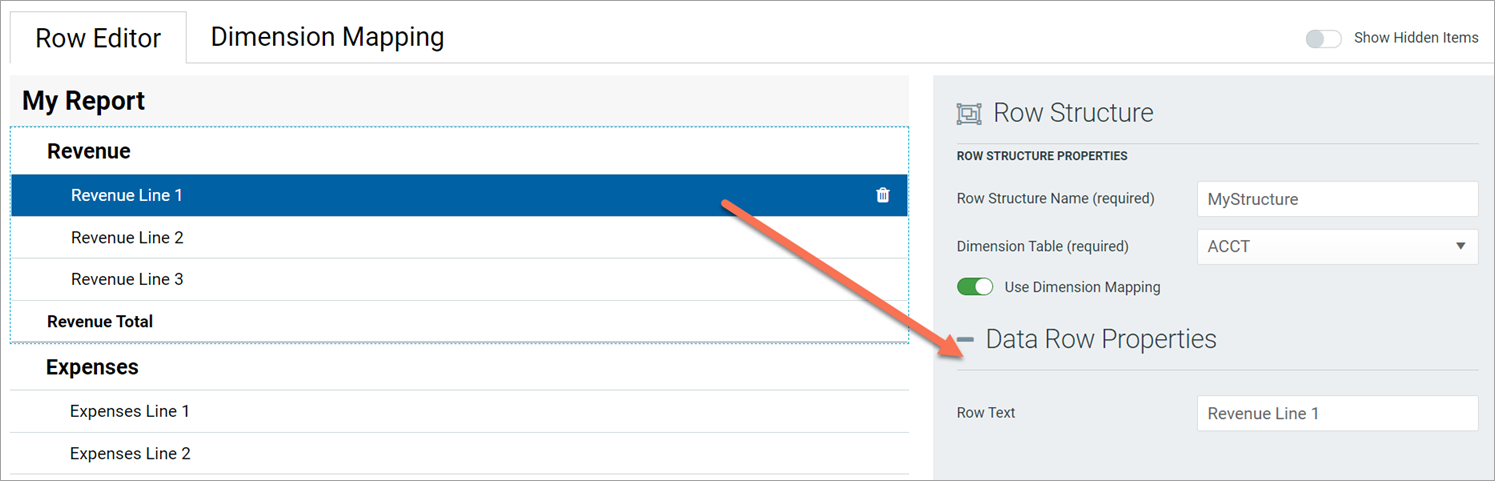
In the top of the right-hand panel, complete the following required properties for the row structure:
Item Description Row Structure Name
Enter the name of the row structure. The name identifies the row structure so that users can select it when creating a new fixed report.
Dimension Table
Specify the dimension table to use for the Filter Wizard when defining row data. For example, if rows will be defined using accounts or account groupings, select the ACCT table.
Use Dimension Mapping
Enable this toggle switch if you want to map specific items in the dimension table to specific rows in the structure. When using dimension mapping, all row data is defined at the key column level of the dimension table, and each dimension item can only be assigned to a single row. The toggle switch shows as green when enabled and as gray when disabled.
If this option is not enabled, then row data is determined by defining filter criteria statements at the row and section level. For more information, see Using dimension mapping versus row filters in a fixed row structure.
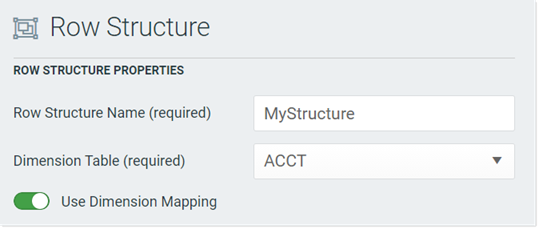
Example required properties with dimension mapping enabled
Once these items are completed, you can use the Save button to save the row structure.
-
In the left-hand row editor, add sections and data rows as desired to create the overall row structure. Think of the Root Section as the overall "wrapper" in which all row sections are placed. To create the first row section, click the plus icon on the Root Section header and then select Add New Section.
Your row structure will now look like this:
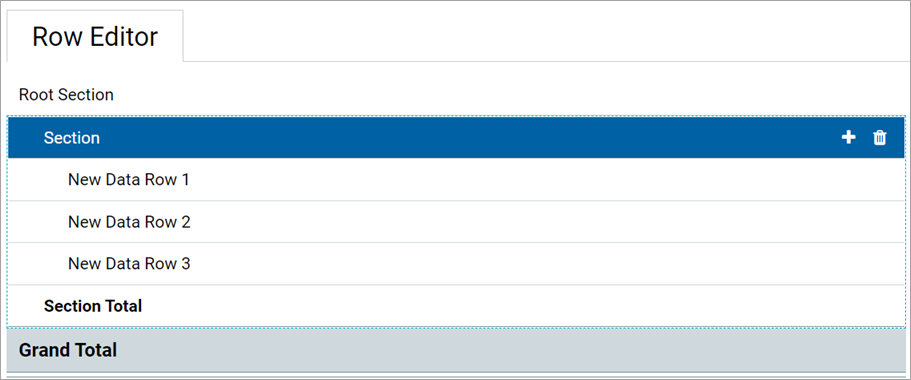
You can then continue to add data rows or additional sections:
-
To add a section, select the section header where you want to add the section, then click the plus icon > Add New Section. The new section is added as a subsection to the current section. By default, all new sections contain a section header row, three data rows, and a total row. You can add or remove data rows as needed.
-
To add a data row within a section, select the section header where you want to add the data row, then click the plus icon > Add Data Row. The new data row is added to the current section.
When you add a new data row or section, it is always added at the bottom of the current section. You can drag and drop the row or section to a different location within the section as needed (but not to a different section).
If a data row or a section is not needed, select the row or section header and then click the trash can icon. The row or section is deleted from the row structure.
NOTE: Header rows and total rows cannot be deleted from a section. The trash can icon on a section header row is used to delete the entire section, not the header row. If you do not want a particular section to display a header row or a total row, you can hide these rows on a per section basis using the Section Properties.
-
-
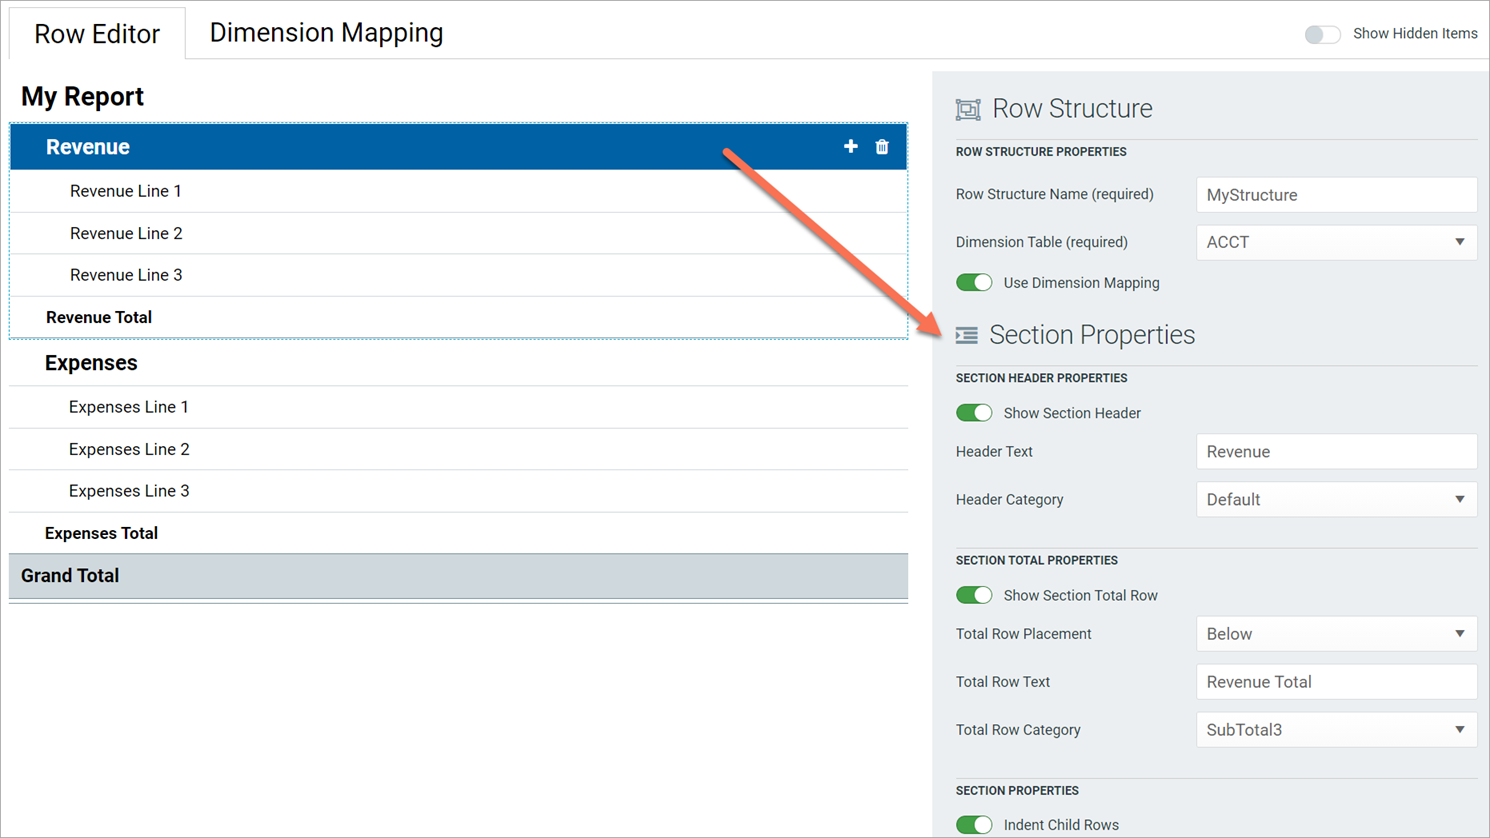
For each section in the report—including the Root Section—configure the properties for that section. To configure a section, select the section header and then complete the Section Properties in the right-hand panel. The section properties control the following:
- Visibility, text, and style of the section header row
- Visibility, text, placement, and style of the section total row
- Whether data rows are indented from the parent section
- Whether section data is added or subtracted when calculating the parent total
-
An optional data filter to apply to all data rows in the section (only available if the structure does not use dimension mapping)
For more information on all of the section properties, see Section properties.
In most cases, the row structure immediately updates to reflect section properties that affect the display. For example, if you define header text, that text is immediately shown on the row structure. However, if you hide the section header row, the row will continue to display in the row structure unless you disable the option Show Hidden Items. This option is located at the top right of the row editor, under the Save button. By default, the row editor continues to show hidden section headers so that you can use the Add Data Row and Add New Section actions on the header row.
-
For each data row in the report, configure the properties for that row. To configure a row, select the row and then complete the Row Properties in the right-hand panel.
At minimum, the row properties define the label text for the row. If the structure does not use dimension mapping, then the row properties also define a data filter to determine the data to be shown on the row. For more information on defining the row properties, see Row properties.
-
If Use Dimension Mapping is enabled for the row structure, click the Dimension Mapping tab to map dimension elements to each row. This mapping determines the data to be shown on each row, instead of defining a filter. For more information on mapping dimension elements, see Using the Dimension Mapping editor.
-
Click Save to save the row structure.
When you are finished creating the row structure, you can close the browser tab and then return to the original Report Center tab.The new row structure can now be used when creating or editing web reports.
NOTE: If you go to the Fixed Row Structure node in the Report Center, you may not see your newly created row structure listed here until you refresh the page.
You can copy existing fixed row structures as needed to create additional fixed row structures.
In order to copy a fixed row structure, you must be an administrator or have the Create Web Reports security permission. If you do not have permission to create web reports, then the Copy icon on fixed row structures is disabled.
To copy a fixed row structure:
- In the Report Center, select the Fixed Row Structure node and then locate the structure that you want to copy.
-
Hover your cursor over the row with the structure, then in the Actions column, click the Copy icon
 .
. -
In the Copy Fixed Row Structure dialog, enter a Name for the new fixed row structure, then click OK. By default, the name is Copy of OriginalName.
The fixed row structure is copied with the specified name. You can now open this fixed row structure for editing.
Any user can edit a fixed row structure. The Create Web Reports permission is not required.
Keep in mind that when a row structure is assigned to a report, that report always uses the most current version of the row structure. Any edits that you make to a row structure are immediately available in any reports that use the row structure.
To edit a fixed row structure:
- In the Report Center, select the Fixed Row Structure node and then locate the structure that you want to edit.
-
Click on the row structure name to open it.
TIP: You can also click the Edit icon
 in the Actions column to edit the fixed row structure.
The row structure opens in the row structure editor, in a new browser tab.
-
Using the row structure editor, make changes to the row structure as needed.
- Click Save to save your changes.
When you are finished editing the row structure, you can close the browser tab and then return to the original Report Center tab.
Any user can delete a fixed row structure. The Create Web Reports permission is not required. If the fixed row structure was used by any web reports, those reports will no longer function correctly until they are edited to use a different fixed row structure.
IMPORTANT: If the deleted fixed row structure was used by a web report built from a template, that report will no longer work. Currently, there is no way to edit the row structure assignment for template-based reports. If the report is still needed, it must be re-created from template with a different fixed row structure.
To delete a fixed row structure:
- In the Report Center, select the Fixed Row Structure node and then locate the structure that you want to delete.
-
Hover your cursor over the row with the structure, then in the Actions column, click the Delete icon
 .
. -
When you are prompted to confirm that you want to delete the structure, click OK.
The structure is deleted from the system and no longer displays in the Report Center.
