AX1845
You can enable two types of drilling for web reports:
-
Key columns: Users can drill to view the underlying data based on the key columns of the table specified as the Data Context. This option provides limited "out-of-the-box" drilling functionality that does not require any further setup.
-
Directed: Users can drill to view the underlying data based on predefined drilling paths. The report designer defines the available drilling paths and can configure certain display attributes for the drill.
To enable either drilling option:
- In the Report Builder, select the grid so that the Grid Configuration properties display in the Configuration Panel.
- On the General tab of the Grid Configuration properties, enable Enable Drilling.
- For Drilling type, select either Key columns or Directed.
- If you selected Directed, click the View/Edit Configuration link to define the directed drilling paths.
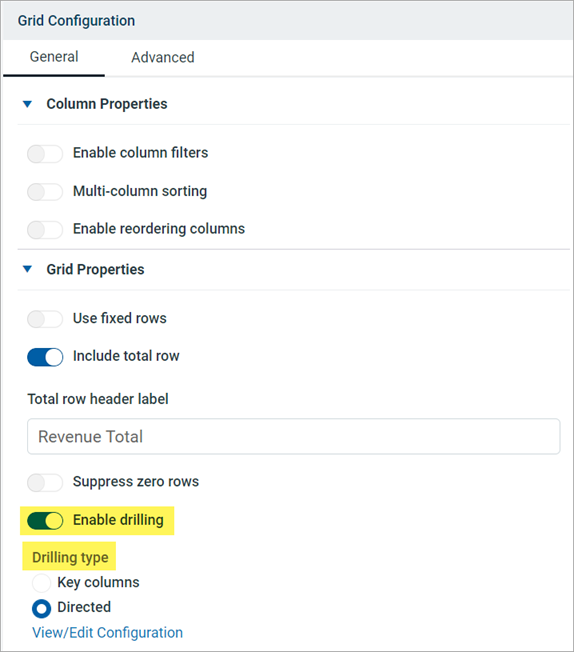
Example drill options enabled for the grid
Configuring directed drilling paths
Use the Edit Drilling Configuration dialog to define the drilling paths for directed drilling.
To define drilling paths:
-
In the Grid Configuration properties, click the View/Edit Configuration link under the Directed drilling option.
-
Drag and drop columns from the table tree to the Drill Columns area in the middle of the dialog. The available columns for drilling depend on the table specified as the primary table for the data context:
-
If the primary table is a data table, then you can use any column on the primary table or on a lookup reference table (the Dimension Tables).
-
If the primary table is a reference table, then you can only use column paths that originate from the primary table. The Dimension Tables node is not present, but you can still use columns from those tables by expanding the primary table and selecting the desired columns through the primary table.
-
-
Place the drill columns in the desired order for the directed drilling. Users can drill from the column at the top of the list down to the column at the bottom of the list. Generally speaking, the lowest level of detail should be at the bottom—for example: VP > Director > Manager > Dept.
- To reorder columns, click the handle on the left side of the column box to drag and drop the column to a new position.
- To remove a column, hover your cursor over the column and then click the X on the right side of the column box.
-
Select each drill column and configure the drill properties in the right side of the dialog. See the following table for information on these properties.
-
Click OK to complete the drill configuration and return to the Report Builder.
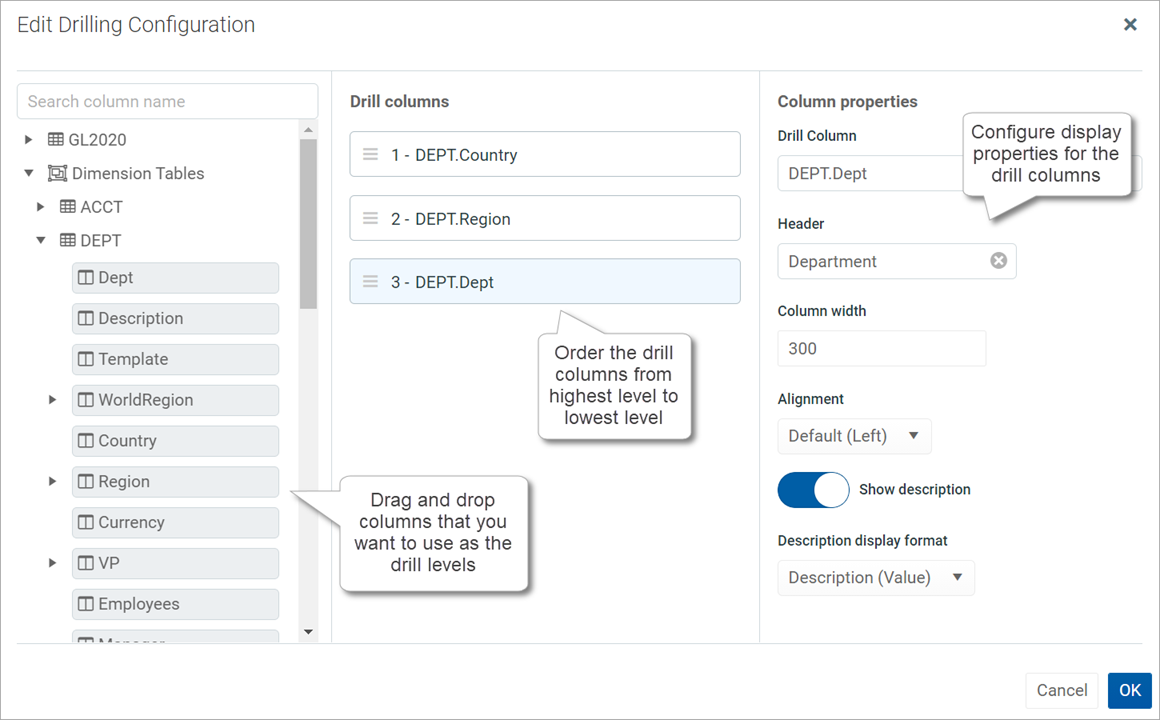
Example drilling configuration dialog
Drill Column Properties
| Item | Description |
|---|---|
|
Drill column |
The full Table.Column path of the drill column displays for your reference, so that you know which column you are configuring. |
|
Header |
Header text for the column in the drill results. Enter the desired text. The column name is used by default. |
|
Column width |
The width of the column in the drill results, in pixels. Enter the desired column width as a whole integer between 20 and 1000. By default, the width is 300 for all drill columns, regardless of data type. |
|
Alignment |
The alignment of the column values. Select one of the following: Default, Left, Right, Center. The default alignment depends on the column data type. If a column is set to use Default and the grid-level defaults are changed, the column will update to use the new default alignment. For more information, see Default column formats. |
|
Show description |
Specifies whether you want descriptions to display for dimension values. This option only applies to key columns and validated columns that have an associated description column.
NOTE: If the dimension table has multiple description columns (meaning columns where Describes Key is True), then the first description column is used. |
Using directed drilling
If directed drilling is enabled and configured, you can drill down the predefined drilling paths to view the underlying data. Directed drilling works as follows:
-
When you view the report, you can hover your cursor over a row to show the magnifying glass icon on the left side of the row.
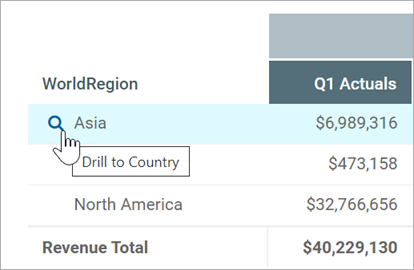
-
Click the magnifying glass to drill to the first level of the drill. This is the column positioned at the top of the Drill Columns list in the Edit Drilling Configuration dialog.The drill results open in a new browser tab.
-
From here, you can continue to drill by hovering over a row and clicking the magnifying glass to go to the next level of the drill. All subsequent drills are performed in the same browser tab.
-
Once you reach the final level of the drill, no more drilling options are available and the magnifying glass no longer displays.
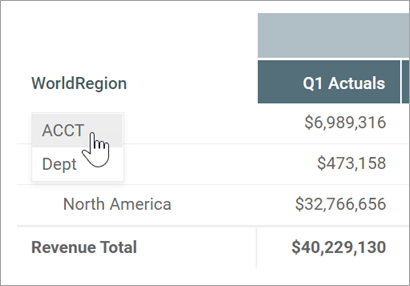
Using key column drilling
If key column drilling is enabled, you can automatically drill to the key column level to view the underlying data. The available key columns are determined as follows:
-
If the primary table used as the data context is a data table, you can drill to the validated key columns on the table. However, any key column used as a row dimension will not be available for drilling, since the report already shows data at that level.
-
If the primary table used as the data context is a reference table, you can drill to the key of the reference table, unless the key is used as the row dimension.
When you view the report, you can hover your cursor over a row to show the magnifying glass icon on the left side of the row. From here you can drill as follows:
-
If there is only one available key for drilling, click the magnifying glass to drill.
-
If multiple keys are available for drilling, click the magnifying glass to show a list of the available keys, then click on the key you want to drill.
The drill results open in a new browser tab. If multiple keys were available for drilling, you can optionally drill the drill results to view the other key(s).
If no keys are available for drilling, then the magnifying glass does not display when you hover your cursor over the row.
Presentation of drill results
When you drill, the drill results display in a new browser tab. The data contents of the drill results are as follows:
- The row dimension(s) of the original report are removed from the grid and replaced with the current drill column. The drill column is either the current column of a directed drilling path, or the selected key column.
- All other columns of the report are included in the drill results and show data for the current drill level.
- If the drill results contain multiple rows of data, the grid includes a total row. If the drill results contain a single row of data, the total row is omitted.
- Drill results are paged if the results contain many rows.
The current drill path displays along the top of the page. The drill path identifies the row that was drilled and the current drill level. If you have drilled the drill results, the previous drill levels also display in the drill path. You can click a previous drill level to return to that level.
The drill column displays as follows:
- For key column drilling, the column alignment and width are determined by the column data type. The header text is the key column name. Key column values are presented as Description (Value).
- For directed drilling, the column alignment, width, and header text are as configured in the Edit Drilling Configuration dialog.
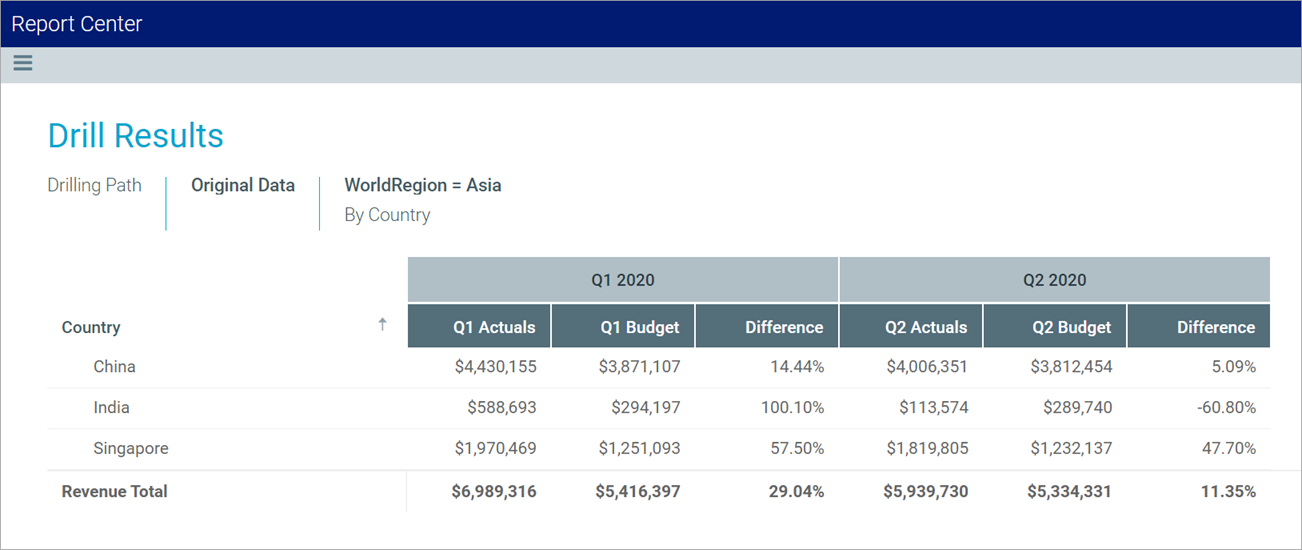
Example drill results with drilling path displayed at the top
