AX1513
If you have old Formatted Grid components that use the deprecated spreadsheet formatting feature, it is recommended to migrate them to the current thematic formatting approach. Thematic formatting has many advantages over spreadsheet formatting, such as:
-
The grid formatting is now externalized from the spreadsheet, making it easier to apply consistent formatting across many files (by using the same styles). Additionally, if the formatting defined in the style changes, the change automatically flows through to all grids using the style.
-
The grid formatting can now exactly match the formatting used in the rest of the form, since the skin formatting now applies to the grid contents. Additionally, grid features such as combo boxes and check boxes use the same controls as the stand-alone components.
-
Thematic grids support all Formatted Grid features, and are the focus for enhancements going forward. New features are not available in spreadsheet-formatted grids.
The ease of the migration process depends on the grid contents, and the size of the grid. Simple grids with only a few unique formatting elements will likely be quick and easy to migrate. Larger grids with many formatting elements and/or heavy use of content tags may be more time consuming to migrate.
Migration considerations
Although thematic grids have many advantages over spreadsheet-formatted grids, there are a few features that they do not support. Keep in mind the following:
-
Excel's Data Validation feature is not supported in thematic grids. It is possible to design alternative ways to communicate out-of-bounds values to users, and to prevent saving data.
-
Thematic grids do not support Excel's Conditional Formatting feature, nor do they support the spreadsheet Foreground and Background parameters in content tags. The ColumnStyle parameter for thematic grids is potentially more powerful and effective to conditionally control formatting via formula, but you are limited to using the built-in styles. The built-in styles may not cover the types of conditional formatting changes that you want to make in the grid.
-
Unlocked cells in thematic grids display as editable text boxes, meaning that the cells are bordered like a text box. If you want unlocked cells to display in a similar manner as the spreadsheet grid—where the cell contents display as normal cells until the user clicks in the cell to edit—then you can use the
CLICK-TO-EDITcolumn style to apply this behavior. -
Thematic grids do not accommodate text that exceeds the designated column width. If a cell has overflow text, the overflow text will be cut off. This is in contrast to spreadsheet-formatted grids, where overflow text displays in the adjacent cell if the adjacent cell is blank. You can handle overflow text in a thematic grid using one of the following approaches:
-
You can use a Format tag to span the cell contents across multiple columns. To do this, you would need to move the cell contents to a target cell, and then insert a Format tag into the cell where you want the contents to display. You can then configure the tag to span as many columns as needed to display the contents. For more information, see Using the Format tag in Formatted Grids.
-
You can wrap the text so that it displays as multi-line content within the cell. To do this, you must set a column style that includes wrap-text, and also make sure that the row style is tall enough to display multiple lines.
-
Preparing the form
If the form is actively being accessed by end users, it is recommended to create a copy of the form in which to perform the migration. Once you have made all changes and tested the form, you can replace the old form with the new form.
Within the migration copy, you should do the following to prepare the form for the migration:
-
In the Form Properties, set the Skin property to Axiom2018. For more information, see Setting the skin for an Axiom form.
It is not required to switch the skin to Axiom2018 in order to use a thematic formatted grid, but it is strongly recommended to do this as part of updating the form to use the latest design elements and features. However, if necessary, you can continue to use the existing legacy skin and just update the grid from spreadsheet to thematic. Keep in mind that if the form uses a legacy skin, this means you must also use the legacy grid styles instead of the new styles, and you must assign a theme.
Migrating the grid
To migrate the existing spreadsheet grid to a thematic grid, do the following:
-
In the Formatted Grid properties, change Grid Formatting from Spreadsheet to Thematic. This property is only available in the Form Control Sheet.
-
Go to the data source for the grid (you can click
 next to the data source name in the grid properties), and then add the missing thematic tags to your data source. You must add the following:
Tag Description [RowStyle]
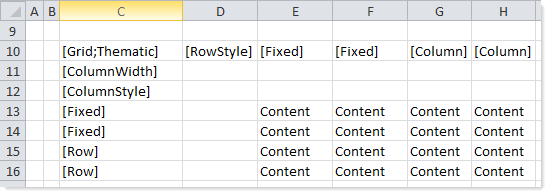
It is recommended to place this tag in the cell directly to the right of the primary [Grid]tag, before any content columns. This placement is not required, but will make it easier to read the settings used by the grid going forward. If desired, you can place this tag anywhere in the control row (to the right of the primary tag).[ColumnWidth]
It is recommended to place this tag in the cell directly below the primary [Grid]tag, before any content columns. This placement is not required, but will make it easier to read the settings used by the grid going forward. If desired, you can place this tag anywhere in the control column (below the primary tag).[ColumnStyle]
It is recommended to place this tag in the cell directly below the
[ColumnWidth]tag (or directly below the primary[Grid]tag, if the width tag is elsewhere). This tag must be placed before any content rows, because it defines the initial style to be used for the columns. If any content rows are above the first[ColumnStyle]tag, then the columns in those rows will use the default column style or the column style specified per cell within content tags.You may need to insert additional
[ColumnStyle]tags to change formatting within the content, but for now you can just insert the tag to define the starting column style.You can add these tags manually, or you can use the Data Source Assistant to add the tags. If you place your cursor within the data source and click Insert for a tag, Axiom Software will insert a new column to the left of the current location or a new row above the current location.
The following example shows a data source with the recommended placement of tags.
Don't worry about populating the new rows and columns at this point; this will be discussed in later steps.
NOTE: If you insert columns and rows, be aware of any breaking changes this may have on your form. You may have other components that reference specific cells in this sheet, and you may have content tags inside this grid that reference specific cells. For example, if you have a Select tag with a target cell of N, this may now need to point to column O after inserting a column.
-
In the
[ColumnWidth]row, set the column width for each column. You can set the width in pixels or percentages. For more information, see Setting column sizes for Formatted Grids.Note the following:
-
If you previously had blank "spacer" columns in your grid, you may not need them any more. Once you have all of the row and column styles set up, try clearing out the column tags for these spacer columns and preview the form. Depending on what content is being displayed in the grid and which styles you are using, the columns may have enough padding. If not, you can add the spacer columns back as needed and set them to a very specific size, like 10px.
-
Fit Columns does not apply to thematic grids. If you want to make sure that the grid contents fill the component width, you can use percentage sizing, or leave one or more columns blank so that they are auto-sized to fill the remaining width. (However, it is not recommended to leave all columns blank, as that will result in all columns being the same size.)
-
-
In the
[RowStyle]column, set the style for each row.The easiest way to do this is to use the Data Source Assistant. Place your cursor in the column to see a list of all available styles and assign them to each row. For more information, see Using row and column styles with Formatted Grids.
Note the following:
-
Among other things, the row style sets the row height. If you have a row that needs to be taller than other rows—for example, because it allows for multi-line input or wrapped text—then you must apply a style that sets a taller row height. Row height styles are set in the Rows category. Alternatively, you can add the
[RowHeight]column tag to the grid data source, and set row heights in this column. For more information, see Setting row sizes for Formatted Grids. -
If you previously had blank "spacer" rows in your grid, you may not need them any more. Once you have all of the row and column styles set up, try clearing out the row tags for these spacer rows and preview the form. Depending on what content is being displayed in the grid and which styles you are using, the rows may have enough padding. If not, you can add the rows back as needed, and apply a spacer style to those rows.
-
-
In the
[ColumnStyle]row, set the initial style for each column.The easiest way to do this is to use the Data Source Assistant. Place your cursor in the row to see a list of all available styles and assign them to each column. For more information, see Using row and column styles with Formatted Grids.
Depending on the grid contents, you may find that you need to apply a different style to certain rows in the column, or to specific cells in the column. You can apply column styles to specific cells when using format tags, and you can add as many
[ColumnStyle]rows as needed to change column styles. -
If you are using content tags in the grid (for example, Select tag, Checkbox tag, Symbol tag), in many cases these tags will work as is and do not require any further migration. However, note the following special considerations:
-
If you are using the Foreground or Background parameters in any tag, these parameters are not supported for use in thematic grids. Instead, you must use the ColumnStyle parameter to set the foreground color or background color via styles.
-
If you are using the CheckBox tag with the NoAutoSubmit parameter, this must be converted to the AutoSubmit parameter for thematic grids.
- If you are using the AddRows tag, this tag is not supported for use in thematic grids. Instead, you must use a Button tag and set the command to the AddRows command. The setup is otherwise the same. If you want the button to look like link text instead of a push button, set the ButtonStyle parameter to Link.
-
-
Make sure that all cells in the data source are locked, unless you deliberately want them to be unlocked for text input. Keep in mind that unlocked cells will display as editable text boxes in thematic grids. You may want to switch these cells to using the TextArea tag to provide better control over the display of the text box (such as the ability to apply column styles to the cell).
-
If the spreadsheet grid used either Data Validation or Conditional Formatting, these spreadsheet features are not supported in thematic grids. You will need to convert these features as follows:
-
Data Validation for the purposes of displaying lists should be converted to using the Select tag with a ComboBox data source.
-
Data Validation for the purposes of validating numeric entries can be converted to a numeric TextArea tag that uses a defined Min and/or Max value. If this does not meet your validation needs, you can:
- Test inputted values using a formula and display an error message to the user in a designated location if a value is out of bounds.
- Configure the form so that saving data (or performing some other action) is not available if any of these error messages are present.
- Conditional Formatting should be converted to changing column styles via formula. For example, column styles can be used to dynamically display a cell in bold, or in green font, or in red font.
-
You will likely need several rounds of viewing the form and tweaking settings to get the grid to display as you want it. You may need to experiment with column sizes and the effects of various row and column styles. Make sure to test all content tags to ensure these are working as expected (especially if columns have been added or removed from the sheet).
