AX2155
When designing a template sheet (or a sheet in any file that supports use of calc method libraries), you can use calc method controls to specify where calc methods can be used in the sheet. Using calc method controls, you can:
- Control exactly where in a sheet that a user can insert or change a calc method. Each row can be marked to allow insertion, overwriting, or both.
- Specify the calc methods that can be used to insert or change on a particular row. Calc methods can be specified by individual calc method name and by calc method group.
- Define custom insertion points, to guide users to the appropriate areas for calc method insertion. Custom insertion points display on the Add Row(s) menu; when one is selected, the user is taken directly to the appropriate row.
To configure calc method controls for a sheet, you must define a calc method control column on the sheet, and then mark each row that you want enabled for insertion or overwriting. You can create these tags manually, or use the user interface (available on the right-click menu) to insert or edit the tags.
|
Tag Type |
Tag Syntax |
|---|---|
|
Primary tag |
[InsertCMColumn; HeaderLabel] |
|
Row tags |
[InsertCM; InsertionPointLabel; CalcMethodList; GroupList; AllowedAction; InsertLocation; MaxInsertCount; DynamicMarker] |
Calc method controls are optional. If no calc method control column is present in a sheet, then calc methods can be inserted or overwritten anywhere on the sheet. However, if a sheet has a calc method control column, then calc methods can only be inserted or overwritten on rows that are marked as enabled.
If a row is marked as enabled, users can only insert or change a calc method if they have security rights to do so. For example, if a row is enabled for overwriting, but the user does not have security rights to overwrite calc methods for the file group, then the change action will not be available to the user.
NOTES:
-
Axiom Software supports an alternate method of controlling calc method insertion, known as dynamic insertion controls. When using this method, the user selects an account (or other dimension item) that they want to work with, and the dynamic insertion controls do the work of determining the correct location and then either automatically inserting a calc method or taking the user to an existing row in the sheet. This method can be more user-friendly, but also requires more work for the template designer to set up the appropriate spreadsheet logic. For more information, see Using dynamic insertion controls.
-
Administrators and users with the Manage Calc Methods security permission can always insert or change calc methods anywhere in a sheet, even if calc method controls are being used. There is no "override" mechanism—the controls are simply ignored for these users. However, note that if you insert a calc method by selecting a custom insertion point, you are always limited to the calc methods allowed for insert at that location. If you want to insert a different calc method at that location and you have the security rights to do so, then you must insert it manually (by placing your cursor at the insert location and selecting Add Row(s) > Insert Calc Method, instead of using the custom insertion point).
Defining a calc method control column
The calc method control column (InsertCMColumn) serves two purposes:
- It enables calc method controls for the sheet.
- It holds the row tags to mark individual rows as enabled for calc method insertion or overwriting.
Typically the calc method control column is located to the far right of the sheet, past any data area that users work with or view. However, it can be placed wherever you like, within the first 500 rows.
You can enter the control column tag into the sheet manually, or you can use the insertion tool:
-
Right-click in the desired cell, and then click Calc Methods > Insert Column Control Tag.
The Insert Column Control Tag dialog opens.
-
In the Menu label box, type the text that you want this set of insertion points to display under on the Custom Inserts menu.
This text serves as the "header" for each individual custom insertion point defined in the column. This text could be sheet related ("Add rows to Budget sheet") or it could be related to the type of calc method actions enabled in the column ("Add new employees").
If you do not want this set of calc method controls to appear on the menu, then clear the Show in Custom Insert Menu check box. Generally, the only use case for this is if the column only controls change actions, and therefore no items would appear on the menu anyway. If the column allows inserting calc methods, then menu text should be defined to guide users to insertion points.
- Click OK to insert the tag and enable calc method controls for the sheet.
The tag is inserted into the current cell as follows: [InsertCMColumn;HeaderLabel]
There is no associated user interface for editing column control tags once they have been inserted. If you later want to change or remove the header text for an InsertCMColumn, make the edit directly within the cell. For more information on the tag syntax, see Calc method control tag syntax.
Once the InsertCMColumn tag has been placed in a sheet, then calc method actions are only allowed on rows that are marked as enabled. If no rows are marked as enabled, then users cannot insert or change calc methods anywhere in the sheet.
NOTES:
- The primary tag must be placed in the first 500 rows of the sheet.
- Formulas can be used to create the tags, as long as the initial bracket and identifying keyword are whole within the formula.
Marking rows as enabled for insertion and/or changing
Each row that you want enabled for calc method insertion or changing (overwriting) must be marked with an InsertCM tag.
Tags that allow calc method insertion are typically placed at the bottom of a section in a sheet, beneath any "hard-coded" rows, or beneath rows that will be brought in via Axiom query when plan files are built. In this case the tags are placed directly in the template sheet.
However, insertion can be allowed anywhere. For example, you may have a calc method that uses detail sub-rows to calculate a total, and you want to allow users to insert additional detail rows. In this case the tags must be saved as part of the calc method, so that the tags are brought in with the calc method when the plan file is built or when the calc method itself is inserted.
Tags that allow overwriting must be saved within the calc method that you want users to be able to change. If the calc method is a multiple-row calc method, only the first row must contain the InsertCM tag to allow the calc method to be changed.
The InsertCM tag has multiple parameters and can be fairly long. While you can manually type the tag within the sheet, the easiest method is to use the insertion tool to create the tag:
-
Place your cursor in the row that you want to enable for insertion and/or overwriting, within the calc method control column (the column marked with InsertCMColumn). Right-click in the cell and then click Calc Methods > Insert Row Control Tag.
The Insert Row Control Tag dialog opens.
Remember that some tags must be saved within calc methods instead of within the template itself. You would need to insert the calc method into the sheet, add the tag to the appropriate column, and then save the modified calc method back to the library.
-
If this row will be enabled for insertion, type the desired text for the Custom Inserts menu into the Menu label box.
For example, if this insertion point is where users can add new hourly employees, the menu label could be "Add New Hourly Employee".
If the row will only allow overwriting, then this setting does not apply, because overwriting locations are not displayed on the menu. In this case, clear the Show in Custom Insert menu check box.
This setting is optional in any circumstance, however, if the row allows insertion then menu text should be defined to guide users to the insertion point.
-
For Actions to allow on this row, select the desired calc method action:
- Insert: Users can insert calc methods at this location.
- Change: Users can change the calc method that starts with this row.
- Insert/Change: Users can insert or change calc methods at this location.
NOTE: A fourth option is available, named GoTo. This option is only for use with dynamic insertion controls. If you select this option for use with standard calc method controls, then the row will be ignored.
- Select one of the following to determine which calc methods can be used at this location:
- Allow any calc method (default)
- Allow only the selected calc methods and groups
If you selected Allow only the selected calc methods and groups, then select the check box for each individual calc method and/or calc method group that you want to allow at this location. If you select a group, then all calc methods in that group can be used at this location.
-
Optional. Configure Max insert count as appropriate.
This setting controls how many instances of the selected calc method the user can insert. For example, if the user is inserting a detail row, you may want to allow the user to insert more than one detail row at a time. You should evaluate this setting depending on whether only one calc method is eligible for insert at this location, or whether multiple calc methods are eligible for insert:
-
If the Insert Calc Method dialog will display to the user (i.e. more than one calc method is available for insert at this location), then this setting controls what the user can enter into the Number of items to insert field in the dialog. In this circumstance, blank or 0 means unlimited—the user can insert as many instances as they wish. You can enter a number if you wish to limit the number of instances that can be inserted, or you can enter 1 if you do not want the user to be able to insert more than one instance of the calc method.
-
If only one calc method is available for insert at this location, then this setting controls whether or not the user will be prompted to insert more than one instance of the calc method, and if so what is the maximum number they can input. You should leave this setting blank if you do not want the user to be prompted. If you want the user to be prompted, you can enter 0 for unlimited instances, or enter a number higher than 1. (Entering 1 does not make sense in this circumstance, because this will cause the prompt to display but the user will be unable to change it to a number higher than 1.)
-
- Optional. For Insert location, specify where the calc method should be inserted, relative to the current row:
- Above the tag (default): The calc method is inserted directly above the current row.
- Below the tag: The calc method is inserted directly below the current row.
- Click OK to insert the tag and enable the row for insertion and/or overwriting.
The following screenshot shows an example Insert Row Control Tag dialog:
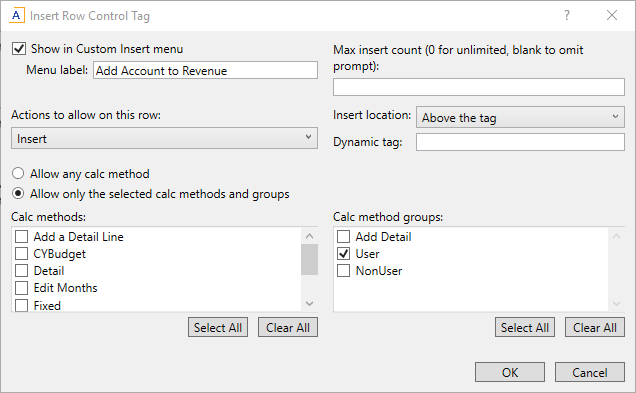
The selections in this example result in the following tag:
[InsertCM;Add Account to Revenue;;Budget;Insert;Above]
NOTE: The Dynamic tag option within the dialog is only for use with dynamic insertion controls. It is ignored when using standard calc method controls. Whether it is blank or has text, it has no impact on the row.
Once the tag has been inserted into a cell, you can edit it manually, or you can use the right-click menu: Calc Methods > Edit Row Control Tag. For more information on the control tag syntax, see Calc method control tag syntax. This section also has example InsertCM tags for various scenarios.
Using multiple control columns in a single sheet
You can have multiple calc method control columns defined on a sheet. For example, if you have several departments in a plan file, users may need to add departments or add accounts. You could have two separate calc method insertion columns as follows: [InsertCMColumn;Insert Dept in Budget Sheet] and [InsertCMColumn;Insert Acct in Budget Sheet].
If a sheet has multiple calc method control columns, and the same row is marked as enabled within multiple control columns, then the settings of the individual control columns are combined to result in the allowed actions and the allowed calc methods. This means:
- If one tag specifies Insert, and another tag specifies Change (on the same row), then users can insert and change on that row.
- If a user selects a custom insertion point, the calc methods are limited to the items allowed by the InsertCM tag that defines the insertion point. However, if a user chooses to manually insert a calc method, the user has access to the full set of calc methods allowed for that row (in all tags).
- If a user changes a calc method, the user has access to the full set of calc methods allowed for that row (in all tags).
