Using dynamic insertion controls
In addition to the standard calc method controls, Axiom Software supports an alternative method that allows you to dynamically determine where a new calc method should be placed in a sheet based on a user's dimension selection (such as an account), and then automatically insert it.
For example, imagine that the user wants to insert a Travel account. Using the standard calc method controls, the user must either manually navigate to the appropriate area of the sheet, or select the appropriate custom insertion point from the Add Rows menu. Depending on how many insertion points are available, this may be a lot of items to choose from. Additionally, maybe the account is already in the sheet, and the user doesn't know it.
Using the dynamic insertion controls, the user experience can instead be something like this:
-
The user selects to "Update an account" (or some similar text) from the Add Rows menu. It does not matter what type of insertion the user wants to make (for example, a brand new account, or new detail rows for an existing account), or where the rows need to go—it can all be performed using this single option.
-
A dialog box presents the user with a list of accounts (or any desired dimension). The account list can be filtered so that the user only has to choose from accounts that are relevant to the plan.
-
Once the user selects an account, the account is placed in a designated location in the sheet and then the sheet is calculated. This process is transparent to the user. The assumption is that the plan files have been designed so that based on the user's account selection, the appropriate row for calc method insertion is now identified.
-
A calc method is inserted in the correct location on the sheet, using the preferred calc method for the selected account. Optionally, you can allow the user to select which calc method they want to use, and/or you can allow the user to specify how many items to insert (for example, when inserting detail rows).
-
If the selected account already exists in the sheet and no available actions can be taken for that account (such as inserting additional detail rows), then the user is simply taken to the appropriate row in the plan file.
It is important to understand that the dynamic controls alone do not determine where the account should be placed in the sheet (or whether the account is already there). The dynamic controls enable the dimension selection for the user, stamp the user's selection in the sheet, and then calculate the sheet before performing the calc method insertion. It is up to the template designer to create the spreadsheet logic that identifies the appropriate location for calc method insertion (or navigation to an existing row).
Dynamic insertion controls can provide a very intuitive and streamlined experience for the end user, but they are more complex for the template designer to set up and may require advanced Excel knowledge to create the necessary spreadsheet logic.
Dynamic insertion controls use a special control column of DynamicCMColumn. This column is similar to the standard InsertCMColumn, but it uses additional parameters to enable the dynamic insert. Rows are flagged using the same InsertCM tags, however, certain settings are ignored in this context, and a few additional options are available.
|
Tag Type |
Tag Syntax |
|---|---|
|
Primary tag |
[DynamicCMColumn; Label; DynamicMarker; Table|Filter|SheetDestination|CalcMethodDestination; MultipleInsert] |
|
Row tags |
[InsertCM; InsertionPointLabel; CalcMethodList; GroupList; AllowedAction; InsertLocation; MaxInsertCount; DynamicMarker] This is the same syntax used with the standard calc method controls (InsertCMColumn). |
NOTES:
- By default, dynamic insertion controls find a single match and then insert or go to that location. If multiple matches exist, the first one is used. You can configure the controls to allow multiple insertions, but certain behavior restrictions apply.
- When using DynamicCMColumn, the Insert Calc Method option does not appear on the Add Row(s) menu, even if the user's cursor is on a row that is enabled for insert. All calc method insertions are controlled by use of the dynamic insertion menu item. (If necessary, you can set up an InsertCMColumn in the same sheet, and enable the menu item that way.)
- For administrators and users with the Manage Calc Methods security permission, the behavior of dynamic insertion controls is the same as for non-admin users. However, as always, calc method administrators have the right to insert or change calc methods anywhere in the sheet, regardless of any calc method control tags. The dynamic insertion behavior will only apply if they select the relevant custom insert from the Add Row(s) > Custom Inserts menu.
Defining the dynamic insertion control column
To configure dynamic insertion controls for a sheet, you must specify a dynamic insertion control column (DynamicCMColumn). This column is similar to the standard InsertCMColumn, but uses different syntax to enable the dimension selection and the placement of values on the sheet.
To define the DynamicCMColumn, place the following within any cell in the first 500 rows of the sheet:
[DynamicCMColumn; Label; DynamicMarker; Table|Filter|SheetDestination|CalcMethodDestination; MultipleInsert]
For full details on the syntax for the dynamic insertion control column, see Calc method control tag syntax.
The DynamicCMColumn portion of the tag is required, and flags the column as the control column. The remaining parameters must be completed as follows:
| Item | Description |
|---|---|
| Label |
The text to appear on the Add Row(s) > Custom Inserts menu. For example, "Update an account". This is the only text that will appear on the menu for this column. Unlike when using the InsertCMColumn tag, any label text defined in the individual InsertCM tags is ignored. |
| DynamicMarker |
Optional. The text that identifies an InsertCM row as the "active" row for dynamic insertion. For example, you could use the text "InsertHere" as the dynamic marker. After the user selects an account and the sheet is calculated, Axiom Software will look for the first InsertCM tag in the column that contains a matching "InsertHere" tag. That row becomes the active row for insertion. If omitted, then the active row is the first row in the column that contains an InsertCM tag. |
| Table |
The table to present to the user, so that the user can select the desired item in the table. The table can be any reference table, such as ACCT or DEPT. The full syntax for specifying the table is as follows: Table.PrimaryColumn.AdditionalColumn.AdditionalColumn The PrimaryColumn is the column that contains the items for the user to select. In most cases this is the key column for the table. Any additional column listed will display in the dialog to help the user make a selection. You can list as many additional columns as desired, delimited by periods. For example: ACCT.ACCT.Description In this case the user will select an account from the ACCT table, and the Description column will also display in the dialog. NOTE: Additional columns only apply if the PrimaryColumn is the key column for the table. Otherwise they will be ignored. |
| Filter |
Optional. A filter to limit the items to display in the selection dialog. The filter must be based on the specified table. Use standard filter criteria syntax. For example: ACCT.Category NOT IN ('Balance Sheet','Statistics') Accounts belonging to these categories will not be listed in the dialog. If omitted, then all items in the table will be listed in the dialog. If you omit this parameter, you must delimit it with an empty pipe character. |
| SheetDestination |
The cell in the workbook to place the user's selection. Specify both the sheet name and the cell reference, even if you want the item to be placed on the current sheet (the sheet where the tag is defined). For example: Budget!B25. This is a fixed location. The spreadsheet logic that you build within the sheet to determine the active row for insertion must point to this cell to obtain the user's selected item. |
| CalcMethodDestination |
Optional. The cell within the inserted calc method to place the user's selection. This location is relative to the calc method. The location is specified as follows: For example:
If omitted, then the user's selection is not placed inside the inserted calc method. NOTES:
|
|
MultipleInsert |
Optional. Type the keyword If enabled, then a calc method will be inserted at all matching locations, not just the first matching location. Enabling this behavior has the following limitations:
The idea is that multiple calc method insertions can take place without requiring any further input from the user. Any configuration that requires additional input, such as selecting a calc method or completing variable values, is considered invalid and will prevent the insertion. |
All required parameters must be present in the tag in order for the label text to appear on the Add Row(s) menu.
NOTES:
- The primary tag must be placed in the first 500 rows of the sheet.
- Formulas can be used to create the tags, as long as the initial bracket and identifying keyword are whole within the formula.
The DynamicCMColumn tag must be manually typed in the cell. No helper dialog is available to build the tag.
Configuring the InsertCM tags for dynamic insertion
Within the dynamic insertion control column, rows are marked using the same InsertCM syntax used with the standard calc method controls. For more information on InsertCM syntax, see Calc method control tag syntax. Although the syntax is the same, some behavior differences apply.
When using dynamic insertion controls, the goal is to design the sheet so that once the user's dimension selection is placed in the sheet and the sheet is calculated, only one row is marked as "active" for the dynamic insertion. This can be accomplished in one of two ways:
-
The InsertCM tags can contain a text "marker" that matches the dynamic marker defined in the DynamicCMColumn tag. The first row that contains this marker is the active row.
The dynamic marker is placed in the last parameter of the InsertCM tag, and is only valid for use within a dynamic insertion control column. If used within a standard calc method control column (InsertCMColumn), it is ignored.
- If no marker is defined in the DynamicCMColumn tag, then the active row is the first row that contains an InsertCM tag.
In both cases, it is assumed that the InsertCM tags are constructed using a formula. The formula should be designed so that based on the user's dimension selection, only one InsertCM tag in the column is now flagged with the dynamic marker or visible within the sheet (depending on which approach you are using). How this formula is constructed and what spreadsheet logic is used to determine the active row is entirely up to the template designer.
The following additional behavior differences apply when using InsertCM tags in a dynamic insertion control column:
-
The InsertionPointLabel text is ignored. When using a dynamic insertion control column, the only text that displays on the menu for the column is the label defined in the DynamicCMColumn tag.
-
The AllowedAction parameter supports an additional action of
GoTo. If GoTo is specified as the action, then when the current row is identified as the active row, the user is taken to the current row but no calc method insertion occurs. The GoTo action is intended to be used in situations where the user's selected dimension item already exists in the sheet. In that case, the user should be taken to the existing row rather than inserting a new row. For more details, see the following section Using dynamic insertion with existing rows.
To create InsertCM tags, you can manually type the tag or use the insertion tool on the right-click menu (Calc Methods > Insert Row Control Tag). In most cases it will be easier to start the tag using the insertion tool, and then convert it to a formula to accommodate the necessary conditional logic. Once the tag is converted to a formula, you will no longer be able to use the insertion tool to edit the existing tag.
Using dynamic insertion with existing rows
When using dynamic insertion controls, the user is first prompted to choose an account (or whichever table is specified in the DynamicCMColumn tag). It is possible for the user to choose an account that already exists in the sheet. The spreadsheet logic used in the sheet to determine the active row must address this situation.
For example, imagine that the user selects the Travel account, and that account is already in the sheet.
-
If the calc method used for the Travel account allows for detail rows, then you probably want to configure the dynamic insertion so that the user can insert more detail rows. In this case the spreadsheet logic would need to identify one of the existing detail rows as the active row, and the InsertCM tag would need to allow for insertion of the detail calc method. You could also give the user the option of inserting multiple detail rows.
-
If the calc method used for the Travel account does not allow for detail rows, then the dynamic insertion should be configured so that the user is simply taken to the existing row. To accommodate this, the InsertCM tag now supports an additional action of GoTo (instead of Insert and/or Change) for the AllowedAction parameter. If the active row is flagged with GoTo, then the user is taken to the active row and no further action occurs. The user can then edit the existing row as desired.
TIP: If you want the user to be able to change the existing row by applying a different calc method, then you can use Change as the AllowedAction instead of GoTo. For more details, see the following section Changing calc methods when using dynamic insertion.
It is also possible to configure the sheet so that if the user selects an account that is already in the sheet, no row becomes the active row. In this case, a message displays to the user as follows: "There is nothing to insert in the sheet for <the selected item>." However, this is not a recommended configuration, since it does not let the user know that the account is already in the sheet.
Whichever approach is used, the spreadsheet logic should ensure that a duplicate row is not inserted into the sheet for the selected account (unless that edge case behavior is explicitly intended by the plan file design).
Allowing users to change calc methods when using dynamic insertion
If you want users to be able to change calc methods on existing rows in the plan file, you can configure the dynamic insertion controls to allow this. The following design considerations apply:
-
On existing rows, InsertCM tags can use Change as the allowed action instead of GoTo. In this case the user will be taken to the row just like when using GoTo, but if the user has Allow Calc Method Change permissions then they can use the Add Row(s) > Change Calc Method menu option to select a different calc method. Use of GoTo explicitly denies use of Change on the row (unless the user is a calc method administrator and therefore can change calc methods anywhere).
-
To flag active rows, you must use the dynamic marker method. This way, all InsertCM tags can be visible in the sheet at all times, so that if the row is configured to allow overwrite then the user can do so. The formulas that determine the InsertCM tags just need to identify which row should be flagged with the dynamic marker at any one time.
Alternatively, you could set up a separate standard InsertCMColumn in the sheet, and use that column to control access to changing calc methods.
Allowing multiple insertion points
You can use the optional MultipleInsert parameter to allow the dynamic insertion process to insert at multiple locations instead of just one. If this parameter is used, then a calc method will be inserted at all matching locations, instead of just the first matching location. This behavior applies regardless of whether matched rows are determined using the dynamic marker text or just by hiding and showing the InsertCM tag as appropriate.
This behavior should only be used for configurations where multiple insertions of the same item make sense. For example, in a traditional single-department budget you would not want to allow multiple insertions of the same account within a single sheet. However if the plan file was for multiple departments, then you could have multiple insertions of the same account, one for each individual department.
Use of this feature has several limitations as compared to the standard single-insertion behavior:
-
All matching rows must be limited to a single calc method. This means that the InsertCM tag for the matching row must either specify a single allowed calc method, or a calc method group that only contains one calc method. Also, the MaxInsertCount parameter for the InsertCM tag must be blank (meaning inserting multiple instances of the calc method at a single location is not allowed).
NOTE: Each matching row can allow a different calc method—so Insert Monthly might be inserted at one matching location, and then Spread Total might be inserted at a different matching location. All matching rows do not need to be limited to the same calc method.
-
The allowed calc method for the matching row cannot use any calc method variables.
-
Matching rows flagged as GoTo or Change are ignored.
The idea is that this behavior only makes sense if the multiple insertions can take place without requiring any further input from the user. Any configuration that requires additional input, such as selecting a calc method or completing variable values, is considered invalid and will prevent the insertion.
These limitations apply regardless of whether the process finds one match or multiple matches. Once the multiple insert behavior is enabled, the limitations apply in all cases.
When the insertion process is complete, the user's cursor will be placed at the first insertion location. Keep in mind that the user has no way of knowing the other insertion locations except by visual cues in the sheet itself. You should design your templates and calc methods with this in mind.
The dynamic insertion process
This section explains how the dynamic insertion process works, to help template designers construct the sheet and Excel logic appropriately.
-
If a DynamicCMColumn tag exists in the sheet, the label text for that column displays on the Add Row(s) > Custom Inserts menu as a stand-alone item. If any InsertCMColumn tags exist in the file, they still display on the menu as normal. The only difference between the DynamicCMColumn entries and the InsertCMColumn entries is that the DynamicCMColumn entries do not have a sub-menu. For example:

-
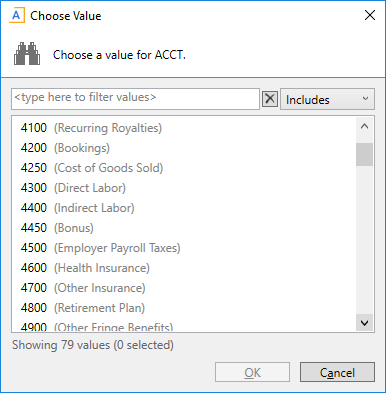
The user is prompted to select a single item from the table specified in the DynamicCMColumn tag. The list of items is filtered based on any optional filter placed in the tag.
For example, if the DynamicCMColumn tag is:
[DynamicCMColumn;Update an account;InsertHere;acct.acct|acct.category NOT IN ('balance sheet','statistics')|Budget!BB22|F1]
Then the user selection dialog will display like this:
-
Once the user selects an item, it is placed in the SheetDestination cell designated in the DynamicCMColumn tag. The sheet is then calculated.
Continuing the example DynamicCMColumn tag above, the item would be placed in cell BB22.
-
After the calculation, Axiom Software does one of the following to find the active row:
-
If the DynamicCMColumn tag has a defined DynamicMarker, Axiom Software looks for a matching marker within an InsertCM tag in that column. The first matching tag in the column becomes the active row.
-
If the DynamicCMColumn tag does not have a defined DynamicMarker, Axiom Software looks for the first row in the column that contains an InsertCM tag. That row becomes the active row.
The example DynamicCMColumn tag above uses a marker of InsertHere. Therefore the first InsertCM row that contains the InsertHere marker will be the active row. For example:
[InsertCM;;Input Monthly;;Insert;Above;;InsertHere]
The way in which a particular row gets identified as the active row is entirely up to the spreadsheet logic developed by the template designer. Typically the InsertCM tags are constructed using a formula, so that once the sheet is calculated only one row is eligible to be the active row, based on some calculation involving the user's selected item.
NOTE: If MultipleInsert is enabled for the DynamicCMColumn tag, then the process will check for all matching rows, instead of stopping at the first matching row in the column.
-
-
If the InsertCM tag in the active row is configured to allow calc method insertion, then a calc method is inserted as follows:
-
If only one calc method is valid for insertion at that location, that calc method is inserted. If the MaxInsertCount parameter of the InsertCM tag is 0 or above, then the user is first prompted to specify how many instances of the calc method they want to insert, up to the specified limit. If this parameter is blank, then the user will not be prompted and only one instance of the calc method will be inserted.
-
If multiple calc methods are valid for insertion at that location, then the Insert Calc Method dialog opens, so that the user can select which calc method to use. This dialog contains an option to specify multiple items to insert if desired (the MaxInsertCount limit specified in the InsertCM tag, if any, will be honored).
-
If the selected calc method uses variables, a calc method form is presented to the user before the calc method is inserted.
-
The calc method is inserted either above or below the active row, as configured in the InsertCM tag. The user's selected item and any variable values are placed within the inserted calc method as applicable (if the DynamicCMColumn tag has a defined CalcMethodDestination, and if the inserted calc method has defined variables). If applicable, action tags are processed after the calc method insertion as normal.
In the InsertCM example above, the row is configured for insert, and Input Monthly is the only allowed calc method. The InsertCM tag is not configured to prompt for multiple lines, and the calc method does not use variables, so the Input Monthly calc method is automatically inserted with no further input required from the user. The calc method is inserted above the current row. The DynamicCMColumn tag has a defined CalcMethodDestination of F1, so the selected item is placed in the first row of the calc method, in column F.
NOTE: If MultipleInsert is enabled for the DynamicCMColumn tag, then calc method insertion will only take place if all matching rows meet the requirements as described in the previous section. Essentially, the insertion must be able to occur without requiring any further input from the user.
-
-
If the InsertCM tag in the active row is configured for GoTo (or Change), then the user is taken to the active row and no further action is taken.
For example, if the active row was instead configured like this, then the user would simply be taken to the active row:
[InsertCM;;Input Monthly;;GoTo;;;InsertHere]
NOTE: If MultipleInsert is enabled for the DynamicCMColumn tag, then any rows configured for GoTo or Change are ignored.
-
If no active row is found, then the user is informed that the insertion cannot occur. This occurs if:
- The DynamicCMColumn has a defined dynamic marker, but no InsertCM tags in the column contain the marker.
- The DynamicCMColumn does not have a defined dynamic marker, and no InsertCM tags were found in the column.
