AX1334
plan file processes for a file group
You can create plan file processes for a file group to manage a planning process. Plan file processes are associated with the file group and stored within the Process Definitions folder of the file group.
Plan file processes use a special kind of process known as a plan file process definition. Plan file process definitions are dedicated to progressing plan files through a defined set of steps. These processes can only contain steps relating to editing plan files and approving plan files. For more information on how plan file processes work, see About plan file processes.
Only administrators and users with the appropriate file access permissions (as defined on the Files tab of the Security Management dialog) can manage process definitions for a file group. In order to create new process definitions, non-admin users must have Read/Write access to the Process Definitions folder for the file group (or a subfolder).
To create a plan file process definition for a file group:
-
In the Explorer task pane, expand the file group and then right-click the Process Definitions item. Select New > Plan File Process Definition.
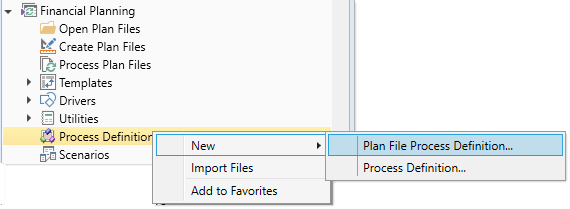
TIP: You can also create new plan file process definitions from the file group button in the Axiom ribbon tab (if the file group is listed there), or by going to Manage > Process Management > Process Definitions. In systems with installed products, this feature may be located on the Admin tab.
The Edit Process dialog opens. As you are working in this dialog, any validation errors for missing or invalid settings will display at the bottom of the dialog. You can save the process definition with configuration errors, however, you will not be able to start the process until all configuration errors are resolved.
-
In the Process Properties tab, complete the general process settings as desired, such as the process name and the process owner. For more information on these settings, see Plan file process definition properties.
If the plan file process is for an on-demand file group, then the following additional settings are available in the On Demand Properties section:
-
Enable aborting plan file processes: On-demand processes can optionally allow approval step owners to abort a plan file in the process, meaning the item is denied. To use this feature, it must be enabled at the overall process level and then for the individual steps where you want to permit it. For more information, see Enabling the "deny request" option for a plan file process.
-
Process Initiator Column: On-demand processes can optionally designate a column to be used to set the process initiator when a plan file is started in the process. For more information, see Setting the process initiator for plan files.
-
-
In the Process Steps tab, define the steps for the process.
-
To add a step, click Add and then select the type of step to add. New steps are added after the step that you currently have selected in the list. Plan file process definitions can only use the following step types:
- Edit Plan File Process Step
- Approval Process Step (plan file processes)
- Multiple Approvals Process Step (plan file processes)
If the currently selected step is a Multiple Approvals step, then the new step can only be an Approval step and it is added as a sub-step to the Multiple Approvals step. In this case, if you want to add a new top-level step that comes after the Multiple Approvals step, you must click Add After Current Step and then select the type of step to add.
-
To remove a step, select that step and then click Delete. If the deleted step has child steps, those steps are removed as well.
-
To change the order of steps, you can drag and drop them to different locations in the list.
-
To copy a step, select the step and then click Duplicate. You can then modify the copied step as needed and move it to the desired location in the list.
Steps are performed in the order listed. By default, steps are dependent and sequential—meaning, each step in the list must be completed before the next step can be done. The exception is the Multiple Approvals step. When a Multiple Approvals step becomes active for a plan file, all of its Approval sub-steps become active concurrently and can be completed in any order. When all of the Approval sub-steps are completed, then the parent Multiple Approval step becomes completed and the plan file moves to the next step in the process. (Unless one of the Approval sub-steps is rejected, in which case the plan file is rejected back to a prior step.)
Once you have added a step to the process, you can configure the settings for that step in the right-hand pane. This includes the display text for the step, the step ownership assignment and due date, and other properties specific to the step type. You can also configure step-specific notification settings.
NOTE: If you want certain plan files in the process to skip a step, this is not configured in the step properties. Instead, it is controlled by using dynamic ownership assignments. If the ownership assignment for a step uses an assignment column or an assignment workbook, you can leave the assignment blank for a plan file instead of entering an owner name, to indicate that the plan file should skip the step.
For more information on configuring the steps in the process, see the following topics:
- Assigning owners to plan file process steps
- Defining the due date for plan file process steps
- Configuring rejection behavior for a plan file process
-
Defining notifications at the step level for a plan file process
TIP: In most cases, you should configure the process-level notification settings on the Notifications tab before configuring any step-level notification settings. This way the steps will have access to the inherited process-level settings.
-
-
In the Notifications tab, complete the notification settings for the process. You can enable or disable notifications for the process, define the default notification delivery method, and define default notifications to apply to the steps in the process. For more information, see Configuring notifications for a plan file process.
-
In the Web Configuration tab, complete the configuration settings for the Web Client process pages. For more information, see Configuring process web pages for plan file processes.
If your plan files are form-enabled and end users will be accessing them using the Web Client, then you should review and complete all web configuration settings as needed. If your plan files are traditional spreadsheet files and users will be accessing them using the Desktop Client, then you only need to complete these settings if users will be completing tasks in the Web Client, or if you want to customize the Time-in-Step report with refresh variables.
-
In the Advanced Properties tab, complete the advanced options as needed. This tab is only present for plan file processes in standard file groups. On-demand file groups cannot use these options.
-
Process Grouping Options: You can optionally specify a grouping column for the process, so that the process can be started and managed separately for each group. Specific owners can be designated to manage each group. For more information, see Managing a plan file process by groups.
-
Process Filter Options: You can optionally specify a filter to apply to the process, so that only plan files that meet the filter can be started in the process. For more information, see Using a process filter to limit plan files in the process.
-
-
Click Apply to save (or OK if you are finished editing).
Plan file process definitions display with a special icon in the Process Definitions folder of the file group, so that you can tell the difference between plan file process definitions and general process definitions:

|
General process definition | |

|
Plan file process definition |
Configuring the file group to use the plan file process definition
After creating a plan file process definition, you may want to edit the file group properties of the file group to designate the process as the Plan File Process for the file group. This setting is used as follows:
-
If the file group is an on-demand file group, then when new plan files are created, they are automatically started in the process designated as the Plan File Process (assuming that process is active).
-
Various process web pages and components use the Plan File Process setting to determine which process to show in the page. For example, this applies to the Process Directory page, the Process Tasks page, and the Process Summary component for Axiom forms.
Only administrators and users with one of the following security permissions can edit file group properties: Administer File Groups and Modify File Group.
To designate the Plan File Process for a file group:
-
In the Explorer task pane, right-click the file group and select Edit.
TIP: You can also access the file group properties from Manage > File Groups or by using the file group menu on the Axiom ribbon tab (if the file group is present on the ribbon).
-
In the Edit File Group dialog, select the Options tab.
-
In the Process Options section of the tab, complete the Plan File Process field. Click Browse to select any plan file process definition that exists in the Process Definitions folder for the current file group.
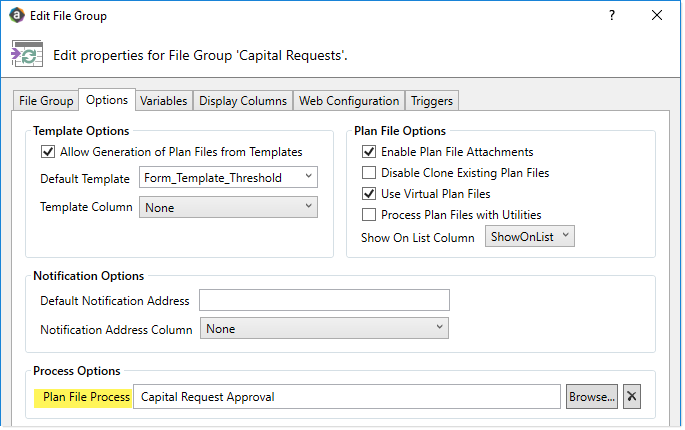
- Click Apply to save (or OK if you are finished editing).
