AX2745
Defining stages for a workflow
Each workflow consists of one or more stages that plan files progress through. For each stage, each plan file is assigned a stage owner to be responsible for the plan file while it is in that stage. Stage owners can be individual users or roles.
There are two types of stages:
- Edit stage: Owners of edit stages have read/write access to plan files, and can save plan data to the database. It is assumed that users will be developing plans and making changes to plan files. Users can submit their files to the next stage, but cannot send files back to the prior stage.
- Review stage: Owners of review stages have read-only access to plan files, unless read/write access is explicitly granted for the stage. It assumed that users will be reviewing the plan files, and then either approving them to send the files to the next stage, or rejecting them to send the files back to the prior stage.
NOTE: If you are defining a workflow for an on-demand file group or a "copy target" file group, certain design considerations apply. For more information, see Workflow design considerations.
To create workflow stages:
-
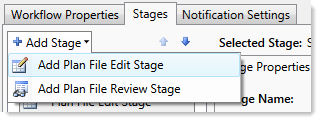
In the Edit Workflow dialog, in the Stages tab, click the Add Stage button. From the drop-down list, select one of the following:
- Add Plan File Edit Stage
- Add Plan File Review Stage.
The new stage is added to the stages pane in the left-hand side of the dialog.
NOTE: The first stage of a workflow should not be a review stage. Review stages allow the stage owner to either approve the file to the next stage or reject the file to the prior stage. If the first stage is a review stage, then there is no prior stage to reject to. If you want the workflow to start with a review process, then you should create an edit stage for the first stage and a review stage for the second stage. You can then use the advanced workflow settings (Specify alternate workflow start stage) to start the workflow at stage two instead of stage one. Even though the workflow will start at stage two, you must still complete ownership details for stage one in case any plan files are rejected as part of the review.
-
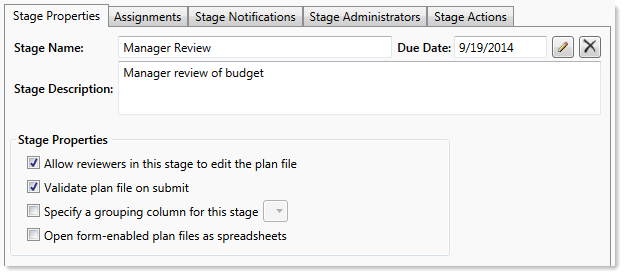
In the right-hand side of the dialog, on the Stage Properties sub-tab, define the basic details for the stage:
Item Description Stage Name
The name of the stage. This name will display to users in the Workflow task pane, and in other workflow-related dialogs.
Stage Description
The description for the stage. By default this description does not display to users in any dialogs, though it can be queried into reports.
Due Date
The date by which the stage must be completed. Any plan files that are still in this stage past this date will be considered overdue. The stage due date can be a specific date, or a relative date. For more information, see Defining the due date for a stage.
Allow reviewers in this stage to edit the plan file
Specifies whether reviewers in this stage can also edit the file. Applies to review stages only.
- If enabled (default), then reviewers will have read/write access to plan files, and can make edits in addition to reviewing.
- If not enabled, reviewers will have read-only access by default (unless a user has been assigned a higher level of rights in Security).
Validate plan file on submit
Specifies whether plan files must be validated and saved before the workflow task can be completed. This only applies when tasks are completed by using the Workflow task pane; if tasks are completed as part of a file save, then the validation occurs by default.
- If enabled (default), then plan files are validated for save errors and then saved before completing the task. If the validation fails then the task cannot be completed.
- If not enabled, then the workflow task is completed without performing any validation or save actions on the plan file.
For review stages, this only applies if Allow reviewers in the stage to edit the plan file is enabled.
Specify a grouping column for this stage
If desired, you can specify a grouping column to group the tasks for this stage. This will cause the tasks to be displayed in groups in the Workflow task pane, and users have the option to complete the tasks as a group. For example, you can specify DEPT.Manager to group tasks by manager, or DEPT.Region to group tasks by region.
To use this feature, select the check box and then select the grouping column from the drop-down list. You can select any grouping column in the plan code table. For more information, see Using groupings for a stage.
Open form-enabled plan files as spreadsheets
By default, form-enabled plan files are opened as forms from the Workflow task pane. If this option is enabled, then the plan file will be opened as a spreadsheet instead. The document link in the email notification (if applicable) will also honor this setting.
You might use this option for a review stage, where finance users need to view information in the spreadsheet source file instead of only seeing what is displayed in the form view.
- On the Assignments sub-tab, assign the plan file owners for the stage. For more information, see Defining ownership assignments for workflow stages.
- Optional. On the Stage Notifications sub-tab, you can customize the notification emails used when plan files enter this stage. For more information, see Customizing workflow notification emails.
- Optional. On the Stage Administrators sub-tab, you can specify one or more stage administrators for the stage. For more information, see Assigning a stage administrator.
- Optional. On the Stage Actions sub-tab, you can set up stage actions for the stage. For more information, see Setting up stage actions.
-
Repeat steps 1-6 for each stage that you want in the workflow.
Plan files will progress through stages in the order that the stages are listed in the Edit Workflow dialog. If you need to change the order of the stages, select a stage and then click Move Up
 or Move Down
  .
. - When you are finished editing, click Apply (or OK if you are finished editing the workflow).
Editing and deleting workflow stages
To edit a workflow stage, select the stage in the Stages tab of the Edit Workflow dialog. You can change stage details such as the name or due date, or change ownership assignments. See Defining ownership assignments for workflow stages for more details on the options available to create or change ownership assignments.
If the workflow has not yet been activated, you can make any changes to the workflow stages, including changing the stage order (Move Up ![]() or Move Down
or Move Down ![]() ). To delete a workflow stage, click the delete button
). To delete a workflow stage, click the delete button ![]() in the top right-hand corner of the stage.
in the top right-hand corner of the stage.
For more information on considerations for editing workflow stages after the workflow has been activated, see Modifying active workflows.