AX1426
Manage roles in Axiom Security using Save Type 4
Using Save Type 4, you can create or edit Axiom security roles by using save-to-database within a spreadsheet, rather than using the security administration tools. This may be a more convenient approach if you need to create or edit roles as part of an automated process.
NOTE: Although both features allow security edits within a spreadsheet environment, Save Type 4 is intended to be used for a different purpose than Open Security in Spreadsheet. Open Security in Spreadsheet is a system-controlled environment that is intended for one-time edits to security. Save Type 4 is intended to handle custom security management needs, such as automating ongoing security updates based on external sources.
Save Type 4 depends on the placement of save-to-database tags within the sheet. There are three components:
- The primary SaveStructure2DB tag, which defines the locations of the save-to-database control row and control column, and specifies the desired operation.
- Column tags in the save-to-database control row to specify the columns which hold the role properties.
- Row tags in the save-to-database control column to flag rows to be saved.
| Tag Type | Tag Syntax |
|---|---|
|
Primary tag |
[SaveStructure2DB;Axiom.Roles;CustomSaveTag=Name] |
|
Row tags |
[Save] |
|
Column tags |
Any supported property exposed from Axiom.Roles. |
NOTES:
- You must enable Save Type 4 for the sheet on the file's Control Sheet for the save process to occur.
- You can only modify general role properties and table-related security permissions, from the Tables tab of security, using Save Type 4.
- The user performing the save must be an admin or have the Administer Security permission. Subsystem admins cannot create or edit roles using Save Type 4.
Place the primary save-to-database tag in the sheet
To define the save-to-database process, place the following tag in any cell in the sheet, within the first 500 rows:
[SaveStructure2DB;Axiom.Roles]
The row containing SaveStructure2DB becomes the control row and the column containing SaveStructure2DB becomes the control column.
You can also optionally use the custom save tag parameter. For example:
[SaveStructure2DB;Axiom.Roles;CustomSaveTag=SaveRole]
NOTES:
-
The primary SaveStructure2DB tag must be located in the first 500 rows of the sheet.
-
The SaveStructure2DB tag can be placed within a formula as long as the starting bracket and identifying tag are present as a whole within the formula.
Define the role properties in the control row
Within the control row for the save-to-database process, specify the columns that define the role properties by placing the reserved names from Axiom.Roles in any column. The column tags can be placed to either the right or the left of the SaveStructure2DB tag.
At minimum, you must include the following properties on the control row to create a new role. All other role properties use the default value if omitted from the save.
- RoleID (set this to 0; the ID will be automatically assigned when saving)
- RoleName
NOTE: If RoleID is set to 0 but the RoleName matches an existing role name, that existing role is updated instead of creating a new role.
When updating an existing role, you must include the RoleName and the RoleID in the save to identify the role to update. You can modify any of the following role properties:
- RoleName
- Description
- TableType and Table permission columns
- AssignedSubsystem
The control row must be dedicated to containing only valid column names for the Save Type 4 operation to the target table. Any invalid entries in the control row produces an error when saving.
NOTE: If you include a TableType or Table permission column in the control row but leave it blank in the save, this is interpreted as setting the permission to no access. Alternatively, if you want the role to default to no configured permission for the table or table type, you should either not include the column in the control row or include it but set the value to NotConfigured.
IMPORTANT: For performance reasons, only a small number of table and table type filters are validated when creating or editing roles by Save Type 4. Additionally, any text in table or table type permission columns that does not match the reserved permission values (such as NotConfigured or FullAccess) is interpreted as filter text. Use caution when setting up and using this feature as it can be quite easy to save invalid filters. We recommend running the Validate Security Filters utility after saving to catch any invalid filters. Run this utility with the Run QA Diagnostics command.
Flag the rows to be saved
Within the control column for the save-to-database process, mark each row that you want to be saved with a [Save] tag. This is the only valid tag for the save. You cannot delete roles using Save Type 4.
If you have defined a custom save tag in the SaveStructure2DB tag, you must mark the rows with that tag instead of the default tag. For example, if your primary tag is [SaveStructure2DB; Axiom.Roles; CustomSaveTag=MySave], you would place the tag [MySave] in the rows that you wanted to be saved.
Only rows that are marked with a valid tag are processed; all other rows are ignored, even if there is content in the property columns. If a row contains a valid tag but no content exists in the property columns, a save error occurs.
NOTE: The row tag can be placed within a formula, if desired.
Populate the role properties in the spreadsheet
In the property columns, enter the relevant role properties for each Axiom Platform role that you want to create or update. Typically, this process would be automated by using an Axiom query to the Axiom.Roles table to bring in properties for existing roles.
The following example shows a spreadsheet set up to query existing role properties from Axiom.Roles and then save changes back using Save Type 4. To edit any of the existing roles, you would edit the properties in the spreadsheet and then enter a [save] tag into column B. A new role is also being added in row 13.
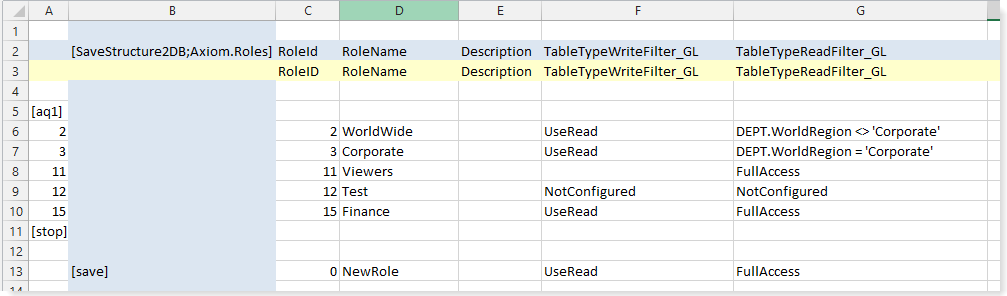
Example of Save Type 4 to Axiom.Roles
