AX1256
Editing hierarchy assignments
Using the Dimension Editor, you can edit the hierarchy assignments for the individual items in a table. For example, if a hierarchy has a structure of VP > Manager > Dept, then each individual department in the DEPT table must have an assigned VP name and an assigned Manager name to determine its place in the hierarchy. While these assignments can also be edited using Open Table in Spreadsheet, the Dimension Editor provides an alternate interface that presents the hierarchy assignments in a treeview and allows drag-and-drop editing.
Example
Using the Dimension Editor may be easier and more intuitive for making certain kinds of edits to hierarchy assignments. For example:
-
Imagine that one of your VPs has left the company and is being replaced by a new VP. In Open Table in Spreadsheet, you would need to find all instances of the old name in the VP column and then replace it with the new name. In the Dimension Editor, you can simply rename the appropriate VP node in the hierarchy to reflect the new name. When you save the change in the Dimension Editor, Axiom will update the VP column in the DEPT table as appropriate for this change.
-
Imagine that one of your VP positions is being reorganized so that half of the managers who used to report to that VP are now reporting to a new VP position. In the Dimension Editor, you can first create a new VP node for the new position. Then you can expand the VP node for the reorganized position, and then drag-and-drop items as appropriate from that VP to the new VP. When you save the change in the Dimension Editor, Axiom will update the VP column in the DEPT table for the changed assignments. Although you could also make this change in Open Table in Spreadsheet, it is probably easier to visualize the changes in the Dimension Editor and it requires fewer steps to make all changes.
The Dimension Editor is accessible from the Dimension Manager:
-
From the Axiom tab, in the Administration group, click Tables > Table Administration > Dimension Manager.
-
In the left-hand pane of the Dimension Manager, select the hierarchy where you want to edit the hierarchy assignments. You can use the View by drop-down and the Filter box to help find the hierarchy that you are looking for.
- In the right-hand pane of the Dimension Manager, click Edit hierarchy assignments.
Only administrators and users with the Administer Tables permission can access the Dimension Manager.
NOTE: Because changes made in the Dimension Editor will be applied to the underlying table when saved, opening the Dimension Editor locks the table to the current user (in the same way that opening the table using Open Table in Spreadsheet locks the table). Similarly, if the table is already locked to another user when you attempt to open the Dimension Editor, then you will be informed that the table is locked and given the option to open the Dimension Editor read-only (to view assignments only).
Dimension Editor overview
The Dimension Editor displays the hierarchy assignments from the underlying table in a treeview. In the following example, the hierarchy starts by displaying the top-level column of VP and the entries in that column (in this case, various VP names). Expanding one of the VP nodes displays the entries for the next level column of Manager that are assigned to that particular VP. Lastly, expanding a Manager node displays the lowest level of the hierarchy, the individual departments assigned to that VP > Manager path.
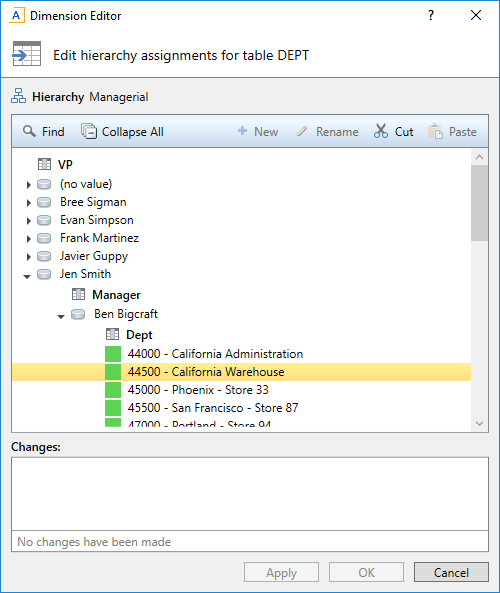
Another way to visualize the hierarchy assignments is to look at the lowest level of the hierarchy and trace its path upwards to see the column entries for a particular department. If you look at Dept 44000 in the Dimension Editor, you can see that the DEPT table for that department would look as follows (for the columns included in this hierarchy):
| Dept | Manager | VP | ||
|---|---|---|---|---|
| 44000 | Ben Bigcraft | Jen Smith |
As you work in the Dimension Editor, if you change anything that would impact the hierarchy column assignments for a particular dimension element, the corresponding entries in the underlying table will be updated when you save the changes. The following examples illustrate what will be updated in the DEPT table when changes are saved:
-
Imagine that Ben Bigcraft leaves the company and Mike Jones is hired as his replacement. If you rename the Ben Bigcraft node to Mike Jones, then the Manager column of the DEPT table will be changed to "Mike Jones" for every department that is currently assigned as follows: VP Jen Smith > Manager Ben Bigcraft. For example, Dept 44000 will look like this after changes are saved:
Dept Manager VP 44000 Mike Jones Jen Smith Keep in mind that Ben Bigcraft may also be assigned as a Manager underneath different VPs—the hierarchy entries are not required to be exclusive. To be sure that you have changed all applicable entries, you can use the Find functionality to search for "Ben Bigcraft".
-
Imagine that the company is reorganized and now Ben Bigcraft reports to a different VP, but the departments he is responsible for remain the same. If you drag and drop the Ben Bigcraft node underneath VP Bree Sigman, then the VP column of the DEPT table will be changed to "Bree Sigman" for every department that is currently assigned as follows: VP Jen Smith > Manager Ben Bigcraft. For example, Dept 44000 will look like this after changes are saved:
Dept Manager VP 44000 Ben Bigcraft Bree Sigman Nodes can only be dragged and dropped to the same level in the hierarchy. In this example, Manager nodes can only be dragged and dropped to the Manager level at other locations in the hierarchy. They cannot be moved to a different level such as VP, because then the departments would not have entries for all levels in the hierarchy.
-
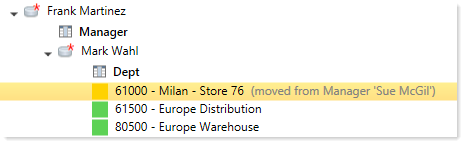
Imagine that the company is reorganized and now department 44000 reports to a different VP > Manager path. If you drag and drop department 44000 so that it is now located under VP Frank Martinez and Manager Mark Wahl, then the VP and Manager columns of the DEPT table will be changed for Dept 44000 as follows:
Dept Manager VP 44000 Mark Wahl Frank Martinez
These are just a few examples of the types of changes you can make in the Dimension Editor, and the corresponding impact on the underlying table. You can also make changes such as creating new entries (or "nodes") within a column and assigning items to those nodes, and even deleting dimension elements from the table.
Moving items to new locations in the hierarchy
Using the Dimension Editor, you can edit the hierarchy assignments by dragging and dropping dimension elements and hierarchy nodes to different locations in the hierarchy treeview, at the same level. For example, if a node is at the second level of a hierarchy, you can drag and drop it underneath a different first-level node, but you cannot "promote" it to the first level or "demote" it to the third level. All items underneath the node will be moved along with it to the new location.
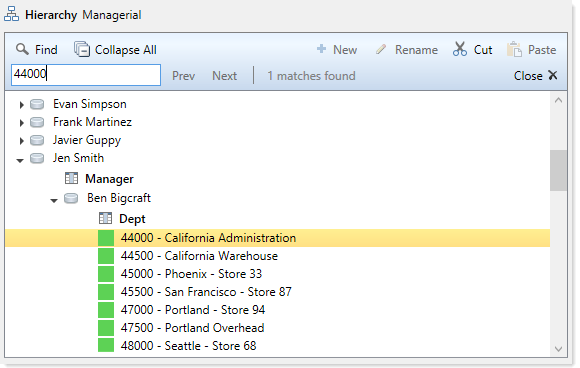
To locate a hierarchy node or individual dimension element in the hierarchy, click Find and then type in the value that you are looking for. If the value matches several items, you can use Prev and Next to move to the next or previous item. When you are done searching, click Close to hide the Find toolbar.
As an alternative to dragging and dropping, you can also use Cut and Paste. This may be useful for situations where you are not sure of the new location in the hierarchy so you need to search for it. For example, imagine you want to move Dept 44000 to Manager Susan Thompson but you are not sure where that manager is located in the hierarchy. You can first cut Dept 44000 from its current location. Then you can use Find to locate Susan Thompson. Once located, you can use Paste to place Dept 44000 in its new location.
NOTE: Hierarchy assignments are not required to be exclusive in Axiom. For example, if you have a manager value of Jane Doe, that manager might roll up to VP Susan Thompson for some departments, and VP Frank Martinez for other departments. If you move the Jane Doe node that is located under VP Susan Thompson to a different VP, only those departments will be assigned to the new VP; the Jane Doe assignments under VP Frank Martinez will be unchanged. If you are unsure whether a value exists at multiple locations of the hierarchy, you can search for that value to check.
Creating new hierarchy values
Using the Dimension Editor, you can create new values for hierarchy columns. For example, if VP is a column in the hierarchy, you can create a new VP value.
Depending on the situation, you might create a new value by renaming an existing value, or by adding an entirely new value. For example, if a VP leaves the company and is being replaced by a new VP, you can simply rename the existing VP value to the new value. This will adjust the hierarchy so that everything that used to be assigned to the old VP is now assigned to the new VP.
On the other hand, if you are adding a new VP position and all the existing VP names are still valid, you would want to add an entirely new value to the VP column. Once you have created the new value, you would then move existing items in the hierarchy to the new VP name as appropriate.
-
Adding a new value: To add a new value, highlight an item in the hierarchy that is at the same level where you want to add an item. Click New
 and select New ColumnName value, where ColumnName is the name of the level for which you are adding a new item. You also have the option of adding items for levels underneath the current level.
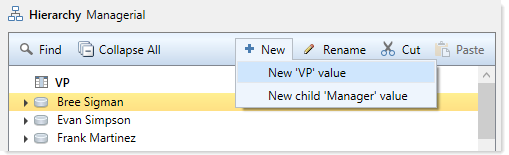
This adds a new node at the current level. You can type in the name for the new node, and then drag and drop items to this node as appropriate.
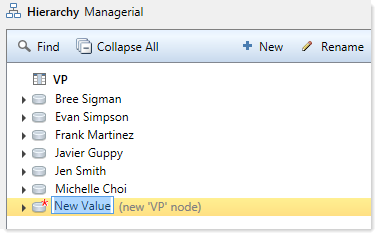
NOTE: New values are only saved if at least one dimension element is assigned to that value. The values displayed in the Dimension Editor represent entries in the hierarchy columns within the underlying table. If a value does not have a place to be written in the table, it will not save.
You can also add new values by using the right-click menu in the hierarchy treeview.
-
Renaming an existing value: To rename an existing value, right-click the item that you want to rename, and then select Rename.
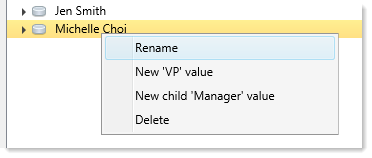
The current value becomes editable and you can type in the new value. All assignments in that current path of the hierarchy will be updated to belong to the new value.
NOTE: Hierarchy assignments are not required to be exclusive in Axiom. For example, if you have a manager value of Jane Doe, that manager might roll up to VP Susan Thompson for some departments, and VP Frank Martinez for other departments. If you rename the Jane Doe node that is located under VP Susan Thompson, then only those departments will be assigned to the new name; the Jane Doe assignments under VP Frank Martinez will be unchanged. If you are unsure whether a value exists at multiple locations of the hierarchy, you can search for that value to check.
Only hierarchy column values can be added or renamed in the Dimension Editor—meaning, values in grouping columns assigned to the hierarchy such as VP or Manager. The individual dimension values (such as departments) cannot be added or renamed using this dialog.
Deleting items from the hierarchy
Using the Dimension Editor, you can delete hierarchy nodes or individual dimension elements.
IMPORTANT: Deleting an item from the hierarchy deletes the corresponding dimension elements (such as departments) from the underlying table (such as DEPT). If you delete a hierarchy node, all dimension elements under that node will be deleted. This action should be used with extreme caution and only when you are absolutely certain that you want to delete these dimension elements.
To delete an item, right-click it and select Delete. A warning message lists the number of rows that will be deleted from the underlying table and prompts you to confirm that you want to delete the item. If you click OK to this warning message, keep in mind that you can still opt to Undo the change or Cancel out of the dialog without saving. However, once you save the change (by clicking Apply or OK for the Dimension Editor), then the dimension elements will be irrevocably deleted from the table if they are eligible to be deleted. Dimension elements will not be deleted if they are referenced by other tables.
Reviewing and undoing changes before saving
As you make changes in the Dimension Editor, these changes are tracked as follows:
-
In the treeview, if a change has been made to a hierarchy node or an individual dimension element, a description of the change displays next to the item in parentheses. If the changed item is a dimension element, the icon changes from green to yellow to indicate the changed status. Also, if a change has occurred anywhere underneath a hierarchy node, a red asterisk displays on the node icon.
-
A running list of all unsaved changes is displayed at the bottom of the Dimension Editor dialog, in the Changes section. The change listed at the bottom is the most recent change. The change directly above it is the next most recent change, and so on. Additionally, the running total displayed over the Changes box shows you how many records in the underlying table will be updated as a result of these changes.
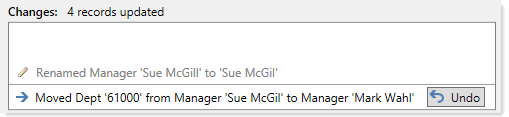
Any change made in the Dimension Editor can be reversed ("undone") as long as it has not yet been saved. Changes must be undone one at a time, starting with the most recent change. Once changes have been saved by clicking Apply or OK, they cannot be undone.
To undo the most recent change, click Undo. Once that change has been reversed, the Undo button is now available for the next change in the list. You can continue reversing changes until you have returned the hierarchy assignments to the desired state. Of course, if you want to reverse all changes that you have made in the Dimension Editor, you can simply click Cancel to exit the dialog without saving.
Saving the changes to the table
When you are finished making changes to the hierarchy assignments, you can save the changes to the underlying table for the hierarchy. The table that will be affected by the changes is listed at the top of the dialog.
Click Apply to save the changes and leave the Dimension Editor open, or click OK if you want to save the changes and are finished editing.
All changes listed in the Changes box will be applied to the table. After the save is complete, the treeview in the Dimension Editor will be updated to reflect the current state of the hierarchy assignments.
