AX2653
Adding multiple related columns
You can add multiple related columns at once by using the Add Multiple Columns feature. This feature is primarily intended to add a series of columns to hold time period data. For example, you might have columns NYB1 through NYB12 to hold twelve months of budget data. (The columns could be literally named that, or more likely you would name the columns something like P1-P12, and then define NYB1-NYB12 as alias names.)
To initially create a set of multiple related columns, the columns must share a naming convention and use the same column properties. Once the columns are created, they have no programmatic relationship to each other. If you want to change the name or other properties for the set of columns, they must be edited individually.
The ability to add columns to a table is limited to administrators and to users with the following security permissions: either the global Administer Tables permission, or the Allow changing table structure permission for individual tables.
To add multiple columns:
-
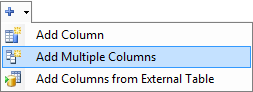
On the Columns tab of the Edit Table dialog, click the down arrow to the right of the Add Column button, and then select Add Multiple Columns.
If you are creating a new table, you can manage columns on the Edit Columns screen of the Create Table wizard.
-
In the Add Multiple Columns dialog, complete the following settings:
Field
Description
Column Prefix
Enter a name to use for all columns in the set. This name is combined with a number to create each individual column.
Start Number
Enter the start number for the set of columns.
End Number
Enter the end number for the set of columns.
Data Type
Select a data type.
Max Length
If the data type is String, enter the maximum length of the string column.
Fixed
If this check box is selected, users cannot use Open Table in Spreadsheet to delete the columns or change column settings.
For example, if the column prefix is P, the start number is 1, and the end number is 12, this process will create 12 columns named P1-P12.
-
Click OK to close the Add Multiple Columns dialog.
The new columns are added to the Edit Table (or Create Table) dialog.
- Click Apply or OK to save your changes.
Once the columns have been created, you can edit them as normal on an individual-column basis. For example, you can add a description to each column.
