Importing data from Ellucian Ethos
Ellucian Ethos is the higher education framework connecting people, process, and applications across the institution to power coordinated programs designed for student success. At the foundation is the Ellucian Data Model, which defines a common language across systems. APIs and business rules enable integration of Ellucian, partner, and institution applications. As an Ellucian partner, Syntellis Performance Solutions makes it easy to import your institution's data into Axiom systems using Ellucian Ethos.
To import Ethos data, you must first create a connection between Ethos and Axiom. This process requires you to enter an API key and execute a job in Axiom to begin the process of importing your Ethos data into Axiom staging tables. After the staging tables are set up with the API key, you will run a job in Axiom that will import Ethos data into the staging tables and then map that data to Axiom product tables. This will ensure that your Ellucian Ethos data is aligned with the correct Axiom counterpart. This help topic will walk you through the details of these steps.
All import activities described in this topic are performed in the Axiom Excel client. Only users with an Axiom System Administrator role can access the Excel client.
Creating a connection between Ellucian Ethos and Axiom
Creating a connection between Ellucian Ethos and Axiom allows you to import your Ellucian Ethos data to Axiom staging tables which will allow the data to be mapped for use by Axiom product tables. This process requires the Ellucian API key generated when you set up Ethos.
To create a connection between Ellucian Ethos and Axiom:
-
In the Explorer task pane, in the Imports Library section, click Ethos Imports.
-
Click on a sub-folder that contains staging tables: EthosFinance, EthosLabor, EthosStudent.
-
Double-click a staging table to open it. Staging table file names begin with "EthosStage Import".
-
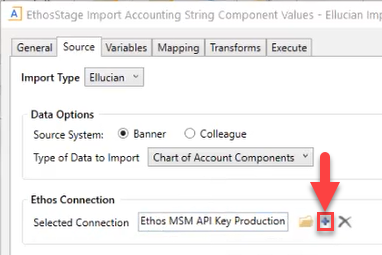
In the staging table dialog that opens, click the Source tab.
-
In the Source tab, in the Ethos Connection section, click the Create a New Connection icon.
-
In the New Connection tab dialog that displays, click the Name text field and type a name for the connection.
-
Click the Ellucian Key text field and enter the Ellucian API key generated when you set up Ethos.
IMPORTANT: You will need to repeat this process for each import staging table. To prevent an excess number of alerts in the event of an import failure, please test the instructions in this help topic using a single staging table first.
TIP: Once you create an API connection in Axiom, you can reuse that same connection for additional tables. Click the folder icon to open a list of existing API connections.

-
Click OK.
-
In the staging table dialog, click OK.
Importing data from Ellucian Ethos to Axiom
After you have entered your Ellucian API key in the import table settings, you can run a job in Axiom to execute the data import. This job will import your designated Ellucian Ethos data into Axiom. Axiom maps the imported Ellucian Ethos data to Axiom product tables during this process.
To import Ellucian Ethos data to Axiom staging tables:
-
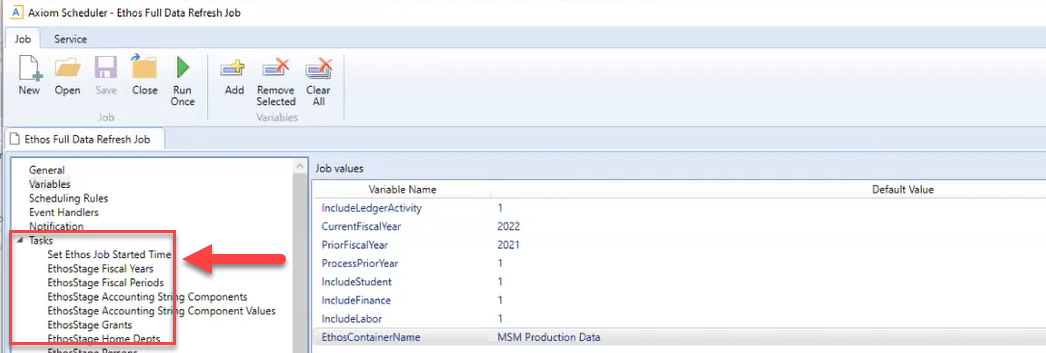
In the Explorer task pane, in the Libraries section, click Scheduler Jobs Library > Ethos Jobs.
-
Double-click Ethos Full Data Refresh Job.
-
To select a staging table, in the left-hand menu, click Tasks > EthosStage [Table Name].
-
In the Job values section, in the Default Value column, double-click the value corresponding to the CurrentFiscalYear variable name and type to enter a new value that updates the current fiscal year setting.
-
In the Job values section, in the Default Value column, double-click the value corresponding to the PriorFiscalYear variable name and type to enter a new value that updates the prior fiscal year setting.
-
In the Job values section, in the Default Value column, double-click the value corresponding to the ProcessPriorYear variable name and type 0 or 1 to indicate whether you want to process the prior year data. For example, if the prior year's books are still open then you would want to bring that in. Type 0 to exclude the prior year data or type 1 to include the prior year data.
-
In the Job values section, in the Default Value column, double-click the value corresponding to the EthosContainerName variable name and type in a name.
-
In the Job values section, in the Default Value column, double-click the values corresponding to the IncludeStudent, IncludeFinance, and IncludeLabor variable names and type 0 or 1 to indicate whether you want to process student, finance, or labor data, respectively. Type 0 to exclude the data or type 1 to include the data. You must include at least one of these variables.
-
Click Run Once.
TIP: This process may take a while to run. We suggest you run it overnight.
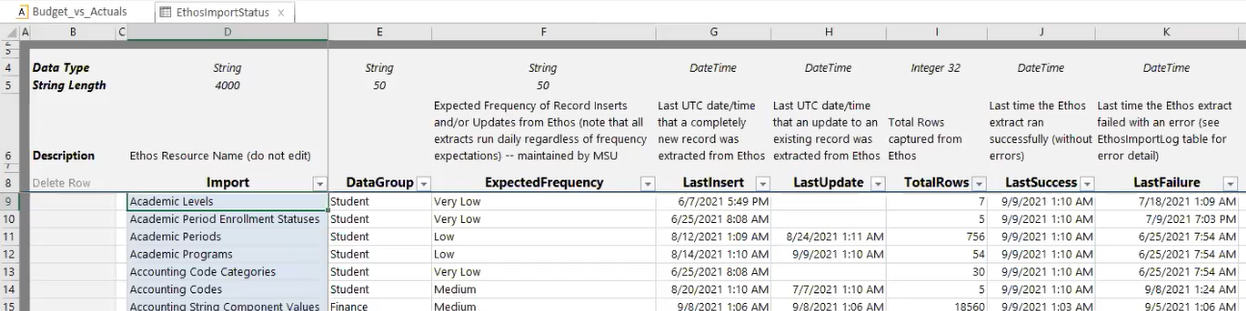
Checking on the status of an import process
The import process may take a while and you probably want to run it overnight. After executing the initial run command, you may want to check on the import process. You can also use these steps to ensure that the expected amount of data was imported.
To check on the status of the import process:
-
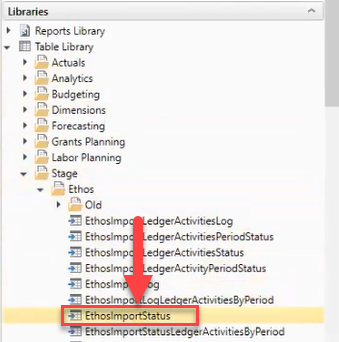
In the Explorer task pane, in the Libraries section, click Table Library > Stage > Ethos.
-
Double-click EthosImportStatus.
-
In the LastSuccess column, review the date and time the an Ethos extract last ran successfully. This should match the last time you ran an import of the table listed in the associated Import column.
TIP: The TotalRows column indicates the number of rows of data imported from Ethos for the associated table in the Import column. You can use this column to ensure that the expected number of rows imported successfully into Axiom.