Configuring drill-down reports
When you view a report with the Columns panel open, the Groupings and Measures tabs display on the left side of the page. (By default, opened reports initially display with the Columns panel closed.)
Report shown in flat view
These tabs contain all of the data elements available for building reports. When building a report, always select at least one item from Groupings and at least one item from Measures.
Organizing groupings and measures
When organizing groupings and measures, you can use the provided folder structure or create your own. You can customize the tabs by adding, deleting, and rearranging folders to organize the groupings and measures data elements as you wish. The folder structure built by one user has no effect on any other user, nor does how you choose to organize the data elements. However, data elements remain within their designated tab, Groupings or Measures, and sort alphabetically within their folder. Measures sort alphabetically first by standard measures, then by calculated fields.
To create a new folder:
-
Determine where the folder should be created.
- To create a main folder, click Groupings (or Measures), and then click Add New.
-
To create a subfolder, first click the main folder, and then click Add New.
A new folder displays, prompting you to name it.
-
Type in the name and press Enter.
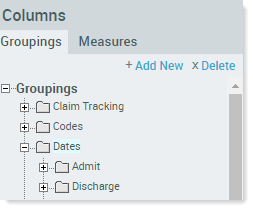
In the following image, Dates is a main folder containing two subfolders: Admit and Discharge.
To delete a folder:
- Click the selected folder.
- At the top of the tab, click Delete.
-
In the confirmation dialog, click OK.
NOTE: You cannot delete a folder with contents. Delete or move the folder’s contents and then delete the folder.
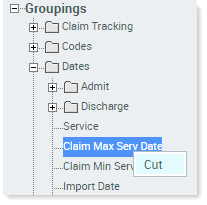
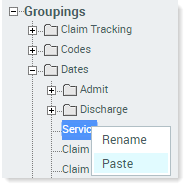
To move data elements between folders, do either of the following:
- Drag-and-drop the data element from its current location to the new folder.
-
Right-click the data element, and click Cut. Then right-click on the new folder location, and click Paste to move the data element.