Profile Filters
To refine the population of encounters referenced by your profile, you can add a Profile Filter.
- In the Profile Manager, select the profile you would like to edit or click +Add Profile in the upper right corner.
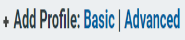
- To add a Profile Filter to this profile, click the Add drop-down menu in the upper right corner of your Profile Manager screen.
- Select the criterion you would like to filter on. See Available Filters for a full list of filter options. Not specifying filter values for any criterion will return all data.
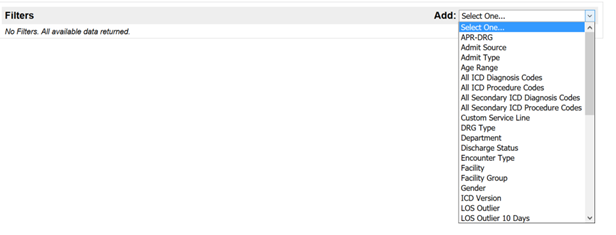
- Choose your "Set Filter By" option. For more information on this feature, see Set Filters By.
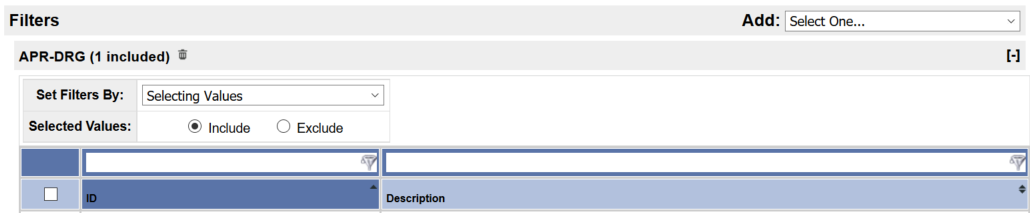
- Choose if you would like the values you select to Include or Exclude the associated encounters. See Inclusion vs Exclusion for a visual explanation of these options.
- Check the box(es) to the left of the values you would like applied to the filter.
- As with tables elsewhere in Clinical Analytics, you can filter a column by typing in the white box in the table header.
- Clicking the very top check-box gives you an option to "Check (or Clear) Everything" (all items on all pages of the table) or "Check (or Clear) Visible" (all items on the current page).
- Click a column header name to sort the table by that column.
- When you have finished applying filters and defining your other profile options, click Save in the lower left to return to the Profile Manager page. Clicking Cancel will exit the editor without saving changes.
- In Scorecards, click the green check in the upper right corner to exit the Profile Manager and be taken back to your scorecard.
- In PPE and Facility Reporting, click another tab to exit the Profile Manager.


Additional functions
- Click the [-] to collapse the filter options.

- Click [+] to expand the filter selections.

- Click the trashcan to delete the filter so encounters for all values of that field will be included.