AX1564
Export Wizard: Destination tab
Use the Destination tab of the Export Wizard to specify the export destination and configure the necessary destination properties. You can export data to the following destinations:
- External database (SQL Server or Oracle)
- Delimited file
The destination properties differ depending on the selected destination type.
Exporting data to an external database
Complete the following settings to export data to a target table in an external database.
| Item | Description |
|---|---|
|
Remote Destination |
Select either SQL Server or Oracle. |
|
Remote Data Connection |
If your Axiom system is hosted on the Axiom Cloud, then you must specify a remote data connection in order to connect with the external database. You can select any remote data connection that has been set up in Scheduler. |
|
Server |
|
|
Database |
Enter the name of the external database. This setting only applies if the database is SQL Server. |
|
User |
Enter the user name to use to connect to the external database. For SQL Server, the user credentials must be for a SQL Server account; network domain credentials cannot be used. NOTE: The user credentials must have the appropriate permissions to perform the table actions for the export in that database. |
|
Password |
Enter the password to use to connect to the external database. NOTE: The password must be re-entered whenever any of the other connection properties are changed. |
|
Target Table |
Specify the name of the table to create or update in the destination database. If desired, you can use the Choose Table button You can update an existing table or create a new table. The behavior is determined by the setting Drop and Create Destination Table. Note that if "drop and create" is not enabled for the export, then the table must already exist in the destination database because the export will not create it. You can either manually create the table in the destination database before running the export, or you can run the export once with "drop and create" enabled to initially create the table, then disable the option for future executions to update the existing table. |
|
Drop and Create Destination Table |
Specifies whether the destination table is created or updated.
|
|
Truncate Destination Table |
Specifies whether the existing rows in the destination table are deleted before updating the table with new data from the export. Only applies if the export is configured to update an existing table (Drop and Create Destination Table is disabled).
NOTE: New data rows are added "as is", without validating for duplicate keys or other constraints. This option should only be used if you are confident that new data will not conflict with existing data. |
Once the connection information is completed, you can click Test connection to test the connection information for the external database. The Status updates to show either a success message or an error message.
NOTE: The test connection requires the user to have the highest level of permissions that could potentially be used by the export (permission to drop and create tables). If the specified user does not have this level of permissions, the test connection will fail. However, if "drop and create" is not enabled for the export, then the export may succeed even though the test connection failed.
Exporting data to a delimited file
NOTE: The ability to export data to a delimited file using an export utility is only supported for Axiom Cloud systems using a remote data connection. As an alternative, on-premise systems can use the File Processing feature instead.
Complete the following settings to export data to a delimited file.
| Item | Description |
|---|---|
|
Remote Destination |
Select Delimited File to export data to a delimited text file. |
|
Remote Data Connection |
Select a remote data connection to use for the export. You can use any remote data connection that has been set up in Scheduler. |
|
Folder path |
Enter the folder path where you want the destination file to be saved. You can type the path or click the folder icon to navigate to the desired path. The folder path must be a UNC path (i.e. \\servername\foldername). If you enter a mapped drive, it will automatically be converted to a UNC path. The folder path must be accessible to the Axiom Cloud Integration Service. |
|
File name |
Enter the name of the delimited file for the export to create. By default, comma-delimited files are saved as CSV format, and all other delimiters are saved as TXT format. If you want a comma-delimited file to be saved as TXT format instead, then include the file extension on the file name. |
|
First row has column names |
Select this option if you want the first row of the delimited file to contain column names. |
|
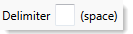
Delimiter |
In the box to the right of the option, enter the delimiting character to use in the export file. For example, to delimit by a pipe character, enter a pipe character into the box. By default, the delimiter is set to comma.
If you want to use a space or tab as the delimiting character, place your cursor in the box and press the space bar or the tab key. The character will be indicated in parentheses to the right of the box (since the character is not visible in this case).
|
|
Text Qualifier |
By default, the character used as the text qualifier is double quotation marks ("). If desired, you can enter a different character as the text qualifier, or you can clear the field if you do not want to use a text qualifier. The text qualifier is used when values in the data may contain the delimiting character. For example, when the delimiting character is a comma, but the data contains values such as full names with a comma (for example: "Doe, Jane"). When the delimited file is created by the export, the value with the comma will be wrapped in quotation marks so that the comma is not read as a delimiter. |
|
Compress |
Select this option if you want the export file to be compressed. If enabled, the export generates a ZIP file that contains the export file. |