AX2574
Creating a Scheduler job to import users from Active Directory
Once Active Directory synchronization has been enabled for your system, you must create a Scheduler job in order to import users from Active Directory into Axiom Financial Institutions Suite.
The Scheduler job must contain an Active Directory Import task. Each import task can import users from a single Active Directory domain into the current Axiom Financial Institutions Suite system. The import task specifies the Active Directory domain and groups to import, and role mappings for those groups. When setting up the job, you can configure a scheduling rule so that it runs nightly, weekly, or whatever frequency is appropriate for your organization.
If you need to import users from multiple Active Directory domains, then you must create an import task for each domain. You can create a single Scheduler job with multiple import tasks, or you can separate the import tasks into multiple Scheduler jobs. If all of the import tasks can use the same schedule, then it is easiest to create a single job with multiple tasks.
For Axiom Cloud systems, the Active Directory Import task can import users from your local Active Directory by use of the Axiom Cloud Integration Service. If you have a remote data connection that is enabled for user authentication, this task will use that connection when the job is executed by Scheduler.
Before you begin
Before creating the job, you should make sure you are prepared with the following information:
-
The name of your Active Directory domain, or the server name that hosts Active Directory. You will need to specify one of these to identify the source domain for the import.
-
The user credentials to use to access Active Directory. You can specify a user name and password, or you can use the credentials of the Axiom service that is performing the process.
-
The groups to import from Active Directory. You must know the names of the groups that you want to import from Active Directory. All users in the selected groups will be imported into Axiom Financial Institutions Suite. If you do not have groups that exactly correspond with the users that you want to create in Axiom Financial Institutions Suite, you may need to work with your Information Technology department to create new groups or refine existing groups.
-
The Axiom Financial Institutions Suite roles, subsystems, user license types, and authentication types for each imported group. When users are imported, they can be automatically assigned to one or more roles and subsystems in Axiom Financial Institutions Suite, and assigned a user license type and an authentication type. Make sure you know which options to use.
Creating the job
In order to create a Scheduler job, you must be an administrator or have the Scheduled Jobs User security permission. Non-admin users must also have read/write access to at least one folder in the Scheduler Jobs Library.
Scheduler jobs can only be created in the Desktop Client General term for using either the Excel Client or the Windows Client, both of which are installed to the user's desktop.. Although you can view the status of existing jobs in the Web Client, you cannot create new jobs in that environment.
IMPORTANT: The Active Directory Import task can only be executed by a user who has permission to create users in security—an administrator, a subsystem administrator, or a user with the Administer Security permission. If you plan to schedule the job for automated execution, the job owner must have the required permissions to execute the task. The job owner is the user who last saved the job. Effectively, this means that the job must be created by a user with the required permissions. If the job is created by a user who does not have the required permissions, then the job must be saved by a user with the required permissions in order to re-set the job owner. You can see the current job owner for the job in the Job Variables section of the job properties.
To create an Active Directory Import job in Scheduler:
-
On the Axiom tab, in the Administration group, click Manage > Scheduler.
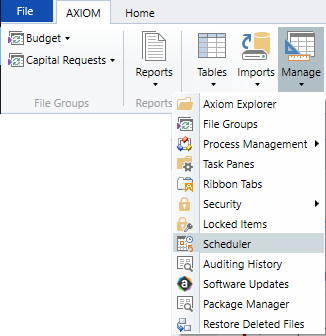
Scheduler on default Axiom ribbon tab
In systems with installed products, this feature may be located on the Admin tab. In the System Management group, click Scheduler.
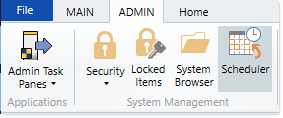
Scheduler on Admin tab (example product ribbon)
-
In the Scheduler dialog, click New.
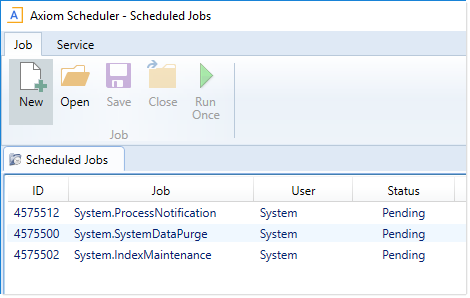
A new job is opened in the dialog, with a tab name of New Job.
-
Click Add > Active Directory Import to add the task to the new job.
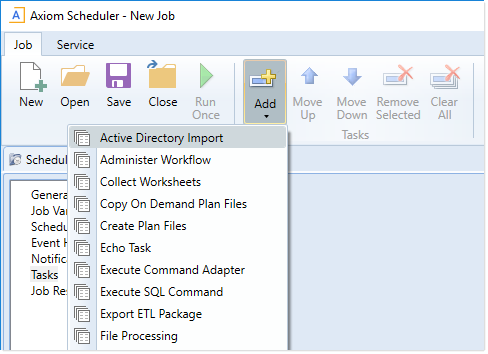
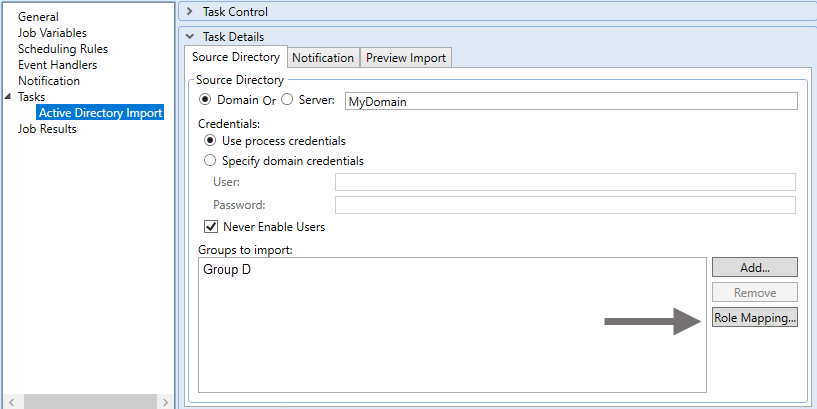
The task is added to the job, and you can now configure the task properties. In the Task Details section, the task has three tabs: Source Directory, Notification, and Preview Import.
-
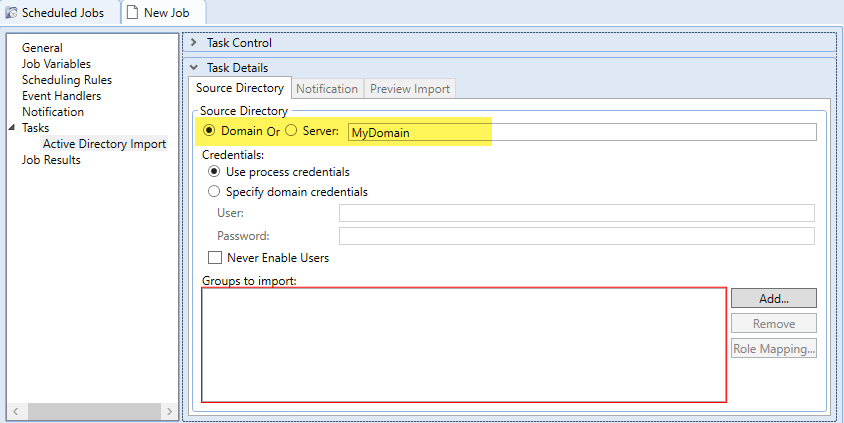
On the Source Directory tab of the Task Details, select either Domain or Server to specify the source domain for the import.
- If you select Domain, enter the name of the domain.
- If you select Server, enter the name of the domain controller server.
The server option is available in case you are not currently logged into the source domain, and your current domain does not have access to the source domain. In this case, you must use domain credentials in order to access the source domain.
Only one domain can be selected per import task. If you want to import users from multiple domains into an Axiom Financial Institutions Suite system, then you must create multiple import tasks.
-
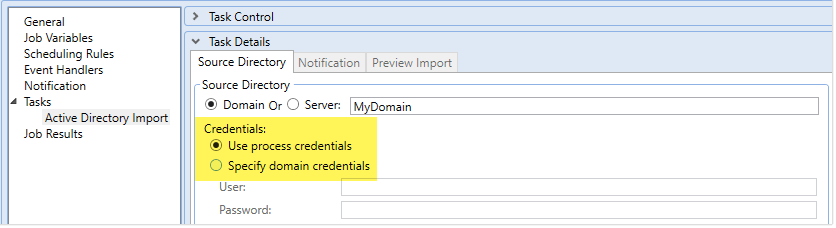
For Credentials, specify the user credentials to use when accessing Active Directory for the import. Select one of the following:
-
Use process credentials: (Default) Use the credentials of the network service account for Axiom Scheduler Server (on-premise installations) or Axiom Cloud Integration Service (Axiom Cloud systems).
-
Specify domain credentials: Enter the credentials of a specified domain User and Password. This option is required if you identified the source domain using the server name instead of the domain name.
-
-
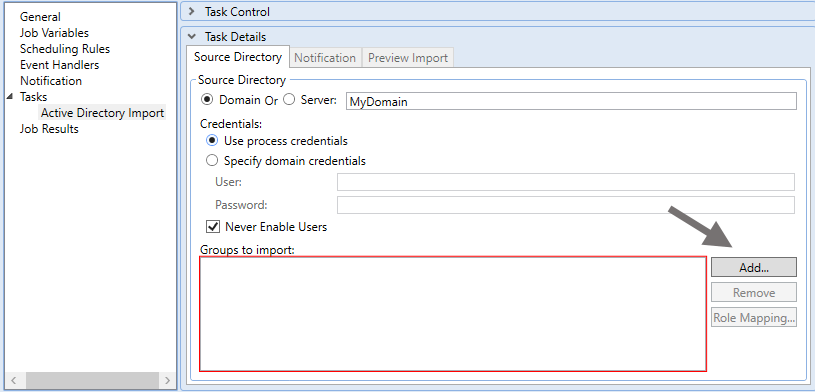
If you do not want new and synchronized users to be automatically enabled by the import, select Never Enable Users. This option works as follows:
-
If unchecked (default), then newly imported users are enabled as part of the import. Additionally, any existing imported users who have been changed to disabled are re-enabled.
-
If checked, then newly imported users are not enabled as part of the import. A security administrator must modify the security settings after the import is complete to enable the new users. Existing imported users retain their current enabled status.
We recommend enabling this option because in most cases it is necessary for a security administrator to make further changes to security settings before the user account is fully ready for use. Additionally, if your system uses subsystems, any newly imported users will not be able to log in anyway, since the import does not assign users to a subsystem.

-
-
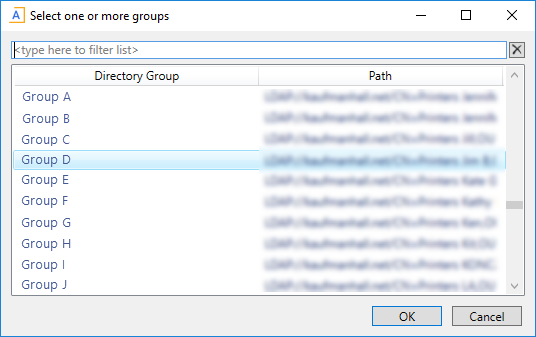
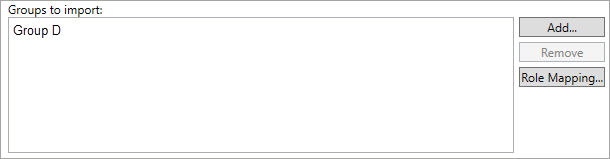
In the Groups to import section, click Add to select one or more groups to import.
The Select Groups dialog opens, displaying a list of groups from the source domain.
-
Select the group or groups that you want to add, and then click OK. You can use the search box at the top of the dialog to find a group by name. You can use the SHIFT or CTRL keys to select multiple groups in the list.
-
The selected group(s) display in the Groups to import box. If you have added a group by mistake, you can select it and click Remove.
-
-
In the Groups to import section, click Role Mapping to define the role mappings for each selected group:
-
In the Role Mapping dialog, click the Add mapping icon
 in the top right to add a mapping row to the dialog.
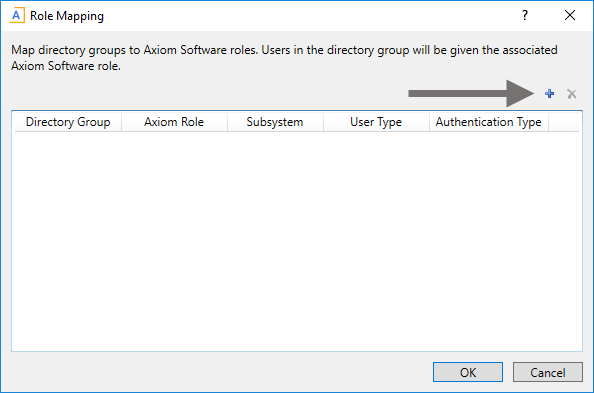
-
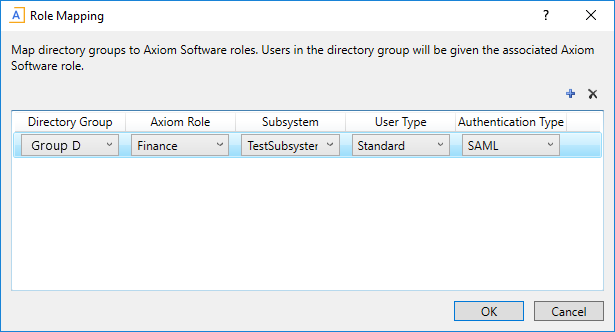
In the mapping row, select a Directory Group to map, then select the following:
- The Axiom Role that you want the users to belong to. You can select None if you do not want the users to be assigned to a role.
- The Subsystem that you want the users to belong to. This option is only present if subsystems are enabled for your system.
- The User Type for the users. This means license type, such as a Standard license or a Viewer license.
-
The Authentication Type for the users, Windows User or SAML. If you want to use a different authentication type, then you must update the users after importing to assign them to the desired authentication type. You may be able to create a Save Type 4 report to Axiom.Principals to update the users, and process that report within the same Scheduler job, after the Active Directory import task is performed.
-
Repeat these steps for each group to be imported. If you want the users in a group to belong to more than one role and/or subsystem, you can create multiple mapping rows for that group. If you need to remove a mapping row, select it and then click the Remove mapping icon
 in the top right of the dialog.
 -
When you are finished defining mappings, click OK to return to the Scheduler task properties.
The defined role mappings do not display in the Groups to import box. If you want to review or edit the role mappings, click Role Mapping.
NOTES:
-
If a group has multiple mapping rows to assign the users to multiple roles and/or subsystems, then the specified user type and authentication type should be the same on each row. If the user type or authentication type is different, then the entry on the last processed mapping will be used.
-
If a group has no defined role mappings, then the users will not be assigned to any roles or subsystems. If the import creates new users without role mappings, the assigned user type is Standard and the assigned authentication type is Windows User.
-
-
On the Notification tab of the Task Details, enter one or more email addresses to send a notification when users have been added or synchronized due to running the Active Directory Import task. Separate multiple addresses with a semi-colon.
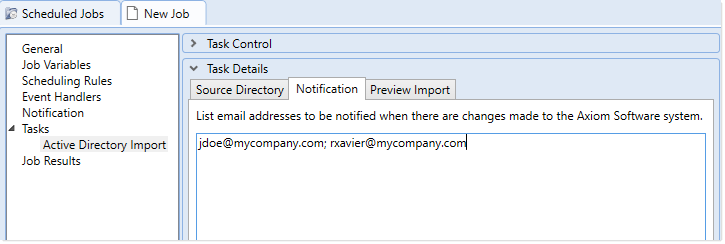
When the import task is run, if any users are created or modified in the Axiom Financial Institutions Suite system, an email notification will be sent to the addresses specified here. The email summarizes the changes made. This email notification is independent of any job-level notification settings (which notify based on overall job completion or failure).
We recommend setting up this task-level notification to send emails to the security administrator(s) responsible for maintaining the security settings in Axiom Financial Institutions Suite, so that he or she can define security settings for newly added users, validate changes made to existing users, and perform any other follow-up tasks.
-
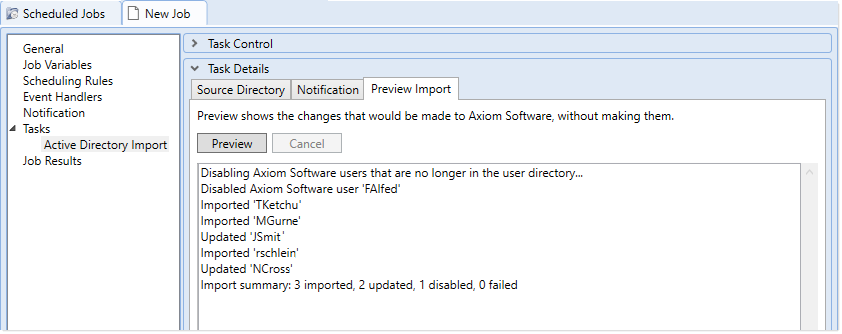
On the Preview Import tab of the Task Details, click Preview to see the changes that will be made to Axiom Financial Institutions Suite Security when the Active Directory Import task is run.
The preview feature is intended to help you verify that you have set up the task correctly. If the reported changes are not as you expect, then you can review and adjust the task settings as needed. No changes are made to security when preview is run.
This completes the settings for the Active Directory Import task. However, there are a few general job properties that should also be reviewed and completed as needed.
-
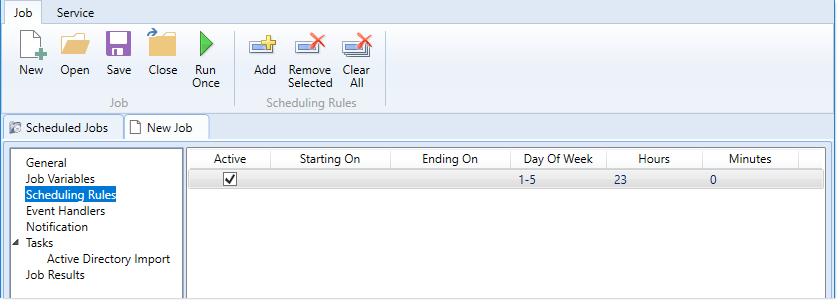
In the left-hand pane, click Scheduling Rules. Using this section, you can define a scheduling rule so that the job runs automatically as needed. Typically, organizations want the Active Directory Import task to run regularly so that users are kept in sync.
Click Add to add a scheduling rule to the job, and then complete the rule as needed based on your desired schedule.
-
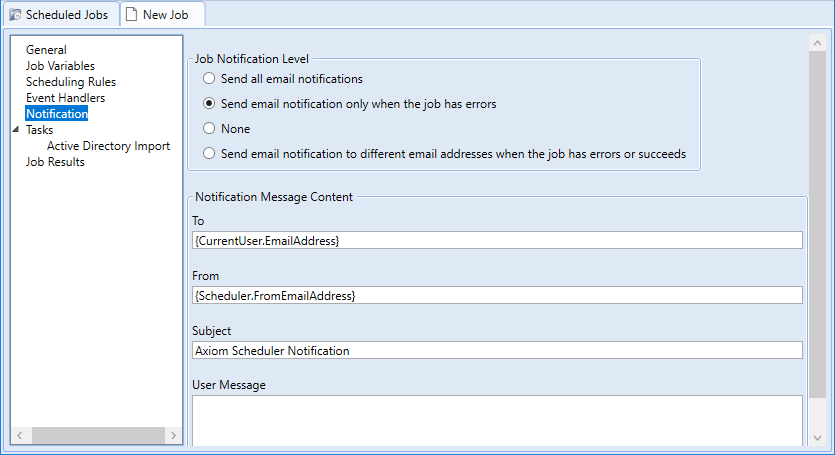
In the left-hand pane, click Notification. Using this section, you can configure the notification settings for the overall Scheduler job. The job-level notifications are intended to inform interested parties when the job completes successfully or has errors. These notifications do not contain any information about user changes to Axiom Financial Institutions Suite Security—to inform someone about specific user changes, you must use the task-level notification settings as described in step 9.
By default, jobs are configured to send a notification whenever the job is run (Send all email notifications). You can change the Job Notification Level as needed, and you can modify the recipients, subject, and message.
- Complete any other job or task properties as needed. In most cases, the default settings are sufficient.
-
Click Save. You can define a name for the job and save it to the desired location in the Scheduler Jobs Library.
Once you save the job with an active scheduling rule, the job is immediately added to the schedule to await the first scheduled execution time. You can see this scheduled instance on the Scheduled Jobs tab.
You can also run the job manually as needed by opening the job and clicking Run Once. Note that when using Run Once, the job runs as the current user instead of the job owner, so you must have the required permissions to perform the import.
For more information on what happens when the Active Directory Import task is run, see How Active Directory user synchronization works.
