Configuring the Merit Increase driver
The Merit Increase driver file lists the merit increase values by pay grade for each comparatio range.
Comparatio is calculated as the employee's current salary divided by the midpoint of the salary range for their pay grade code as defined by the company's pay policy. For example:
- A comparatio of 1.00 means that the employee is paid the midpoint for the salary range.
- A ratio of 0.75 means that the employee is paid 25% less than midpoint.
- A comparatio of 1.15 means that the employee is paid 15% more than midpoint.
Payroll planning supports two distinct increases per year, with up to five comparatio ranges for each increase.
- The first increase must have at least one range and an increase percentage for each pay code.
-
The second increase is optional and enabled with a file group variable.
Click to enlarge image
To configure the Merit Increase driver:
- From the Command Center home page, click Payroll Planning.
- Open the budget, scenario, or forecast for which to edit the driver.
- Click the Drivers & Assumptions tab.
- Click the Merit Increasedriver.
- Click the Settings sheet and enter the number of comparatio ranges for each increase.
Number of comparatio ranges – the first increase can have one to five ranges.
Number of comparatio ranges - 2 – the second increase can have zero to five ranges.
- The entry for the second increase is available only if enabled in the file group variables.
- You must have at least one range column to support the merit increase calculations.
- Click Save to save your settings and to build the comparatio range columns on the MeritIncrease sheet.
-
Click the MeritIncrease sheet and enter the minimum eligible comparatio for each column in the header row.
-
Enter separate rates for the second merit increase if used.
-
Enter separate merit rate records for each year of your projections. Each plan year must have its own records.
-
Merit increases in the base year use the ratios for the first plan year. If separate rates are entered for the base year, they are ignored.
-
You can copy records from one year to the next, if needed.
-
You must have at least one range and rate record for every pay grade and plan year.
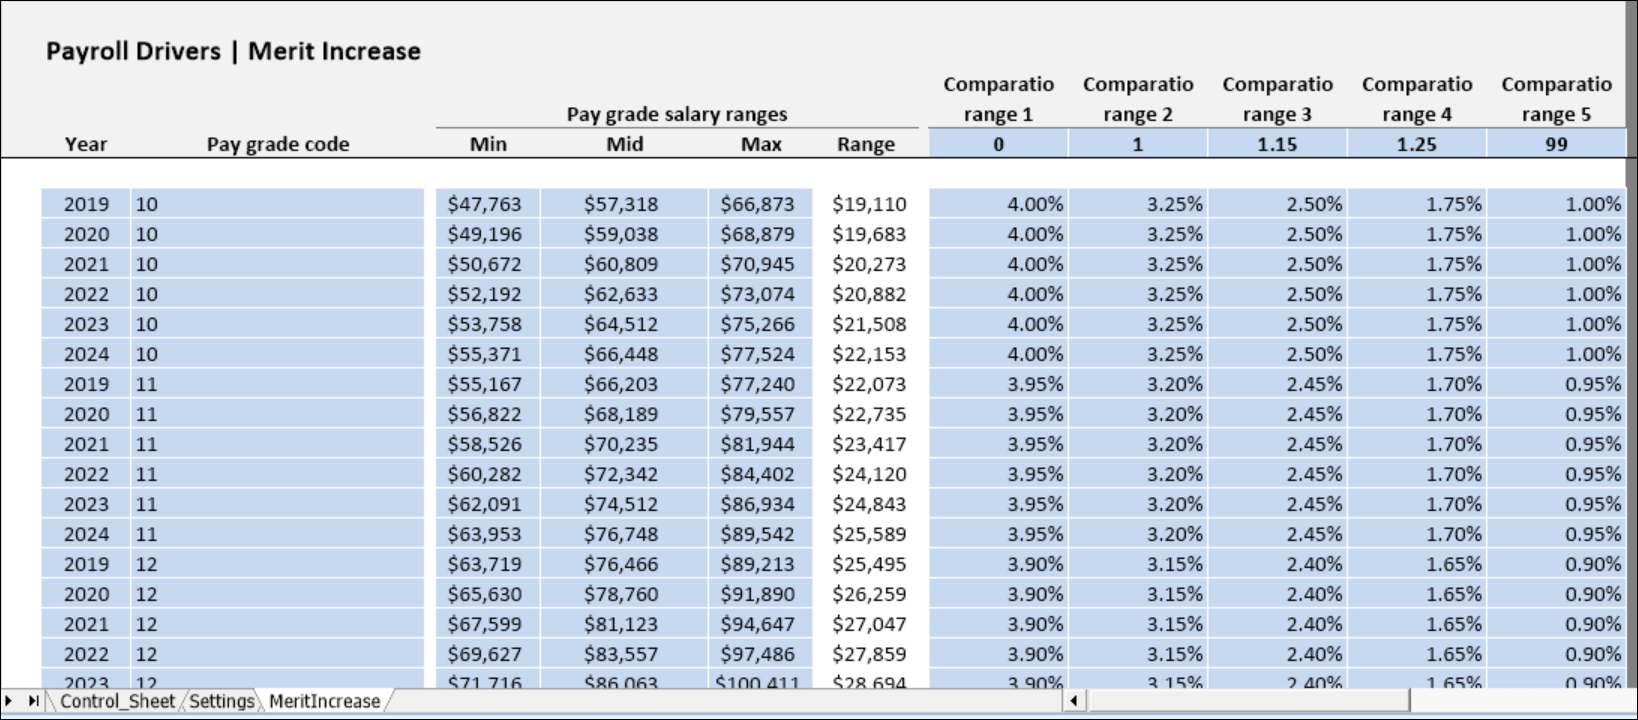
The following table describes the columns in the MeritIncrease worksheet.
Table column Description Pay grade code Populate with all pay grade codes. Pay grade salary ranges - Min The minimum of the pay grade salary range. Pay grade salary ranges - Mid The midpoint of the pay grade salary range. Pay grade salary ranges - Max The maximum of the pay grade salary range. Range This column is automatically calculated. Comparatio range column(s) Populate the blue cells in the header of the Comparatio Range columns with the minimum comparatio value for each range. The first comparatio range must have a value of 0 to ensure that all employees are included. -
- Double-click Add Merit Increase at the bottom of the sheet to add new rows. You can add up to 10 rows at a time.
- When all columns of the table are populated, click Save in the Main menu to save and close the driver file.
