AX1638
Using the Process Directory page, you can view the current process status for all plan files that you have access to within a particular file group. If you are the current step owner of one or more plan files, you can also complete process tasks from this page.
You can access this page as follows:
-
By clicking on the total task numbers in the Process Summary component. The Process Summary component may be included on your home page (or a similar landing page). It displays information such as your total current tasks and your total new tasks.
-
Your system may have been designed to include links to this page within other forms that you have access to, such as your home page.
The directory shows the full list of plan files that you have security permission to access in the file group, as well as various columns with information about the process status for each plan file. The columns shown are defined at the file group level and cannot be changed in the Web Client.
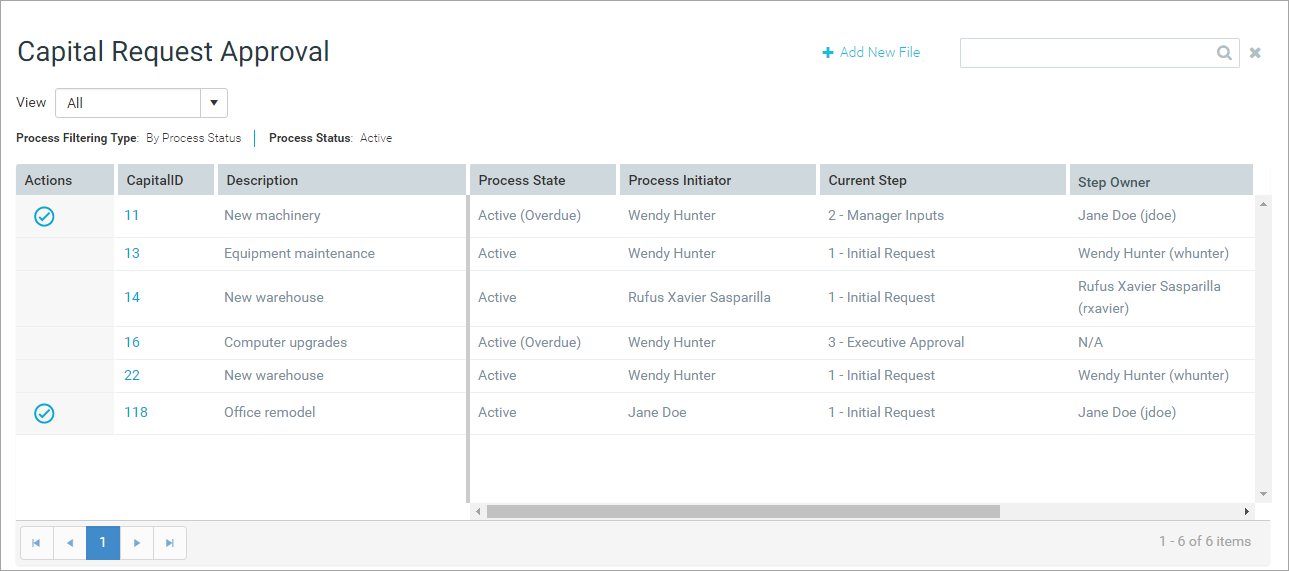
Example Process Directory page
To search for a particular plan file, you can use the use the search box at the top of the page. You can also sort on most columns by clicking the column header. Some process columns, such as owner and due date, do not support sorting.
The directory has three different views that you can choose from the top of the page.
-
All: Shows all plan files that you have access to in the file group. This is the default page view if you navigate directly to the page.
-
My Current Tasks: Shows just the plan files where you are the current process task owner. This is the default page view if you navigate to the page from the Process Summary component.
-
My Requests: Shows just the plan files where you are the process initiator. Typically, the process initiator is the user who created the plan file. This view is only available for plan file processes in on-demand file groups.
Completing process tasks
Using the icons in the Actions column on the left-hand side of the directory, you can complete the current process task for the plan file. The action icons are only available if you are the current step owner for the plan file, or if you are an administrator, process owner, or process group owner.
To complete a task, click the appropriate icon next to the plan file name:
-
 Click the check mark icon to Submit or Approve the plan file (depending on the step type). This will move the plan file to the next step.
 -
 Click the X icon to Reject the plan file. This will return the plan file to a prior step. The reject action is only available for approval steps.
In either case, the Process Action dialog opens, displaying the current step of the plan file and the step that it will be moved to. If desired, you can enter a comment into the Comments box. The comment will be saved in the process history, and included in any notification to the next step owner.
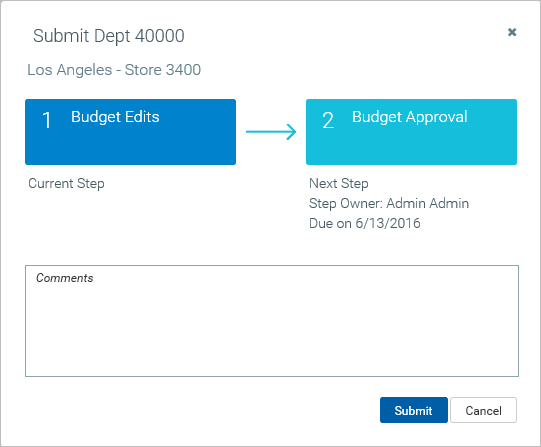
Example Process Action dialog to complete a process task
When rejecting the plan file, in some cases you may have the option to select the step that you want the plan file to return to. In this case, the process diagram at the top of the dialog is interactive, so that you can select the target step.

Example Process Action dialog with a user-selected rejection step
Viewing process history
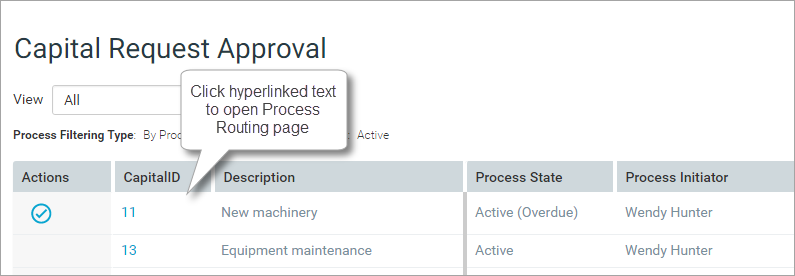
To open the Process Routing page for a plan file, click any column value that displays in blue hyperlink text. The column that contains the hyperlinks is configurable, so it may be different in each system. In the following example, the values in the CapitalID column are hyperlinks and will open the corresponding routing page:
The Process Routing page contains full process details about each plan file, including comments made by step owners when completing tasks.
Creating a new plan file
If the current file group is an on-demand file group, you may be able to create a new plan file from this page. If this option is available to you, you can click the plus icon at the top of the page to create a new plan file. This plus icon displays along with customizable text, so it may be different in each system. In the following example, the custom text is Add New File.

The specific process for creating the new plan file depends on the file group configuration.
Moving plan files to different steps
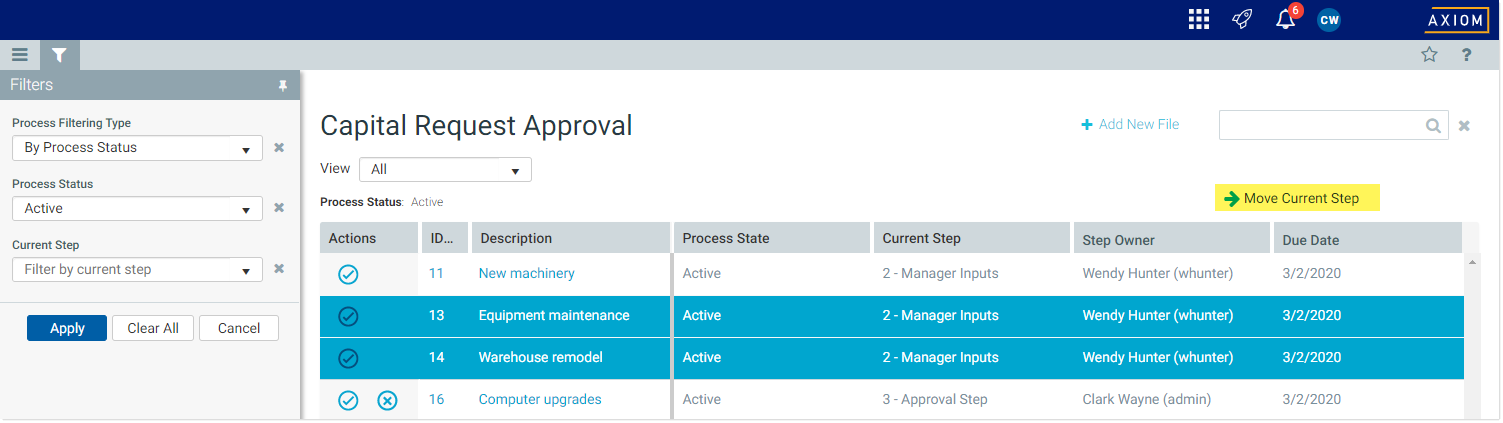
If you are an administrator or process owner, then you can move plan files to different steps as needed. This is intended as an administrative function to adjust the current step of certain plan files, without needing to restart the process. When a plan file is moved to a different step, the currently active step is aborted instead of completed, and the plan file becomes active in the target step.
To move one or more plan files to another step:
-
Select the plan file(s) that you want to move. If you only want to move a single plan file, click on the row for that plan file to select it. You can use the SHIFT and CTRL keys to select multiple rows.
-
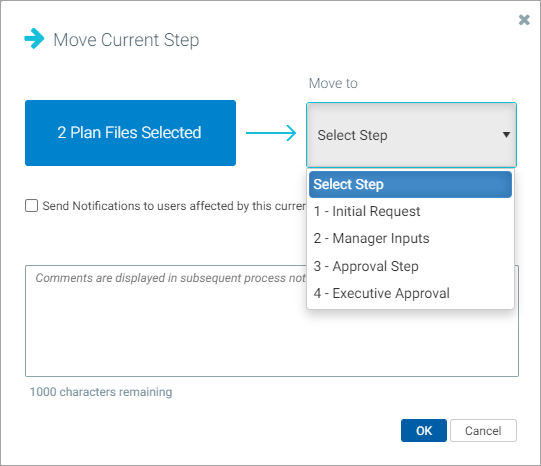
Click Move Current Step to move the selected plan files. In the following example, two plan files are selected to be moved:
-
In the Move Current Step dialog, do the following:
-
Use the Select Step drop-down list to select the step that you want to move the plan files to.
-
If you want to send notifications to the new step owners for the target step, select Send notifications to users affected by this current step change. When this check box is selected, then you can also optionally enter a comment to be included in the notification and stored with the process. By default, notifications are not sent to new step owners when moving plan files to a different step.
If you choose to send notifications, the Step Activated notification is sent for the target step. Because the currently active step is aborted instead of completed, no Step Completed notifications will be sent.
- Click OK to move the plan files to the target step.
-
Filtering the directory
You can filter the directory to only show plan files that meet certain criteria. Click the Filter icon ![]() in the toolbar to open the Filters panel and select values for the filters. When you click Apply, your selections will be used to filter the directory. The currently applied filter displays below the View box for reference.
in the toolbar to open the Filters panel and select values for the filters. When you click Apply, your selections will be used to filter the directory. The currently applied filter displays below the View box for reference.
Filters for My Current Tasks
When the view is My Current Tasks, the directory can be filtered using the following options:
-
Current Step: Show your current tasks for a particular step. By default the view shows tasks for all steps.
-
Task Status: Show your current tasks based on task status, such as whether the task is new, due soon, or overdue. By default the view shows tasks in all statuses. However, if you navigate to the page from the Process Summary component, the view is automatically filtered based on the header you clicked to get here. For example, if you clicked on "3 due soon," then the view is filtered to show only the due soon tasks.
The task status filters are available in the Filters task pane and also using links along the top of the page. You can click any of these links to quickly filter the list based on task status.
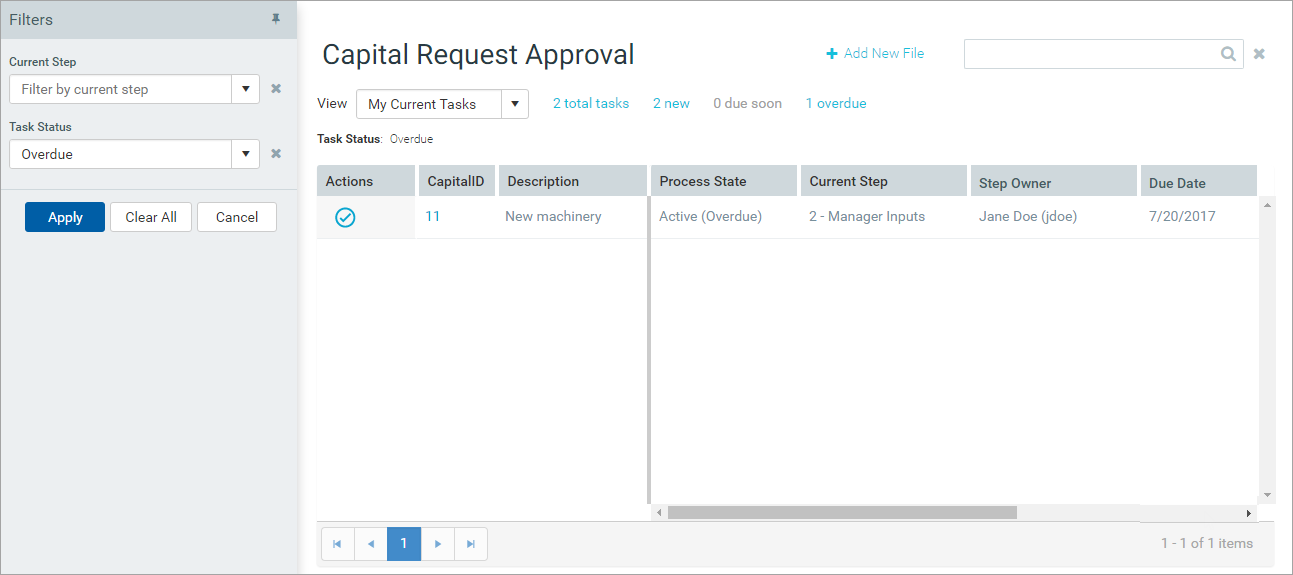
Example My Current Tasks view with filters
Filters for other views
When the view is All or My Requests, the directory can be filtered by various process status properties or step properties. The filters vary based on the Process Filtering Type:
-
By Process Status (default): The view allows filtering based on each plan file's overall process status and current step.
-
By Process Step: The view allows filtering based on each plan file's status for a particular step. By default, if no step status filter is applied, then the view shows all plan files that have ever been active in the selected step. Plan files that have not yet been started or that skipped the step do not show.
-
By Current Owner: The view allows filtering based on each plan file's current owner. The view can be further filtered by task status and specific step.

Example All view with step status filters
Custom filters
Your organization may have defined additional custom filters to allow filtering the directory by plan file attributes. If present, these filters display underneath the built-in process filters.

Example custom filter options at bottom of Filters panel
Process grouping
If the plan file process uses a grouping column, then you can also filter the list by groupings. For example, the process may use Entity as a grouping column. If you have access to plan files in Entity 1 and Entity 2, then you can filter the list by those groupings.
More information for file group administrators
-
For information on how to generate a link to a process directory page, see Using the Process Directory page.
-
The display of the process directory can be customized on a per file group basis, including specifying the columns to display, specifying the initial sort level, and defining optional refresh variables to enable filtering the directory. For more information about configuring the directory, see Configuring display settings for the Process Directory web page.
-
The Add New File option only displays on this page if the on-demand file group has a designated form to allow creating new plan files (an Add File Form). The Add File Form is set on the Options tab of the file group properties, in the Desktop Client. If no form is specified here, then the plus icon will not be available and users cannot create new plan files from this page.
