Collecting and importing data from other sources
The FP Data Collection Template allows you to gather data outside of Axiom Financial Planning. This template works as a stand-alone Excel workbook that you can use to import external data into the product, and interface in the nodes for the three input periods.
NOTE: In some cases, you might want to collect historical data from other members of your organization. To help with this process, Syntellis can provide an Excel Data Collection workbook to share with VPs, directors, managers, and other stakeholders.
You can import data entered into the workbook without the need to grant other users access to Axiom Financial Planning. Instructions on setting up and using the Data Collection workbook are included on a sheet within the workbook.
To collect and import data from other sources:
-
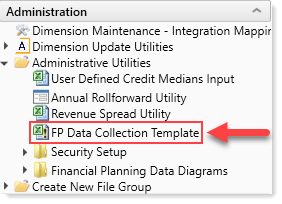
In the Fin Plan Admin task pane, in the Administration section, click Administrative Utilities, and double-click FP Data Collection Template.
-
In the Model Setup tab, do the following:
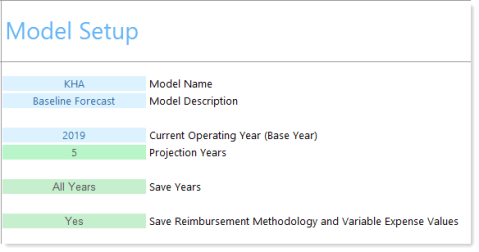
- In the Model Name cell, type the name.
- In the Model Description cell, type a description.
- In the Current Operating Year (Base Year) cell, type the year for the current operating budget.
- In the Projection Years drop-down, select the number of projection years to include in the model.
-
In the All Years drop-down, select one or more years to include in the model.
-
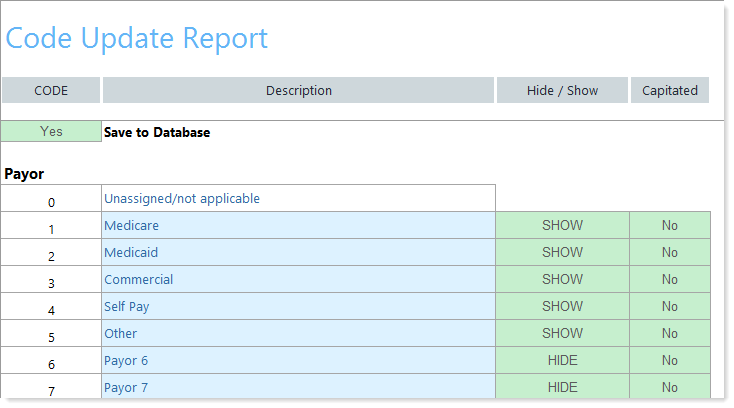
In the CODE Setup tab, do the following for Payors and detailed forecast category inputs:
-
In the Save to Database drop-down, to save the changes from this template to the database, select Yes.
IMPORTANT: If you have already set up dimensions, first refresh the template by pressing F9 to refresh the Code and Payor tabs. Otherwise, if you save the template, it will overwrite the Code and Payor dimensions.
- In the Hide/Show column, do one of the following:
- To enable each input, as required, select SHOW.
- To disable the input, select HIDE.
- For Payor codes, in the Capitated column, do one of the following:
- If the payor is capitated, click Yes.
- If the payor is not capitated, click No.
-
-
Refresh the data to generate the Node tabs by doing one of the following:
NOTE: To add data to other Node tabs, unhide them.
-
In the Main ribbon tab, in the Workbook Options group, click Refresh Data.
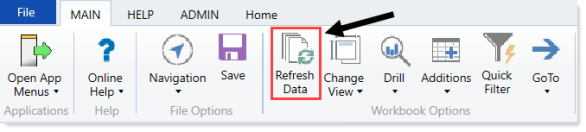
- Press F9.
-
-
Rename each worksheet to the node name to use in Axiom Financial Planning.
IMPORTANT: Nodes that are NOT renamed will NOT be built in the Axiom Software.
- Hide all unused Nodenumber worksheets.
- For each node worksheet that has been renamed, do the following:
- In the Node Type drop-down at the top of the screen, select the node type (Operations, Entity, NonPatient, and so on).
To hide or show the proper inputs based on the node type selection, at the top of the Node tab screen, click Refresh View.
NOTE: This may take 20-30 seconds to process for each worksheet.
Enter node data in the appropriate cells.
NOTE: Enter volumes and statistics in whole numbers. Enter all financial data in thousands (1,000).
- At the bottom of each worksheet, verify data tie out using the statements.
-
In the Consolidating Statement tabs, verify data tie out for the complete model for each year (Consol01, Consol02, Consol03).
-
Import the FP Data Collection Template into Axiom Financial Planning, and open it.
-
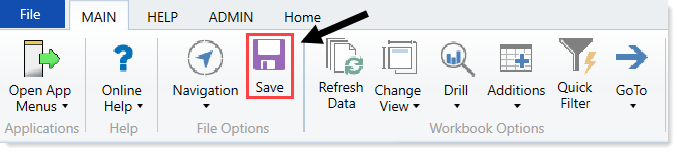
In the Main ribbon tab, click Save.
-
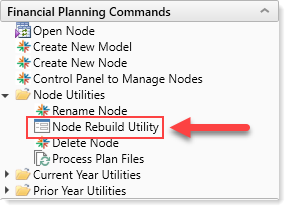
In the task pane, click Financial Planning Commands > Node Utilities, and double-click Node Rebuild Utility.
- In the Node Rebuild Utility, select the nodes and submit them for rebuild.
-
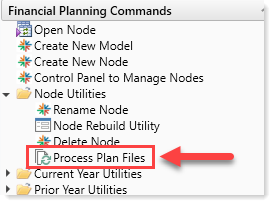
After the nodes have been rebuilt, in the task pane, click Financial Planning Commands > Node Utilities, and double-click Process Plan Files.
- In the Process Model dialog, in the Select a Model drop-down, select the model, and click Process.
- At the Proceed with processing 'model name'? prompt, click OK.
