Staffing sheet
Overview
This sheet allows 24/7 departments to prepare the budget by shift/day of the week, such as a nursing department, cafeteria, lab, or security. This sheet is comprised of three main areas:
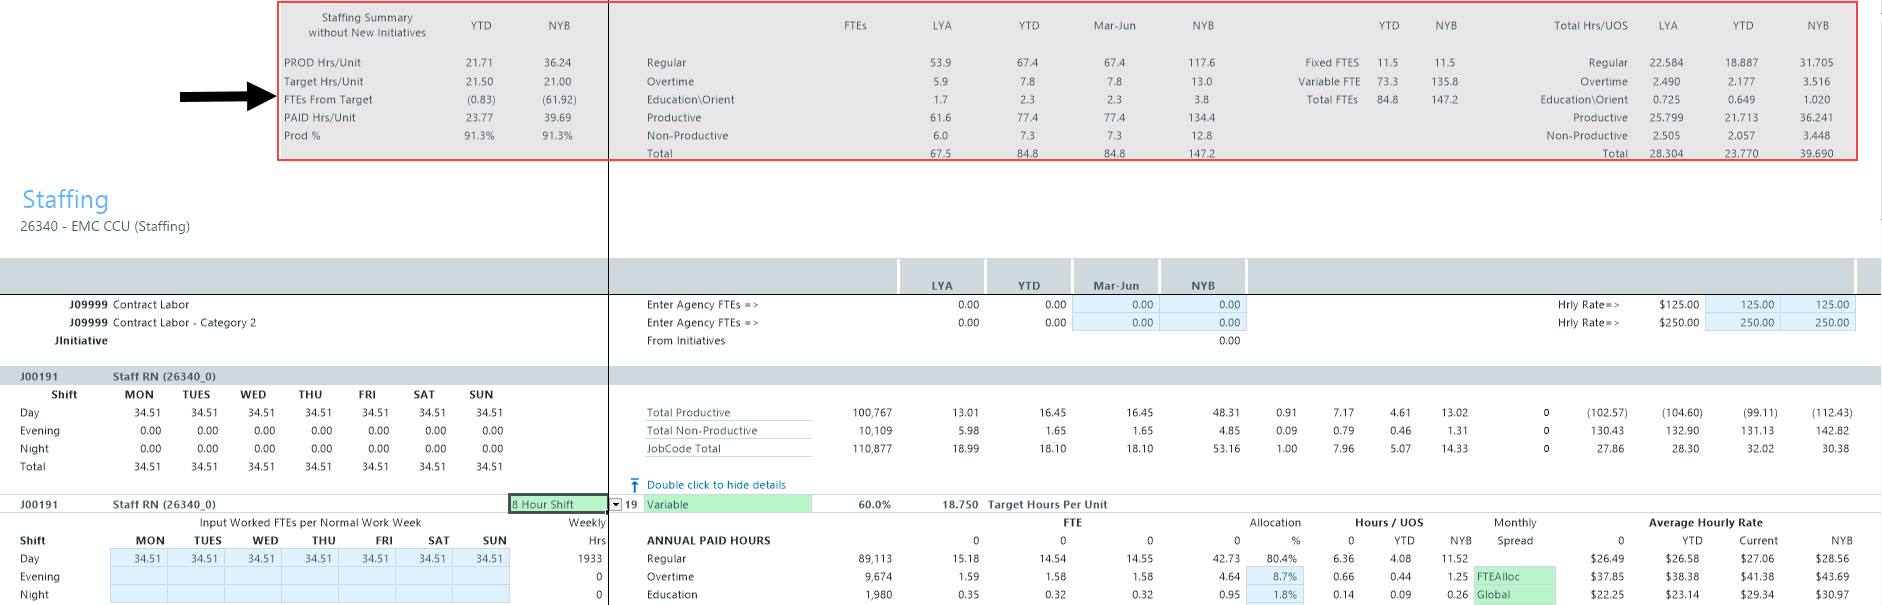
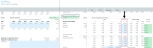
Staffing Summary
This area displays at the top of the sheet and provides an overview of the total hours for productive and target, the FTEs from target, the paid hours per unit, and the productive percentage. It also shows the trending of FTEs over time with LYA, YTD, and budgeted. This provides a quick and easy way to ensure that your numbers are on track without having to dive into the details.
Click image to view full size
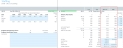
Department Statistics
The first line item in the sheet displays the primary department statistics, which include LYA, YTD, and budgeted hours as well as the total department hours and dollars over months.

Click image to view full size
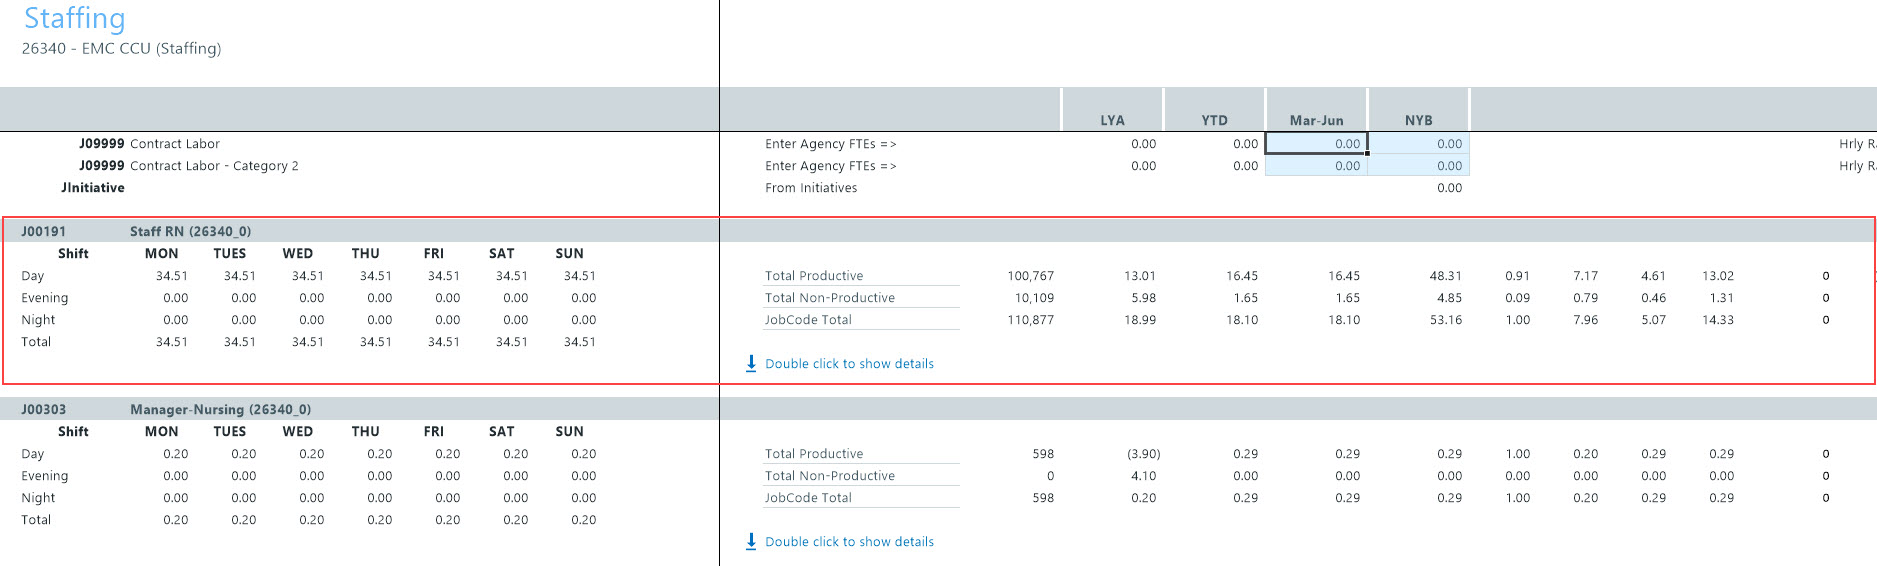
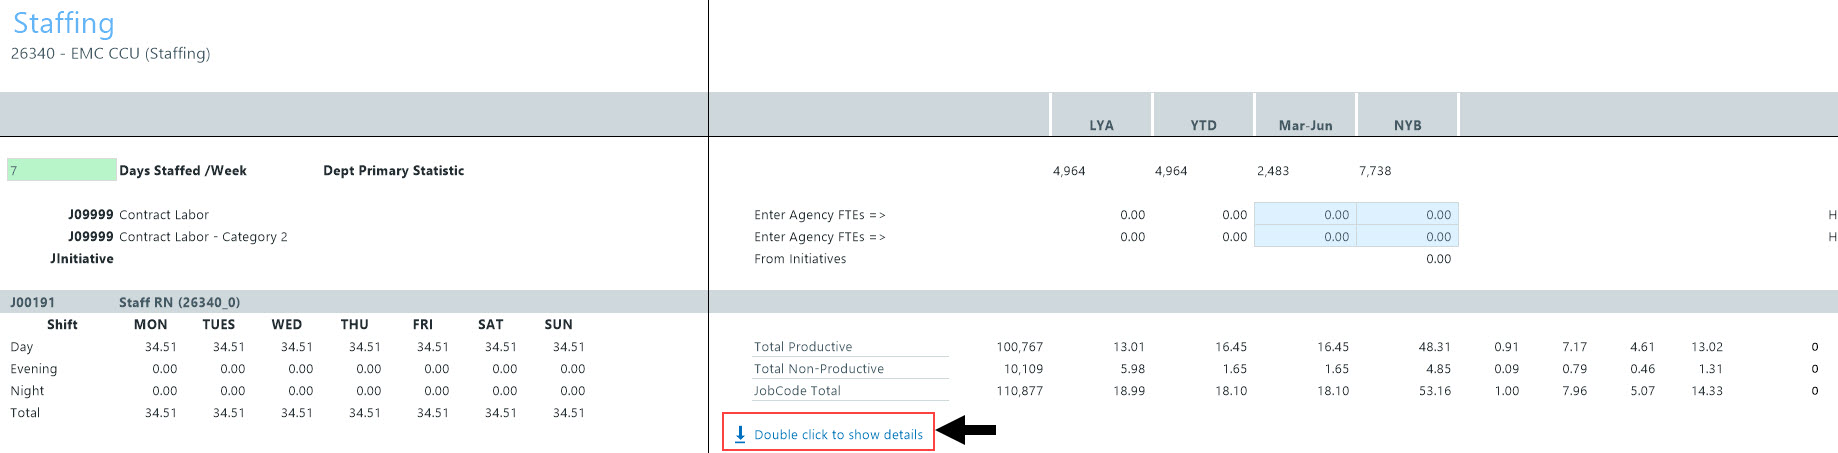
Jobcode summary and details
Most of the sheet is comprised of the individual job code values. By default, the sheet displays only a summary view that includes the shift FTE values, budgeted hours, pay type information, and the breakdown of hours and dollars by month. To view the job code details, double-click the Double click to show details cell.
Click image to view full size
Instead of calculating values monthly, the Staffing sheet allows you to budget hours on a weekly basis using the shift grid. This forms the core component of the calculations performed on this sheet. The totals weekly hours are then translated into monthly values in terms of hours. As you move to the right, you can view the spread of the hours and dollars.
![]()
While the Employee and Jobcode labor methods allow you to change FTEs on a monthly basis, you do not have this ability using the Staffing labor method, though a lot of the logic is still the same in that you still use budget to YTD or a target.
Sheet columns
The following table provides descriptions for the columns in this sheet:
| Column Name | Column Letter | Description |
|---|---|---|
| LYA | N | Values from Last Year Actuals |
| YTD | O | Values for Year To Date |
| Month-Month | P | Values for the months for Remaining Projection |
| NYB | Q | Values for the annual New Years Budget |
| Job Code | AA | The identification number associated with the job code (using Jobcode.KHABgtCode) |
| Pay Type | AB | The pay type associated with the job code (using Paytype.Staffing) |
| Pay Type Description | AC | A description of the pay type |
| Current Rate | AD | The current pay rate for the pay type |
| Begin Rate | AE | The beginning pay rate for the pay type |
| Year End Rate | AF | The pay rate for the pay type at the end of the year |
| Month-Year Hours | AG-AR | Total hours for each month of the year |
| Total Hours | AS | The sum of the total hours |
| Month-Year Dollars | AT-BE | Total dollars for each month of the year |
| Total Dollars | BF | The sum of the total dollars |
Updating the number of days to staff in a week
To update the number of days to staff in a week:
-
In the Days Staffed/Week field, type the number of days to staff in a week.
-
Selecting 7 will allocate FTEs in the grid to all seven days of the week.
-
Selecting 5 will allocate FTEs in the grid to only Mon-Fri columns.

Click image to view full size
-
- After making your changes, in the budget file Navigation panel, click Save Budget.

Updating the shift FTE hours for a job code
The shift grid provides a visual representation of a full 24-hour clock. You can enter all your FTEs in a specific row or you can split them up by time of day. While most organizations simply enter all their hours in the Day part of the grid, you may want to enter hours in another part of the day if there is a premium pay rate for those FTEs in the budget.
To update the shift FTE values for a job code:
-
Navigate to the job code, and double-click Double click to show details.
Click image to view full size
-
In the job code title row, from the drop-down, select the shift to assign to the job code.

Click image to view full size
-
Next to the shift drop-down, from the Fixed/Variable drop-down, select one of the following:
NOTE: In most cases, you will not need to change this unless an exception needs to be made to this job code.

Click image to view full size
- Fixed - The input is the Total Paid FTEs per a normal work week. Non-productive hours are allocated based on the allocation percentage.
- Variable - The input is the Worked FTEs per a normal work week. Non-productive hours are added based upon grossing up to total hours then subtracting productive hours.
-
Fixed w/ Replacement - Similar to fixed, the input is the Total Paid FTEs per a normal work week. Non-productive hours are added based upon grossing up to total hours then subtracting productive hours.
-
In the shift grid, enter the FTE hours for each day of the work week.

Click image to view full size
- After you make your changes, in the budget file Navigation panel, click Save Budget.


Updating the allocation rate for a job code pay type
To update the allocation rate for a job code pay type:
-
Navigate to the job code, and double-click Double click to show details.
Click image to view full size
-
In the Allocation % column (column R), enter the allocation percentage for each pay type, as needed.
Click image to view full size
- After you finish making your changes, in the budget file Navigation panel, click Save Budget.

Updating the pay type values for a job code
To update the pay type values for a job code:
-
Navigate to the job code, and double-click Double click to show details.
Click image to view full size
-
In the Month-Month column (column P) and NYB column (column Q), enter dollar amounts in the blue fields for each applicable pay type.
Click image to view full size
- After you finish making your changes, in the budget file Navigation panel, click Save Budget.

Updating the monthly spread
To update the monthly spread:
-
Navigate to the job code, and double-click Double click to show details.
Click image to view full size
-
In the Monthly Spread column (column V), select one of the following:
NOTE: The choices in the drop-down depend on the pay type.
- FTEAlloc - Percentage of each FTE factor to the total factor. For example, let's say that the FTE factor for month one is 177 divided by the FTE factor for the year of 2080 or 2086. It usually ranges around 8% or so per month.
- Global - Define your own percentage. For example, you may want to use this for a special project where you know there will be a higher use of overtime over the next three months for this project. You can use this option to reflect this in your budget.
- History - Percentage determined over a rolling 12 months (i.e. Percentage of month one to total, month two to total, etc.)
- Prod Hours - Percentage based on productive hours per month to total.
- Paid Hours - Percentage based on the paid hours per month to total.
- Even - Spread evenly across each month.
- After you finish making your changes, in the budget file Navigation panel, click Save Budget.
Adding contract labor
To add contract labor:
-
Navigate to the contract labor job code.

Click image to view full size
- In the Month-Month column (column O), type the total hours for the months.
- In the NYB column (column P), type the total hours for the next year's budget.
- In the Hrly Rate cells (column Y and Z), type the hourly rate for current year and for next year's budget.
- After you finish making your changes, in the budget file Navigation panel, click Save Budget.

Adding a new job code
To add a new job code:
-
Navigate to the bottom of the job code list, and double-click Double Click to Insert New Job Code.

Click image to view full size
- In the Select Job Code field, type a job code or click Choose Value to select one, and click OK.
- Do the following:
- Update the shift values
- Update the allocation rate
- Update the pay type values for non FTE, if needed
Wage rate for Regular pay for the new job code can be pre-populated if the “Mid” wage rate from the Labor Rates driver is filled out. Otherwise, a rate can be manually entered in the “Current Rate” column (note blue cell for Regular in the image below).
You can also enter the starting month of the added FTE (if parital year) in the “Start” and “End” section (note blue cells below for “Start” and “End”).
- After you finish making changes, in the budget file Navigation panel, click Save Budget.

Adding a new department pay type
To add a new department pay type:
-
Navigate to the bottom of the job code list, and double-click Double Click to Insert New Dept Pay Type.

Click image to view full size
- In the Insert Calc Method(s) in sheet Staffing dialog, click OK.
- In the Select Pay Type field, type a pay type or click Choose Value to select one, and click OK.
- In the Month-Month Dollars column (column P), enter the dollars for the pay type.
- After you finish making your changes, in the budget file Navigation panel, click Save Budget.

