AX1582
You can configure a Text Box component to enable rich text input. This allows the user to apply a limited set of formatting options to the text, such as bold and italics, ordered and unordered lists, and alignment options.
NOTE: When rich text is enabled, the text box uses a different underlying control than the regular text box. These controls behave and display differently. Additionally, styles designed for the regular text box will not affect the rich text box, and vice versa.
Configuring a Text Box component for rich text
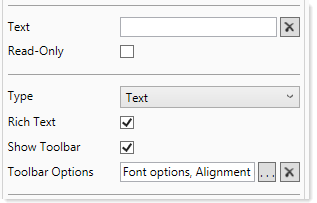
To configure a Text Box component to use rich text, set the Type property to Text (this is the default setting). You can then configure the following options:
| Item | Description |
|---|---|
| Rich Text |
Select this option to enable rich text input for the text box. When users input text, they can optionally apply formatting such as bold and italics. This can be done by using the rich text toolbar, or by using standard shortcut keys (such as CTRL+B for bold). |
|
Show Toolbar |
Specifies whether the formatting toolbar displays on the rich text box. This option only applies when the Rich Text option is enabled.
|
|
Toolbar Options |
Specifies which formatting options display on the toolbar, when the toolbar is enabled. The currently selected options display in the Toolbar Options field. To configure the options, click the [...] button and then select the check boxes for the desired options:
NOTE: On the Form Control Sheet, your selections are converted into a numeric code that tells Axiom Software which options to display on the toolbar. It is recommended to always use the Form Assistant or Form Designer to configure the options, to ensure that a valid code is used. |
Example rich text box configuration
When rich text is enabled, some other text box properties no longer apply or have special behavior:
-
Placeholder: Does not apply when rich text is enabled and will be ignored. Rich text boxes do not support placeholder text.
-
Multi-Line: Does not apply when rich text is enabled and will be ignored. Rich text boxes always allow multi-line input.
-
Text: When defining default text for the rich text box, you can use valid HTML formatting tags, such as to apply bold or italics to the text. The easiest way to do this is to let Axiom Software generate the tags for you:
- Preview the form in a browser and enter the desired text with the desired formatting.
- Submit the text to the source file (either by enabling auto-submit for the text box, or by using a Button component), and then use the Download Source Workbook option on the Tools menu.
- In the downloaded copy, locate the Text field for the text box in the Form Control Sheet, and then copy the text that was written to the field with the formatting tags.
- Go back to the original source file and paste this text into the Text field.
Additionally, all settings relating to the Numeric and Masked Input types do not apply when using the Text type. If defined on the Control Sheet, these options will be ignored. This includes options such as minimum / maximum numeric values and input mask format.
When rich text is enabled for a text box, users can apply formatting by using keyboard shortcuts (such as CTRL+B for bold), or by using the formatting toolbar.
The Show Toolbar option determines whether the toolbar displays on the text box. If enabled, then the text box displays as a framed box with a toolbar at the top. For example:
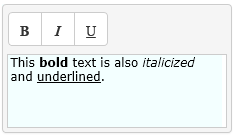
If disabled, then the text box is a simple box with a border. In this case, the user must use keyboard shortcuts to apply font formatting (other formatting options are unavailable without the toolbar).
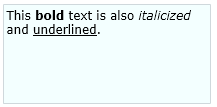
When the user's text is submitted back to the Text field in the source file, the formatting is indicated using HTML tags. The sentence in the previous example would be written to the Text field as:
This <strong>bold</strong> text is also <em>italicized</em> and <span style="text-decoration:underline;">underlined</span>.
