AX1739
You can enable drilling for Fixed Report components and configure the report so that certain drilling selections are available to users. If drilling is enabled, users can drill any row in the report by clicking on a drill icon that displays on each row. Users can select a drilling level from among the available selections, and then the drilling results are presented in a separate web page. Users can continue to drill the drilling results if desired, or return to the original report and drill again from there.
When configuring drilling for the report, you specify which drilling levels are available to users. You can choose to present users with predefined hierarchies for drilling, or you can define custom drilling levels using a DrillLevels data source.
NOTE: Some browsers may require pop-ups to be allowed for the Axiom Software site in order to perform drilling in the browser.
Enabling drilling for a Fixed Report component
To enable drilling for a Fixed Report component, you must complete the following component properties in the Form Assistant or the Form Designer:
| Item | Description |
|---|---|
|
Enable Drilling |
Select this check box to enable drilling for the report. If enabled, users can "drill down" a row in the report to see the data in that row at a different level of detail. |
|
Drill Button Tooltip |
Optional. Defines text to display in a tooltip when a user hovers their cursor over the drill icon. If left blank, no tooltip displays on hover. |
|
Drilling Hierarchies |
Optional. Specify one or more hierarchies to determine the drilling levels available to users. For more information on how to specify the desired hierarchies, and how users select from the hierarchy levels, see Using hierarchies to define drilling levels. |
|
Drill Levels Data Source |
Optional. Enter the name of a |

Example component properties to enable drilling
The drilling options presented to users are determined as follows:
-
When drilling the report, Drill Levels Data Source is always used if defined, otherwise Drilling Hierarchies is used. If Drilling Hierarchies is blank, all relevant hierarchies are used (based on the primary table).
-
When drilling the drill results, Drilling Hierarchies is always used (Drill Levels Data Source is ignored if set). If Drilling Hierarchies is blank, all relevant hierarchies are used (based on the primary table).
IMPORTANT: It is up to the form designer to ensure that any listed hierarchies or custom drill levels are valid in the context of the data displayed in the report. If invalid selections are presented to users, errors may occur when drilling.
Using hierarchies to define drilling levels
You can configure the drill so that users select a drilling level from one or more hierarchies that are associated with the report data. This is similar to how drill-down drilling works for spreadsheet Axiom files in the Desktop Client. However, when using hierarchies to drill in an Axiom form, you can specify which hierarchies you want to be available to the user.
If you want to use hierarchies to define the drilling level, complete the Drilling Hierarchies property using one of the following options:
| Hierarchy Option | Description | Example |
|---|---|---|
|
<Blank> |
If Drilling Hierarchies is left blank, then all relevant hierarchies are shown to the user (based on the primary table of the report being drilled). |
N/A |
|
TableName |
Enter a table name to display all hierarchies defined for that table. You can also enter multiple table names, separated by commas. The dialog will display all hierarchies defined for all listed tables. |
Dept Displays all hierarchies defined on the Dept table. Dept,Acct Displays all hierarchies defined on the Dept table and the Acct table. |
|
TableName:HierarchyName |
Enter a table name plus a hierarchy name to only show the specified hierarchy. You can also enter multiple table:hierarchy pairs, separated by commas. The dialog will display all specified hierarchies. |
Dept:Geography Displays the Geography hierarchy defined on the Dept table. Dept:Geography, Acct:Type Displays the Geography hierarchy defined on the Dept table and the Type hierarchy defined on the Acct table. |
|
TableName.ColumnName: |
Enter a Table.Column name plus a hierarchy name to only show the specified hierarchy path, and to apply the selected hierarchy level in the context of the specified Table.Column. This may be helpful when the query data contains multiple paths to the hierarchy columns, which by default causes hierarchies to show multiple times. |
Dept.Region:Region Displays the Region hierarchy on the Region table, where |
NOTE: If the report data contains multiple paths to the hierarchy columns, the same hierarchy will show multiple times (once for each valid path). The Table.Column option is available if you want the hierarchy to always use a particular path, and therefore only that path will be listed.
If you configure the drill to use specific hierarchies, you must make sure that hierarchy is valid within the context of the report. The hierarchy must be on a lookup reference table for the primary table of the report. Additionally, if the report columns are from multiple data tables, then the hierarchy must be on a shared lookup reference table for all of the data tables in the query.
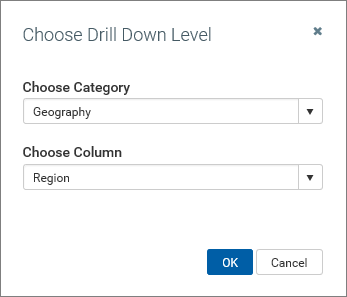
When hierarchies are used, users first select a category (the hierarchy) and then select a column in the hierarchy. In the following example, the user has selected the Geography hierarchy and then the Region column, so the drilling data will use regions as the rows.
If only one hierarchy is available, then the user does not have to select the hierarchy. Instead, the columns in the hierarchy are presented in the same way as the options from a DrillLevels data source (as shown in the next section).
For more information on creating hierarchies, see Dimensions and hierarchies.
Using a DrillLevels data source to define drilling levels
You can configure the drill so that users select from a list of custom drilling choices. Each choice corresponds to a table column that you want to allow users to drill by. This provides you with full control over how the drilling levels are presented and which columns can be used to drill.
To define custom drilling choices:
- Create a
[DrillLevels]data source on any sheet within the form-enabled file. The data source defines the columns that can be used to drill, and the display text to show to users for each option. - Enter the data source name in the Drill Levels Data Source field in the component properties.
The tags for the [DrillLevels] data source are as follows:
Primary tag
Row tags
Column tags
NOTES:
- The primary tag must be placed in the first 500 rows of the sheet.
- Formulas can be used to create the tags, as long as the initial bracket and identifying keyword are whole within the formula.
To use the Data Source Wizard to add the tags to a sheet, right-click in a cell and then select Create Axiom Form Data Source > Drill Levels. You can also highlight a range of data first and then use the wizard to add the tags around that data. The cells in the row above and the column to the left of the selected area must be blank in order for Axiom to place the tags in sheet.
The following example shows a DrillLevels data source:

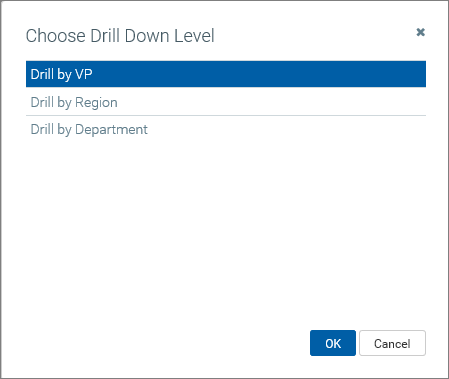
When a user initiates a drill, the drilling items are displayed in the Choose Drill Down Level dialog as shown in the following screenshot. Only the label displays; the column is not shown (unless you include the column name in the label).
The drill results are then created using the corresponding column for the selected label.
The following example is intended to give form designers an idea of the user experience when drilling a Fixed Report component. In this example, the Fixed Report component is configured as follows:

-
The primary table is GL2018, which means than any hierarchies or drilling levels must be valid in the context of this table.
-
Enable Drilling has been enabled for the component.
-
The Drilling Hierarchies property is left blank, but a data source name is defined for Drill Levels Data Source. This means that the data source will be used to define the drilling options for the report instead of using a hierarchy.
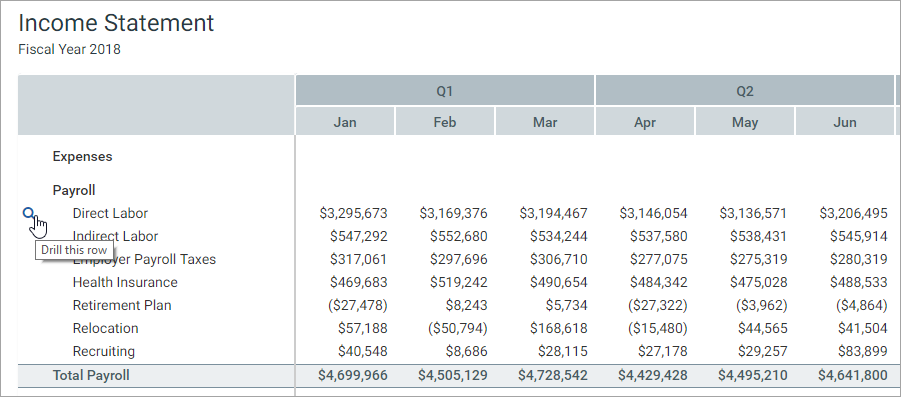
When this file is viewed as a form, the first column in the report is now the drill action column. When a user hovers their cursor in that column, they can see a drill icon (a magnifying glass) for the current row. The user can click on the icon to initiate a drill for that row.
Once the user has initiated the drill, a dialog opens to display the available drilling levels. In this example, these are the drilling levels defined in the DrillLevels data source named DeptDrill. (If instead one or more hierarchy names had been specified in the component properties, the dialog would prompt users to select from the hierarchy levels.)
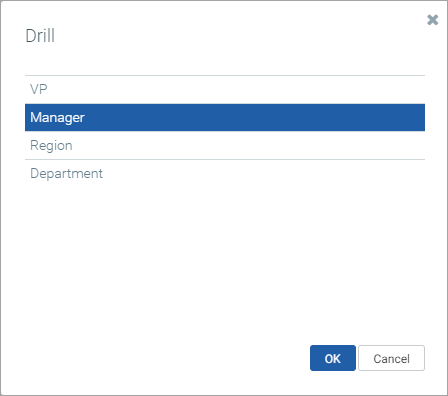
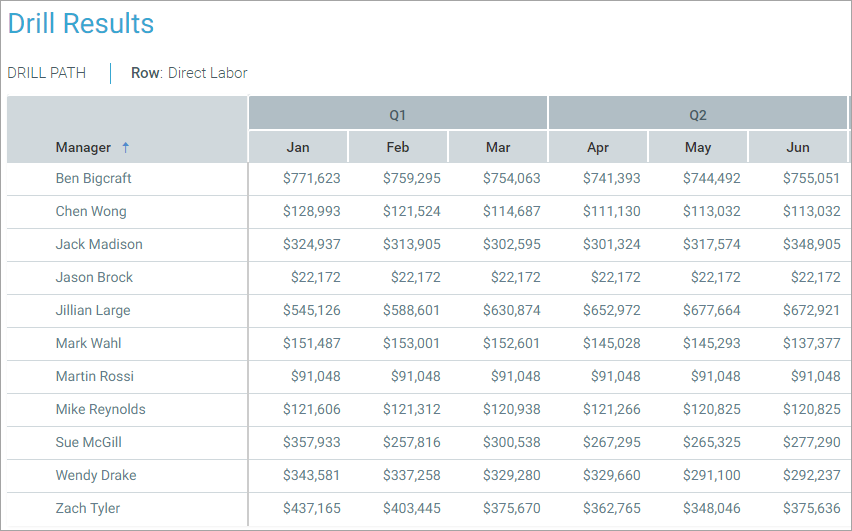
After the user selects a drill level (Manager in this case), a new browser tab opens to display the drill results. In this example, the data for the North America row is now shown at the Manager level.
The drill results automatically include all columns from the original report except for the
NOTE: If the original report included a description column, this column will also be included in the drill results but will not be updated for the drill level. You can work around this by Acct.Acct;Acct.Description as the row data
If desired, the user can further drill on the drill results. Remember when drilling the drill results, the Drill Levels Data Source is ignored and instead the Drilling Hierarchies are used to determine the drill options. Because Drilling Hierarchies was left blank in our report configuration, the user is presented with all relevant hierarchies for the primary table. If we wanted to limit the drilling options available from the drill results, then we could complete the Drilling Hierarchies property as appropriate and it would be used by the drill results.
When drilling the drill results, the results are presented in the same page, overwriting the current results. A new tab is not opened.
