AX1364
Many file group features display lists of plan files in a grid, such as Open Plan Files, Process Plan Files, and Create Plan Files. You can configure display settings for these dialogs on a per file group basis to determine the following:
- Which columns are included in the list, and certain display attributes about those columns
- Which columns are used to sort the list
- Whether the list is a flat list of plan files, or grouped in expandable/collapsible categories
These settings are defined in the file group properties, on the Display Columns tab > Plan File Columns sub-tab. Only administrators and users with one of the following security permissions can edit file group properties: Administer File Groups and Modify File Group.
To access the display column settings:
-
On the Axiom tab, in the Administration group, click Manage > File Groups.
-
Navigate to the file group that you want to edit, then right-click the file group and select Edit.
TIP: You can also do this from the file group node in the Explorer task pane.
-
In the Edit File Group dialog, select the Display Columns tab, then select the Plan File Columns sub-tab.
NOTE: The settings on this tab do not affect the lists of plan files that are displayed in process management dialogs (or legacy workflow dialogs). Process management columns can be customized on the separate Process Columns sub-tab.
Defining the display columns
You can configure the columns to display in lists of plan files by default, as well as certain attributes about those columns. You can specify which columns are searchable, define alternate header text, and define the column width.
The current display columns are listed in the Display Columns box. By default, the following columns are selected to display:
- The key column of the plan code table
- Designated description columns for the plan code table
- Locked By
- Last Modified By
- Last Modified
You can include any column from the plan code table, from a data table that directly looks up to the plan code table, or from a reference table that the plan code table looks up to. You can also include various system columns relating to the modified status of the plan file.
Certain dialogs may automatically include other columns to display information relevant to that particular process. For example, the Create Plan Files dialog always displays the assigned template for each plan file and whether or not the file currently exists.
To configure which columns are included and in what order, click Select Columns. In the Select Columns dialog:
- To add a column, select the column in the left-hand pane of the dialog and then click Add to move it to the Selected Columns box.
- To remove a column, select the column in the Selected Columns box and then click Remove.
- To change the order of a column, select the column in the Selected Columns box and then click Up or Down to move it to the desired location.
Display attributes for each column are configured after the column has been added to the Display Columns box. To configure the display attributes for a column, select the column in the list and then click Edit Column. You can edit the following display properties:
| Item | Description |
|---|---|
|
Header |
The header text for the column. By default, this is the column name. You can customize this text if desired. If the column is not on the plan code table, the fully qualified name is used by default. For example, if the plan code table is Dept, then if you add the |
|
Width |
The width of the column. By default, the display columns attempt to auto-size to a reasonable width for the column contents. If desired, you can enter a different width in pixels, up to a maximum of 500. If you want to go back to using the default width, you can clear this field. |
|
Searchable |
Specifies whether the column is searchable, for dialogs that provide a search box (such as the Open Plan Files dialog). Select this check box if you want the contents of this column to be included in the search. If no columns are flagged as searchable, then the search uses the key column and the designated description columns by default. Additionally, if the first display column is not the key column, it is also included in the search by default. |
|
Custom Formatting |
If the column values are numeric—meaning column data types of Integer (all types) or Numeric—then you can optionally define a custom display format for the values. To define a display format, enter a valid Excel formatting string. These strings can be obtained as follows:
For example, this is the formatting string for a Currency format that shows the negative numbers in parentheses: Colors (such as red font for negative numbers) are not supported. Additionally, text replacement strings are only supported for zero values. Other advanced or unusual formats may not display as expected, so be sure to verify the column display. If you do not define a custom display format, then the default formatting for the column's specified numeric type will be used. |
Defining the sort columns
You can configure the default sort order for lists of plan files. The sort order is specified based on one or more columns in the plan code table. If multiple columns are selected, then the primary sort is the top column, the secondary sort is the next column, and so on.
The current sort columns are listed in the Sorting Columns box. By default, the key column of the plan code table is selected as the sort column. For example, if the plan code table is DEPT, then the plan files will be sorted in order of department codes, in ascending order.
To define the sort columns, click Select Columns. In the Select Columns dialog:
- To add a column, select the column in the left-hand pane of the dialog and then click Add to move it to the Selected Columns box.
- To remove a column, select the column in the Selected Columns box and then click Remove.
- To change the order of a column, select the column in the Selected Columns box and then click Up or Down to move it to the desired location.
By default, the sort is ascending order. Once a column has been added to the Sorting columns box, you can change the order by using the drop-down list next to the column name.
Defining a grouping column
You can optionally specify a grouping for grids that display lists of plan files. By default, no grouping is applied. This means that plan files are displayed in a flat list (one row per plan file).
Alternatively, you can specify a grouping column such as Region or Company, and then plan files will be displayed in expandable / collapsible groupings. For example, the following screenshot shows a list grouped by Country:
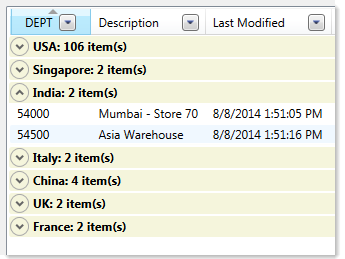
Remember that most end users may only have access to one plan file or a small handful of plan files, in which case grouping may be unnecessary. Administrators and other power users with access to many plan files can always apply a grouping to the list manually when they are in a dialog. End users can do this as well, but in most cases they do not need to.
The current grouping column, if any, is listed in the Grouping column box.
- To define the grouping column, click Select. In the Column Chooser dialog, select the column to group by. You can select any column in the plan code table or a lookup reference table.
- To clear the grouping column, click Clear.
