AX1317
for an on-demand file group
When creating new plan files for an on-demand file group, you often want to collect "starting values" from end users. These values are saved to the plan code table when the new record is created. For more information on why you might need or want to collect these values, see Collecting values for the plan code table when creating an on-demand plan file.
If users are creating these new plan files in the Desktop ClientGeneral term for using either the Excel Client or the Windows Client, both of which are installed to the user's desktop., there are two options to collect these starting values. For more information on the end user experience for these options, see How end users work with on-demand plan files.
-
By default, Axiom will prompt the user to define values for certain columns in the plan code table. This dialog is generated automatically and cannot be customized.
-
Alternatively, you can design an Axiom form to collect these values, and designate this form as the "add file form" for the file group. Axiom Software will present this form to the user as a "dialog" in the application instead of using the default dialog.
Using an Add File Form to create new on-demand plan files
To use an Axiom form as dialog for an on-demand file group, you must do the following:
- Create the Axiom form to use as the dialog. In summary, the form must be set up as follows:
The form must collect the necessary values for columns in the plan code table. The designated Template column (if applicable to the file group) and any alternate key columns must be included. Other columns (including validated columns) can be included as needed, or omitted to use the default value defined for the column. The values can be obtained through user input or derived through other logic (such as using GetUserInfo to return the current user name).
The form must contain a Button component that uses the Add Plan File command. This command is used to pass the collected values to the plan code table and create the new record, and then create the new plan file. The command includes a configuration setting that determines whether the new plan file automatically opens after creation (in the majority of cases this should be enabled). It is also recommended to configure the button with a second command, Close Dialog, so that the dialog automatically closes after the new plan file is created.
- If desired, you can define a form title (in the Form Properties) and this title will display as the dialog title. If no form title is defined, the title of the dialog will be Add New Record.
For more information on how to set up this type of form, see Creating new on-demand plan files using an Axiom form.
-
Save the Axiom form as a utility file within the file group. It is also possible to save the form in the Reports Library, but it is recommended to save the file as a utility instead. Utility files reside within the file group and can stay in sync with it when the file group is cloned (this requires using the Use Current File Group setting in the Add Plan File command for the form).
-
In the file group properties, on the Options tab, use the Add File Form setting to point to the Axiom form.
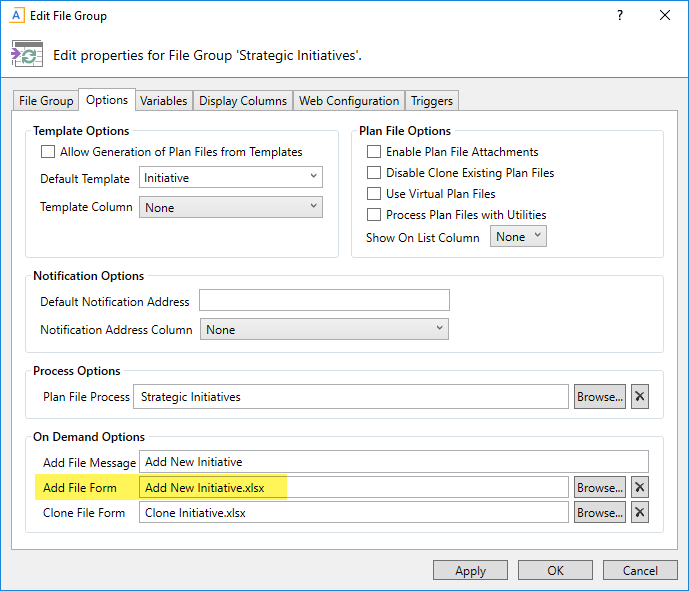
Example file group configured with an Add File Form
NOTE: Users are not required to have any file permissions to the file designated as the Add File Form. If the user has the appropriate rights to create a new plan file for the file group, then the form will automatically display for the user in this context.
When a user clicks the "add new file" command in the Open Plan Files dialog, then the form designated as the Add File Form opens as a dialog. The user can complete the settings in the form, then click the button that is configured with the Add Plan File command. This will create the new record in the plan code table (including the user's inputs) and then create the new plan file. Whether the plan file opens or not depends on the configuration of the Add Plan File command. If a Close Dialog command is included on the button, the dialog closes automatically after the plan file is created (otherwise the user must manually close the dialog).
The Add File Form is also used automatically when users create on-demand plan files using other avenues, such as when using the Add Plan File command, or the option to add new plan files from the Process Summary component in Axiom forms, or the option to add new plan files from the Plan File Directory web page in the Web Client.
Using a Clone File Form to clone existing on-demand plan files
In addition to creating new on-demand plan files from a template, users can also choose to clone an existing plan file. If you are using an Add File Form dialog to collect values when creating a new plan file, then you may also want to use a form dialog when a user clones an existing plan file. You can do this by designating a form as the Clone File Form in the file group properties (see screenshot in the previous section).
This form should be set up like the Add File Form. However, you may want to use the values from the cloned record as default values instead of having the user complete the inputs from scratch. You can do this by using the following reserved key in a GetFormState function within the Clone File Form:
=GetFormState("SourceID")
The SourceID key will return the ID of the plan file that is being cloned (this is the automatically-generated number from the Identity column). You can then use this information in GetData data lookups or GetData functions to return values for the cloned file. For example, imagine that all on-demand plan files are associated with a department, and you want to return the department that was associated with the plan file being cloned. You can do this as shown in the following example :
=GetData("RequestID.Dept","RequestID="&$D$10)
Where RequestID is the name of the plan code table and also the name of the identity key column, and the GetFormState("SourceID") function is in cell D10.
The SourceID value is passed to the Clone File Form when a user clicks Clone Selected Item in the Open Plan Files dialog.
Remember that if you are using a Template column with the on-demand file group, you should not prompt the user to specify a template when cloning. The recorded template must be the same template that was used for the original plan file being cloned. If you do prompt the user to select a template value and then attempt to pass that value to the plan code table, that value will be ignored.
