AX3940
Using the Filter Wizard
The Filter Wizard is available throughout the system to assist you in constructing filters. The Filter Wizard offers two different approaches for building filters:
-
Hierarchies: Build a filter using hierarchies that have been set up for your system. You select the items that you want to include and the Filter Wizard builds the filter criteria statement for you.
-
Advanced Filter: Build a filter using any table and column that is relevant to the current context. This approach also allows for more operators, including greater than, less than, and not equal to.
The Advanced Filter dialog has two versions, depending on how the dialog is launched. The "desktop" version of the dialog is used in most places in the Desktop ClientGeneral term for using either the Excel Client or the Windows Client, both of which are installed to the user's desktop.. The "web" version is used in the Web ClientThe Axiom Software client that operates within a browser. Users can open and work with browser-based files, on various platforms. The Web Client also supports certain administrative activities. and with certain special features in the Desktop Client.
The Filter Wizard can be launched by using the Filter button in various dialogs and task panes. You can also open the wizard manually from any cell in an Axiom spreadsheet file, using the right-click menu: Axiom Wizards > Filter Wizard.
Hierarchies
To create a filter using hierarchies, select the check box for each item that you want to include in the filter. You can expand each hierarchy to see the items listed in it. You can also type a value into the filter box above the hierarchies to filter the list.
For example, you may have a hierarchy for Geography that starts at the WorldRegion level, then goes down to the Country level, and then goes down to the LocalRegion level. If you want to filter by a particular country in the Asia WorldRegion, you can expand the Geography hierarchy, then expand the Asia WorldRegion, and then select the desired country.
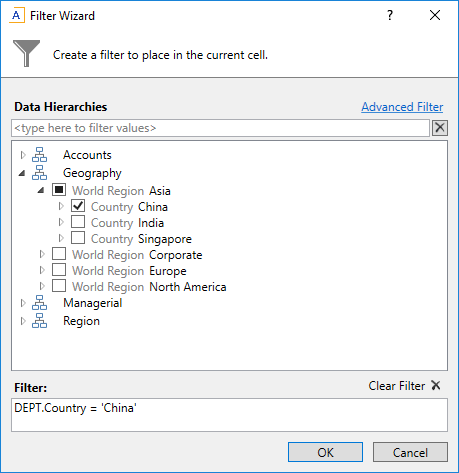
As you select items, the filter criteria statement is created in the Filter box at the bottom of the dialog. You can click OK to apply the filter as is, or you can manually edit the filter by typing in the box.
The hierarchies available to you are defined by your system administrator, based on grouping columns in reference tables. If your system has no defined hierarchies (or if no defined hierarchies are relevant to the current context), then the Data Hierarchies section does not display, and the Advanced Filter opens directly.
Note the following about filters created using data hierarchies:
-
Only "include" filter criteria statements can be created using data hierarchy selections. As you select items, those items will be included by using an equals (=) operator or an IN statement (for including multiple items at the same level). If you want to write a filter criteria statement that specifies items to exclude, or that uses other operators such as greater than or less than, then you must use the Advanced Filter.
-
Certain assumptions are made regarding the use of AND and OR when multiple items are selected from different hierarchy levels or different hierarchies. If you want to change the way each statement is joined, you can manually edit the filter in the Filter box, or you can use the Advanced Filter.
- Sometimes when you select a "child" item underneath a "parent" item, the child and parent will be joined with AND. For example:
DEPT.VP='Jones' AND DEPT.Manager='Smith'. This means that the DEPT table has other instances of Manager Smith that belong to different VPs, so the compound statement is to ensure that you only get the data where Manager Smith is under VP Jones. (You can manually edit the filter to remove the Jones portion of the statement if you want to see all data for Manager Smith, regardless of VP). If instead Axiom Software constructs the filter as justDept.Manager='Smith', that means all instances of Manager Smith are also under VP Jones.
If an existing filter was present when the dialog was launched, this filter is listed in the Filter box. You can manually edit this filter if desired, or you can make new selections to overwrite the current filter.
Advanced filter (desktop version)
Using the desktop version of the Advanced Filter dialog, you can create a filter using any relevant table and column, and using any supported operator. The desktop version is used in most areas of the Desktop Client.
When using the desktop version, you can see a link in the top right corner named Simple Filter. Clicking that link switches the dialog view to Hierarchy view. Once you are in Hierarchy view, you can switch back to Advanced Filter view by clicking the Advanced Filter link in the top right corner. Only the desktop version of the dialog supports switching between Advanced Filter and Hierarchies.
To create a filter using the desktop Advanced Filter dialog:
-
In the left-hand side of the dialog, select the table column on which you want to base the filter.
For example, if you want to create a filter such as
DEPT.DEPT>=5000, then you must select the DEPT column from the DEPT table.To find the desired table and column, you can do the following:
- Use the View by option to view the list by table, table type, folder, or alias. Note that if you want to select an alias, you must change the view to Alias—aliases are not listed under their assigned table.
- You can also filter the list by typing into the filter box. The filter matches based on table name or column name.
Once you select a table column, the values in that column display in the right-hand side of the dialog.
TIP: Alternatively, you can use the folder icon to the right of the Preview box to load a previously saved filter from the Filters Library. If you do this, your selected filter is placed in the Preview box, overwriting any current content in the preview. Skip to step 4.
-
In the right-hand side of the dialog, type or select the value on which you want to base the filter.
You can type into the box above the list of values to filter the list, or to specify a value. If one or more values are selected, then those items are used in the filter. Otherwise, whatever is typed into the box is used by the filter.
For example, you may want to create a filter such as
DEPT.DEPT>5000, but 5000 is not an existing value in the column. In this case, you can type 5000 into the box above the list of values. The filter will use 5000 as the value.If the column is a string, you can type an asterisk at the front or end of the value if you want to use "ends with" or "begins with" wildcard matching.
NOTE: If the selected value is a Date or DateTime value, Axiom Software will convert the value to standard format if the current locale settings may result in an invalid or inaccurate filter.
-
In the space between the two selection boxes, select the operator to use for the filter criteria statement, such as equals, not equals, greater than, or less than. By default, the filter statement uses equals (=).
Note the following about filter operators:
-
Greater than / less than options are only available if the column data type holds numbers or dates.
-
If multiple items are selected, then IN and NOT IN syntax is automatically used for equals and not equals respectively. Note that if the operator is equals but you select more items than you have not selected, Axiom Software will instead use NOT IN syntax for the unselected items to simplify the filter statement.
-
If the column is a string column, and you have typed a value rather than selecting it, then LIKE and NOT LIKE syntax is automatically used for equals and not equals respectively. By default, wildcard characters (% signs) are placed on both sides of the text, meaning that it will match any value that contains the text. If you place an asterisk to the start or end of the text, then the wildcard character will be only at that location.
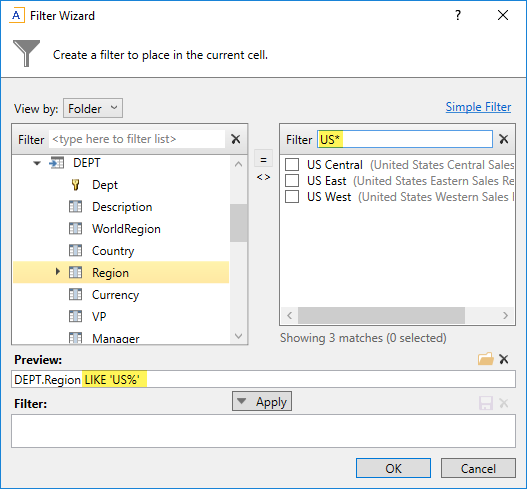
Example with wildcards
- If the column is a string column and the value contains an apostrophe (such as O'Connor), the wizard automatically converts this value to double apostrophes so that it is valid for use in the filter (O''Connor). Apostrophes in string values must be escaped this way so that they are not interpreted as the closing apostrophe for the filter criteria statement.
-
-
Review the filter criteria statement in the Preview box to ensure that it is as intended. If you need to make changes, edit your selections made above. The Preview box is not editable.
- Do one of the following:
If the filter criteria statement is finished, click OK. The filter wizard will use the statement in the Preview box (you do not have to click Apply in this case).
If you want to create a compound filter, click Apply to move the current criteria statement into the Filter box. Then, repeat steps 1-4 to create another criteria statement. When the next statement is complete, click either AND or OR to join it to the prior statement.
You can repeat this process as many times as necessary to create the desired statement. You can also edit the full criteria statement within the Filter box as needed. When the entire statement is complete, click OK.
TIP: If you want to save the filter you have created for future use, click the save icon to the right of the Filter box. You can select a folder location in the Filters Library (or My Documents if applicable), and specify a name for the filter. This option is only available if you have read/write access to at least one location where filters can be stored.
Advanced filter (web version)
Using the web version of the Advanced Filter dialog, you can create a filter using any relevant table and column, and using any supported operator. The web version is used by the following features: the ShowFilterWizardDialog function, the AdvancedFilter refresh variable, and the Filter Wizard command adapter. The web version is also used by the Filter Library when creating or editing a filter directly from the library. The web version of the dialog is the same version that is used in the Web Client.
The web version of the dialog has similar functionality as the desktop version, but there are a few differences. Additionally, the web version of the dialog does not support switching to Hierarchy view.
To create a standard filter using the web Advanced Filter dialog:
-
In the left-hand side of the dialog, select the table column on which you want to base the filter.
For example, if you want to create a filter such as
DEPT.DEPT>=5000, then you must select the DEPT column from the DEPT table.To find the desired table and column, you can filter the list by typing into the Search box. The filter matches based on table and column names.
Once you select a table column, the values in that column display in the right-hand side of the dialog.
TIP: Alternatively, you can use the folder icon to the right of the Preview box to load a previously saved filter from the Filters Library. If you do this, your selected filter is placed in the Preview box, overwriting any current content in the preview. Skip to step 4.
-
In the right-hand side of the dialog, select the value(s) on which you want to base the filter.
You can type into the filter box below the list of values to filter the list. Your current typed value is always placed at the top of the list. You can select this typed value regardless of whether it currently matches an actual value in the column. This behavior is to allow you to create a filter for empty tables, or for tables where the value you want to filter on is not yet present in the column. This is why you may see the "no matches" message but still have one value in the list—your typed value.
-
In the space between the two selection boxes, select the operator to use for the filter criteria statement, such as equals, not equals, greater than, or less than. By default, the filter statement uses equals (=).
Note the following about filter operators:
-
Greater than / less than options are only available if the column data type holds numbers or dates.
-
If multiple items are selected, then IN and NOT IN syntax is automatically used for equals and not equals respectively.
-
If the column is a string column and the value contains an apostrophe (such as O'Connor), the wizard automatically converts this value to double apostrophes so that it is valid for use in the filter (O''Connor). Apostrophes in string values must be escaped this way so that they are not interpreted as the closing apostrophe for the filter criteria statement.
-
The LIKE operator is supported, but is not available for selection in the Filter Wizard. You must manually edit the filter criteria statement if you want to use it. Only advanced users with knowledge of valid SQL LIKE syntax should do this.
-
-
Review the filter criteria statement in the Preview box to ensure that it is as intended. If you need to make changes, you can manually edit the statement, or you can start again with a new statement. If you want to clear the statement, click the X icon to the right of the Preview box.
For more information on valid syntax, see Filter criteria syntax.
-
If no filter is currently present in the Filter box, click Apply to move the filter down to the Filter box. If a filter is currently present in the Filter box, you can do one of the following:
- Click Replace to overwrite the current filter with the preview filter.
- Click AND or OR to add the preview filter to the current filter. This creates a compound criteria statement.
You can repeat the filter creation process as many times as necessary to create the desired statement. You can also manually modify the filter in the Filter box as needed, such as to add parentheses to group statements.
-
When the filter in the Filter box is complete, click OK.
TIP: If you want to save the filter you have created for future use, click the save icon to the right of the Filter box. You can select a folder location in the Filters Library (or My Documents if applicable), and specify a name for the filter. This option is only available if you have read/write access to at least one location where filters can be stored.
Table and column visibility
Whenever possible, the Filter Wizard is context-sensitive, meaning that it only displays hierarchies and tables that are relevant to the current context. For example, if you are defining a filter for a file group permission set in Security, the Filter Wizard is limited to the plan code table (and any hierarchies defined for that table).
The available tables and columns in the Filter Wizard are also subject to the following settings:
-
Security: If a user does not have any read access to a table, then that table does not display in the Filter Wizard. If a user has filtered read access to a table, then the filter is applied to the values displayed in the wizard.
- Column Properties: Individual columns in a table can be configured to be hidden in the Filter Wizard, using the Is Filter Column setting. This may be used to hide columns that are unlikely to be used in filters. Filters can still be manually created using these columns; the properly simply hides the column from the user interface, to streamline the column list.
