AX1727
in Axiom forms
You can configure a KPI box in a KPI Panel component to execute one or more commands. For example, you may want to launch a file with supporting information about the KPI
There are several different ways that you can configure commands for KPIs. The approach to use depends on whether you need to execute one command or multiple, and whether you need to use custom icons with the command.
-
Basic Single Command: If you only need to execute a single command, and you don't need a custom icon, then you can define the command in the Command column
-
Custom Single Command: If you want to display a custom icon with a single command, then you can use a separate KPIMenu data source to define the command and its icon. The KPI box displays with the custom icon in the upper right corner. Users can click this icon to execute the command.
-
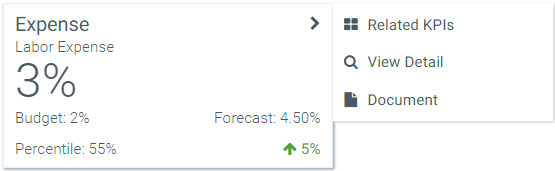
Custom Menu with Multiple Commands: If you need to present multiple command options to users, then you can use a separate KPIMenu data source to define these commands. The KPI box displays with a carat icon in the upper right corner. Users can click this icon to open a fly-out menu that displays all of the commands using their defined names and icons.

Example KPIs with commands
The KPIMenu data source is associated with the KPI in different ways, depending on whether you are using a KPISource data source or a KPI table.
-
If you are using a KPISource data source, then the KPIMenu data source name is placed in the MenuDataSource column.
-
If you are using a KPI table, then you can save the contents of the KPIMenu data source to the MenuData column using Save Type 1. This must be part of the save-to-database file that is being used to save data to the table. See Saving KPIMenu values when using a KPI table for more information.
Valid command strings for use in KPIs
Command strings for KPIs can be any of the following items:
| Valid Commands | Description |
|---|---|
| URL |
Specify a URL (starting with HTTP/S) to open a web page, Axiom form, or web report. For example, you can use GetFormDocumentURL or GetWebReportDocumentURL to generate a URL to another Axiom file and launch it from the KPI. |
| Document shortcut |
Specify a document shortcut to a file in the Axiom Software file system. Document shortcuts use the syntax document://\Axiom\Reports Library\Reports\expense_analysis.xlsx |
| Command |
Specify a command string to execute a command from the Command Library. For example: command://ShowFormDialogPanel?DialogPanel=DialogPanel1 Multiple commands can be combined into a single command string, separated by commas. The command strings use the same syntax supported by the Button tag for Formatted Grid components. If the command string is invalid, no error displays and no action occurs when a user clicks on the menu item. |
To use a command from the Command Library, right-click the cell and select Axiom Wizards > Command Wizard. This opens the Shortcut Properties dialog. Click the [...] button to the right of the Shortcut Target box to open Axiom Explorer, then navigate to the Command Library to select a command. You can then configure the shortcut properties for the selected command. When you click OK, the command string is inserted into the cell. You can use any command that is supported for use in Axiom forms, though some commands may not make sense to execute from a KPI Panel. (The Command Wizard can also be used to create a document shortcut, by selecting a document as the Shortcut Target.)
When a command from the Command Library is used, the form update process is triggered (if supported by the command). The behavior is essentially the same as when a regular Button component is used to execute the command. If the command is a URL or a document shortcut, the form update process does not occur.
NOTE: The command string cannot change dynamically using a formula. If a formula is used to create the string, the formula will not be recalculated before the command is executed. This means that the only way the command can change dynamically is by using bracketed cell references within the command's shortcut parameters. When the command is executed, the current value of the referenced cell is always used. Bracketed cell references are only supported for certain commands and in certain parameters. The reference topic for each command details whether bracketed cell references are supported.
Creating a KPIMenu data source
Using the KPIMenu data source, you can define one or more commands to display with custom icons on a KPI box. When using the data source with a KPI table, the data source must be created in the save-to-database file that is being used to populate the table
The tags for the data source are as follows:
Primary tag
Row tags
Column tags
NOTES:
- The primary tag must be placed in the first 500 rows of the sheet.
- Formulas can be used to create the tags, as long as the initial bracket and identifying keyword are whole within the formula.
The following example data source defines a KPI menu with three items:

Example KPIMenu data source
To use the Data Source Wizard to add the tags, right-click a cell and select Create Axiom Form Data Source > KPI Menu. You can right-click a single empty cell to place the initial tags and then fill out the data, or you can have the data already in the spreadsheet and highlight the applicable data to add the tags. The cells in the row above the data and the column to the left of the data must be blank in order for Axiom to place the tags in sheet.
The resulting menu would display on the KPI as follows:
Example fly-out menu on KPI
If the KPIMenu data source only contains one visible item, then that item displays directly in the top right corner of the KPI box, using the specified icon.
Saving KPIMenu values when using a KPI table
You can use a KPIMenu data source when saving KPI values to a KPI table. To do this, the save-to-database file that you use to save KPI data to the table must be set up as follows:
- The file must contain a KPIMenu data source. This data source is set up as normal, on any sheet of the file.
- When setting up Save Type 1 in the file, the contents of the MenuData column must contain the following special syntax to specify the KPIMenu data source to save:
[Datasource=DataSourceName].
For example, imagine that you have a KPIMenu data source named Menu, and you want to associate that data source with a KPI titled Expense. In the data to be saved to the database, the MenuData column for that KPI must contain the text [Datasource=Menu].

Example save-to-database using special syntax to save KPI menu data
When the save-to-database is executed, Axiom Software finds the designated KPIMenu data source, and converts the contents of it into an XML string. That XML string is then saved to the MenuData column in the KPI table. When the KPI table is used with a KPI Panel component, the XML string is used to render the menu on the KPI box.
The MenuData column in KPI tables can only accept the special data source syntax when saving to the database using Save Type 1. If any other contents are present in the MenuData column within the sheet (even the resulting XML syntax), an error occurs when saving. If you want to modify and save the other columns in the table without modifying the MenuData column, then the MenuData column must be omitted from the save.
Using the Triggering ID to impact the form
When a user clicks on a menu item to execute a command, the ID of the current KPI is written back to the Triggering ID field of the KPI Panel component. You can reference this value to impact the command being executed (using a bracketed cell reference in the command parameters), or to impact something else in the form.
The Triggering ID only applies when using a KPISource data source in an Axiom form. It is not available when using a KPI table. The ID that is written to the Triggering ID field is from the ID column of the KPISource data source. The Triggering ID field does not display in the Form Assistant or Form Designer; it is only present in the Form Control Sheet.
For example, you may have a menu item that launches a Dialog Panel component, and you want to display the name of the current KPI in the dialog panel. The dialog panel can contain a Label component that uses a formula to reference the Triggering ID field. When the user clicks on the menu item, the Triggering ID is submitted back to the source spreadsheet (along with any other changed values in the form), and then displayed in the dialog panel.
The Triggering ID is submitted back to the form whenever a menu item is used to execute a command from the Command Library, assuming that the command triggers the regular form update process (some commands do not do this). This behavior also applies if the command is defined in the Command column instead of using a KPIMenu data source. If the menu item launches a URL or a document shortcut, the Triggering ID does not apply.
