AX2269
Placing data export tags in a sheet
In order to export data to a file, you must set up the sheet with ExportToFile tags. These tags work in a similar manner as the Save2DB tags used for Save Type 1, except that instead of flagging data to be saved to the database, they flag data to be exported to a file.
There are three components:
- The primary ExportToFile tag, which enables data export and defines the control row and control column.
- Column tags in the control row, which flag columns of data to be exported and define the contents of the header row in the export file.
- Row tags in the control column, which flag rows of data to be exported.
Once a file has been set up with ExportToFile tags, you can create the export file using the File Processing feature. When setting up file processing for a file, you can choose to export to a specific file format. You can also use multipass processing to generate multiple export files, one for each pass.
| Tag Type | Tag Syntax |
|---|---|
| Primary tag |
[ExportToFile; CustomSaveTag] |
| Row tags |
[Save] [CustomSaveTag] |
| Column tags |
HeaderName |
Defining the export-to-file control row and control column
To define the location of the export-to-file control row and control column, place the following tag in any cell in the sheet, within the first 500 rows:
[ExportToFile; CustomSaveTag]
CustomSaveTag is optional, and defines a custom save tag to place in the control column, to determine rows to be saved. If you want to use the default save tag, [Save], then this parameter should be omitted. The primary purpose of this optional feature is to allow you to use the same export-to-file control column with multiple export-to-file control rows.
The row containing ExportToFile becomes the export-to-file control row, and the column containing ExportToFile becomes the export-to-file control column.
NOTES:
- The primary tag must be placed in the first 500 rows of the sheet.
- Formulas can be used to create the tags, as long as the initial bracket and identifying keyword are whole within the formula.
Marking columns to export in the control row
Within the export-to-file control row, for each column of data that you want to export, enter a header tag for that column.
The header tags can be anything you like. When the data is exported to a file, the text in the export-to-file control row becomes the first row in the file, and defines the header row.
The header tags do not need to be enclosed in brackets. For example, the header tag can be just ACCT, not [ACCT].
Header tags are required. A column of data is only exported if it is marked with a header tag in the export-to-file control row.
NOTES:
- If desired, you can exclude the header row from the export file. When configuring the file processing settings for the export, set Include Column Headers to Off.
- Reserved Axiom tags are ignored by the export process. For example, if the export-to-file control row also contains a
[DeleteColumn]tag for the purposes of deleting the column in snapshot copies, that column is ignored when exporting.
Marking rows to export in the control column
Within the export-to-file control column, for each row of data that you want to export, enter the save tag. By default, the save tag is [Save]. If you defined a custom save tag in the ExportToFile tag, use that tag instead.
NOTE: If you defined a custom save tag for the export process, that export process only recognizes that unique save tag. For example, if you have defined a custom save tag of [SavePayroll], only rows flagged with [SavePayroll] will be exported. You cannot also use the default [Save] tag for that export process.
Export file example
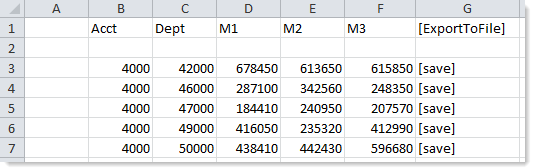
The following sheet is set up with ExportToFile tags. The entries in row 1 (the control row) mark the columns to be exported, and define the contents of the header row. The [save] tags in column G (the control column) mark the rows to be exported.
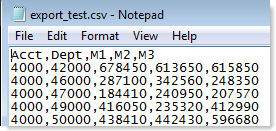
When the file is processed, the resulting output file would look like this, if saved as a CSV file: