AX1801
Setting up the remote data connection
In order to use the Cloud Integration Service with Axiom Software features such as imports or user authentication, you must create a remote data connection. The remote data connection links the Cloud Integration Service with your cloud system.
Remote data connections are created in Scheduler, using the Axiom Excel Client or Windows Client. You must install the Desktop Client before you can perform this activity. For more information, see Axiom Software Client installation for cloud systems.
Once you have logged into the client, go to Manage > Scheduler on the Axiom tab. (If you are using an Axiom packaged product, you can access Scheduler from the Admin tab.)
NOTE: If you are using the Cloud Integration Service to enable Windows Authentication, this authentication protocol will not be available until after you have set up the remote data connection. This means that you must log into the system as an Axiom Prompt user in order to set up the connection. Axiom Support will provide you with the necessary credentials to perform this action.
Setting up the remote data connection is a three-part process:
- Axiom Support must create a namespace for your cloud system and provide you with the connection string to this namespace. Make sure you have this information before proceeding with the steps in the following sections.
- The Cloud Integration Service must be enabled in Scheduler so that it is available to process requests from the remote data connection.
- The remote data connection must be created in Scheduler.
Steps 2 and 3 are discussed in the following sections. Only administrators can perform these actions.
Enabling the Cloud Integration Service
After the Axiom Cloud Integration Service is installed on a local server, you must enable this server for use in Scheduler.
To enable the Cloud Integration Service:
- On the Service tab of the Scheduler dialog, click Servers.
- In the list of servers, select the server hosting the Cloud Integration Service. The name of this server is ServerName-CIS.
- At the bottom of the dialog, under Configuration details, select the check box for Cloud Integration Service Enabled and then click Update.
The server is now enabled and ready for use. You can refresh the page to see the updated server status.
If you installed the Cloud Integration Service on multiple servers to use for different purposes, then you must enable each server separately.
Creating the remote data connection
In order to use the Axiom Cloud Integration Service with Axiom Software features, you must create a remote data connection in Scheduler.
The remote data connection links the Axiom Cloud Integration Service to your Axiom Cloud Service system, using a namespace created specifically for this purpose by Axiom Support. You must have the connection string to this namespace in order to create the remote data connection.
To create a remote data connection:
-
On the Service tab of the Scheduler dialog, click Remote Data Connections.
-
At the bottom of the dialog, click New Connection.
A set of empty fields displays in the Configuration details section.
-
Complete the following settings:
Item Description Name
The name of the remote data connection.
Description
Optional. The description of the remote data connection.
Connection String (SAS)
The connection string to the namespace that was created by Axiom Support in the Microsoft Azure environment for your cloud system. If you do not have this connection string, contact Axiom Support.
Use for authentication service
Specifies whether the remote data connection is used for Windows Authentication. This only applies if Windows Authentication is enabled for your cloud system.
If enabled, this remote data connection will also be used for any Active Directory Import tasks set up for your system.
Cloud Integration Server
The name of the Cloud Integration Service installed in the local network environment. The name of this server is ServerName-CIS.
- Click Save Connection.
The connection now displays in the list of remote data connections.
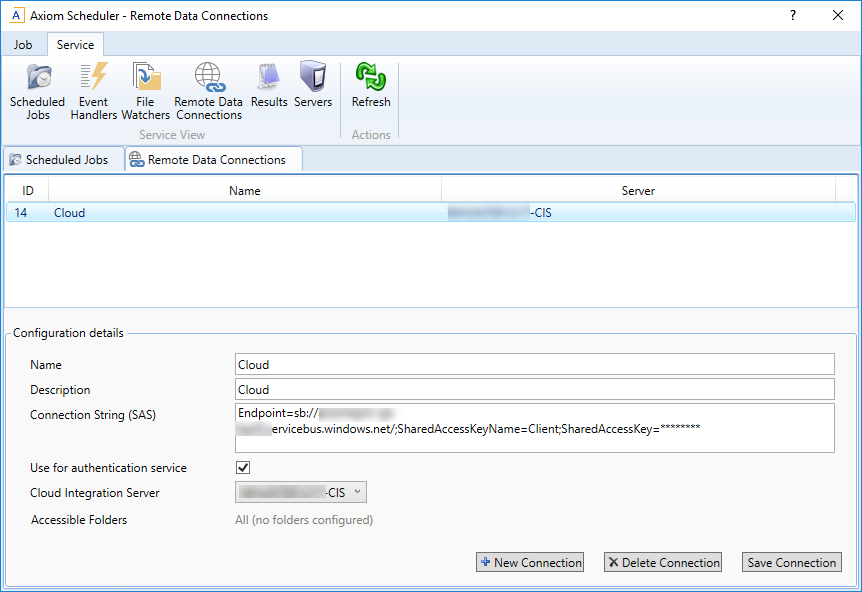
Example remote data connection
If you later want to edit this connection you can come back to this screen, select the connection and make the necessary edits, then click Save Connection to save the changes. To delete a connection that you no longer need, use Delete Connection.
If you installed the Cloud Integration Service on multiple servers, you should create a remote data connection for each server. For example, you could set up one remote data connection for user authentication and another for import/export. For the import/export connection, you would disable the option Use for authentication service.
