AX1628
Picklist tables define lists of values from which users can make selections. Using the Picklist tab of the Web Client Table Manager, you can create, edit, and delete picklist tables.
To access the Picklists area of the Table Manager:
- On the Table Manager page, select the Picklists tab.

Browsing picklist tables
In the Picklists tab, the left-hand pane displays the list of picklist tables in your system that you have rights to see. You can view this list using the following View options:
- All Picklists: The list displays picklist tables in alphabetical order.
- By Table Folders: The list displays picklist tables in a treeview by table folders.
- By Picklist Table Types: The list displays tables in a treeview by picklist table types. Picklist tables that are not assigned to a table type are organized under a (No Type) node at the top of the treeview.
If you click on a table folder or a table type, then the tables in that folder or table type display in the right-hand pane. You can toggle this display between Icon View and Detail View.
You can also use the search box at the top of the left-hand pane to find a table by name. To clear the search results and return to the full list, click the X icon to the right of the search box.
You can select a picklist table in the left-hand pane to see its defined values in the right-hand pane, and to access the management options for the table. All users who have at least read-only access to the table can view the defined values. If defined in security, table filters are honored to limit the values displayed.
NOTE: By default, the list of tables displayed in the Table Manager is limited to the tables where the user has at least read access. However, if the user is an administrator or has the Administer Tables permission, all tables are displayed.
Creating a picklist table
You can create new picklist tables as needed. Only administrators and users with one of the following security permissions can create new picklists: Administer Tables or Administer Picklists.
To create a new picklist:
-
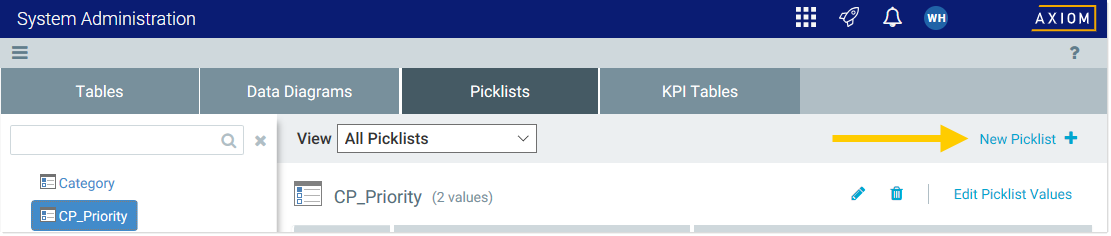
At the top right of the Picklists page, click New Picklist.
-
In the Create New Picklist dialog, complete the following fields:
Item Description Picklist Table Name
Enter the name of the table. The table name can only contain letters, numbers, and underscores, and must start with a letter. Spaces are not allowed.
Description
Optional. Enter a description of the table. This description is visible when users view the table in the Picklists area of the Web Client Table Manager, and also in the Table Management area of the Desktop ClientGeneral term for using either the Excel Client or the Windows Client, both of which are installed to the user's desktop..
Table Folder
Select a folder for the table. You can select any folder that has already been created in the Desktop Client. For example, your system may have a dedicated folder for picklist tables, or picklist tables may be organized by product-specific folders.
It is not possible to create a new table folder from the Web Client. If you want to create a new folder, you must use the Desktop Client. Only administrators or users with the Administer Tables permission can create a new table folder. For more information, see Managing the Table Library.
Table Type
Optional. Select a table type that you want the table to belong to. You can select any picklist table types that have already been created in the Desktop Client.
Table types are useful to assign security permissions to picklist tables as a group. For example, if three different picklist tables belong to the same table type, you can grant access at the table type level instead of needing to grant access to all three tables individually.
It is not possible to create a new table type from the Web Client. If you want to create a new table type, you must use the Desktop Client. Only administrators or users with the Administer Tables permission can create a new table type. For more information, see Table types.
IMPORTANT: If you are not an administrator, then you must select a table type where you have been granted security permissions, so that the newly created picklist table can inherit these security permissions from the table type. Otherwise, you cannot create the table because you will not have access to the table after it is created.
-
Click Create Picklist.
The new picklist table is created, and the Edit Picklist Values dialog opens. For more information on editing picklist values, see the following section.
The picklist table is created using the three required picklist columns of Code, Value, and Description. It is not possible to delete or rename these required columns. It is also not possible to add any additional columns in the Web Client Table Manager.
You can add, edit, and delete the values in a picklist table. Any user with read/write security permission to the table can edit the table values in the Web Client Table Manager.
All picklist tables contain the following columns. When editing picklist values, each record must have a defined code and value.
| Name | Column Properties | Description |
|---|---|---|
| Code |
Integer Key Column |
Required. Defines a numeric code for each record. Each code must be a unique positive integer. When users select items from a picklist, items are returned and stored using this numeric code. |
| Value |
String (50) Alternate Key Column |
Required. Defines a text value for each record. Each text value must be unique. Users select items from the picklist using these values. |
| Description | String (1023) |
Optional. Defines a description or explanatory text for each record. When users select items from a picklist, you can optionally display this text to help users choose the correct values. |
NOTE: If the picklist table has additional columns beyond the required columns, those columns do not display in the Web Client editor and cannot be edited. If you add new records to the table, the default value is used for any additional columns.
To edit picklist values:
-
On the Picklists page, select the picklist table in the left-hand pane.
You can change the View options or use the Search box to help find the picklist that you are looking for.
-
In the right-hand pane where the current picklist values display, click Edit Picklist Values at the top right of the page.
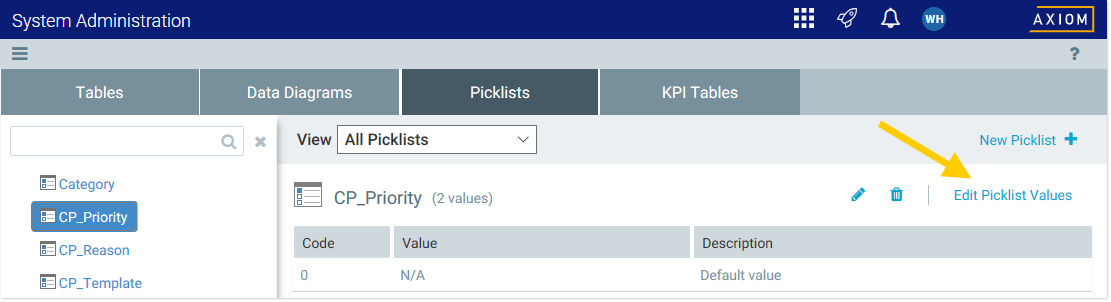
The Edit Picklist Values dialog opens. Using this dialog, you can edit the picklist values as needed. When you are finished, click Save Changes.
-
Adding new values: To add a new value, click New picklist value at the top of the editor. This adds a new record to the table. You can then modify the values in each column as needed.
-
Editing existing values: To edit an existing value, click on the cell that you want to modify. The cell becomes editable, and you can type your desired change. For codes, you can type a number or you can use the up and down arrows to make the current number larger or smaller.
-
Deleting existing values: To delete an existing value, click the Delete button on the record that you want to delete.
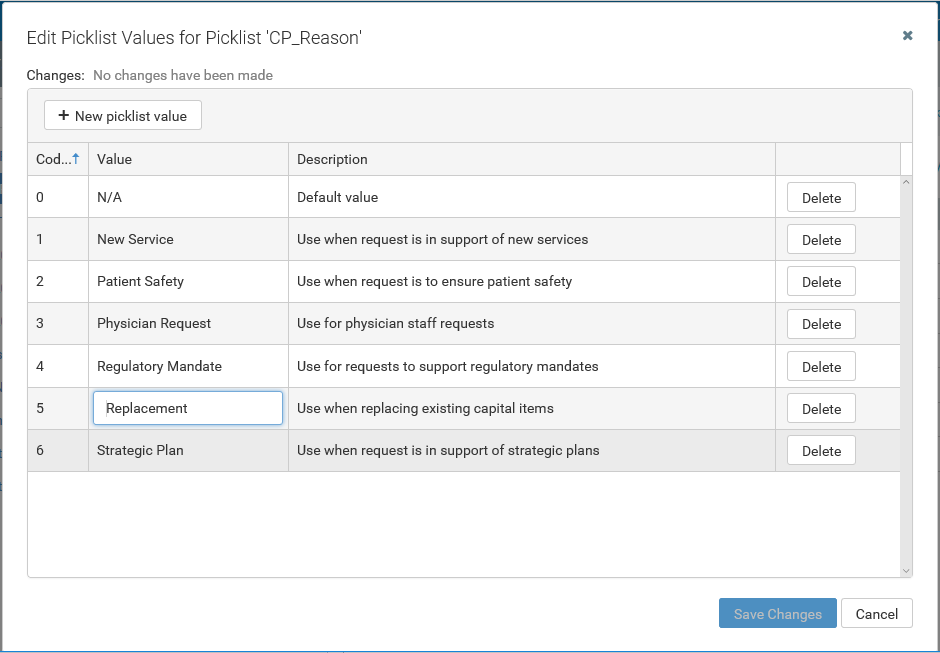
Example picklist value editor
NOTES:
-
All tables start with a row 0 that defines the default value of the table. You can modify the value and description of this row, but you cannot delete it or change the integer code. However, when setting up table columns to look up to this picklist table, you can optionally configure those columns to use a different value in the table as the default value.
-
Code and value must be unique within the table. If a newly added or edited code or value matches an existing code or value, you will be informed of the duplication and prevented from saving the change.
-
The integer codes do not have to be contiguous. You can set the code to any valid integer. When creating a new item in the table, by default the code is incremented by 1.
-
If any validated columns in the system look up to this picklist table, then you will be prevented from deleting any record that is present in those validated columns. You will also be prevented from editing existing codes if the edit would effectively delete a code that is referenced in another table. For example, if code 5 is referenced in a validated column, then you cannot change code 5 to code 6 if that means the picklist table no longer contains a code 5.
Editing picklist table properties
You can edit the main picklist table properties as needed. Only administrators and users with one of the following security permissions can edit picklist table properties: Administer Tables, Administer Picklists, or Allow changing table structure (table-specific permission).
To edit picklist table properties:
-
On the Picklists page, select the picklist table in the left-hand pane.
You can change the View options or use the Search box to help find the picklist that you are looking for.
-
In the right-hand pane where the current picklist values display, click the pencil icon
 at the top of the page.
 - In the Edit Picklist dialog, edit any of the following properties as needed, then click Save.
- Description
- Table Folder
- Table Type
NOTE: If you change the assigned table type of the table, this may affect security permissions for the table. The table will no longer inherit security permissions from the original table type, and will now inherit permissions from the new table type.
If you need to modify a table property that is not displayed in the Web Client Table Manager, then you must use the Desktop Client to edit the table properties. For example, if you want to make the picklist table read-only, you must use the Desktop Client.
Similarly if you need to modify column properties for a picklist table, you must use the Desktop Client. The main column properties cannot be edited (such as column name, data type, etc.), but it is possible to make minor property edits such as defining a description or making a column read-only. You can also add additional columns, though those columns will not display in the Web Client.
For more information on editing table and column properties in the Desktop Client, see Editing table properties.
Deleting picklist tables
Deleting a picklist table removes that table and its data from the database. This action cannot be undone.
You can delete a picklist table if it is not referenced by other tables in the system. Only administrators and users with one of the following security permissions can delete picklist tables: Administer Tables or Administer Picklists.
To delete a picklist table:
-
On the Picklists page, select the picklist table in the left-hand pane.
You can change the View options or use the Search box to help find the picklist that you are looking for.
-
In the right-hand pane where the current picklist values display, click the trashcan icon
 at the top of the page.
 - On the Confirm Delete prompt, click OK.
The picklist table is deleted.
