AX2564
Scheduler task: Process Document List
This task processes a user-defined set of documents. The process operation always calculates the files. In addition, you can opt to run Axiom queries in the files, process alerts in the files, and then perform a save-to-database and/or save the files.
You can process any Axiom-managed Excel files by using this task. The primary intent of the task is to process files such as driver files or report utilities. For example, you may be using Axiom queries and GetData functions in your driver files that need to be updated regularly. Rather than opening, refreshing, and saving each driver file, you can use this task to define the set of files and schedule processing.
NOTES:
-
Generally speaking, plan files should not be processed using this task. Instead, the Process Plan Files task should be used.
-
This task does not perform file processing actions on the file. File processing can be set up for report files and driver files, and can be used to perform actions such as file delivery, using standard or multipass processing. If you want to perform file processing using Scheduler, use the File Processing task.
Documents to process
Specify the documents to be processed when the task is run. Documents are processed sequentially in the order listed.
|
|
To add a document, click the Add button. In the Axiom Explorer dialog, select the file or files that you want to add, and then click Open. |
|
|
|
To remove a document, select the document in the list and then click the Remove button. Only one document can be selected at a time. |
|
|
|
To change the order of documents, select the file in the list and then click the arrow buttons to move the file up or down. |
Only Axiom-managed Excel files are valid to be processed in the task.
Selecting a document using a file group alias
You may want to specify the document to process using a file group alias, so that the task does not have to be manually updated after rolling over to a new file group for a new year of planning. When you are selecting a document in the Axiom Explorer dialog, you can expand the file group alias to see all of the files in the current target of the alias.
For example, in the following screenshot, the file group alias Current Budget is expanded. Because the alias currently points to the file group Budget 2018, the folders and files under the alias are from Budget 2018. When you select a file or folder, you can see the real file path in the top of Axiom Explorer.
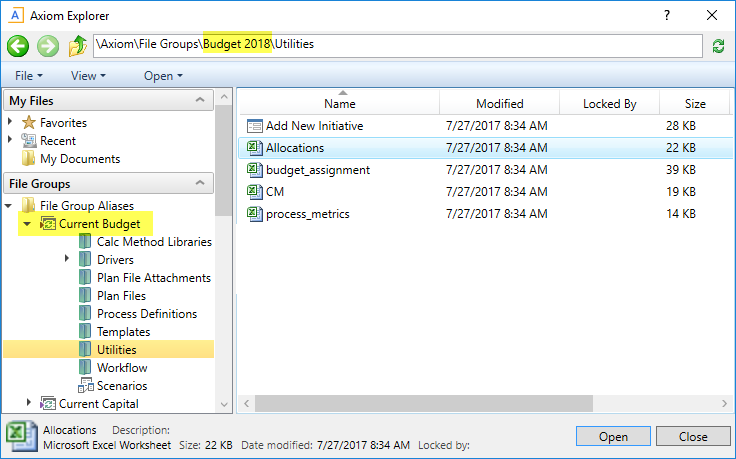
Selecting a document to process using a file group alias
When you select a document underneath an alias, the file path is written using alias syntax, so that the Scheduler task will look for the document within the current target of the alias. This path is visible in the tooltip that displays when you hover your cursor over a selected document.
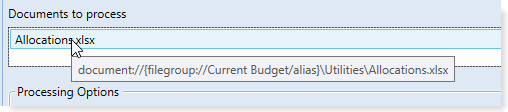
File path using file group alias syntax
When the file group alias is updated to point to a new file group, the Scheduler task will use the file in the new file group automatically. If the file does not exist in the new file group, the task will fail with an error.
Processing Options
By default, both options are selected. Axiom queries are refreshed before the save-to-database occurs.
If neither option is selected, then the files are calculated and then saved.
| Item | Description |
|---|---|
|
Perform all enabled Axiom Queries in selected workbooks |
If this option is selected, then all eligible Axiom queries in all selected files will be refreshed when the task is run. This option is selected by default. NOTE: In order to be eligible for processing, the query must be active, and Refresh during document processing must be enabled. |
|
Enable iterative calculation while processing |
Specifies whether iterative calculations are enabled for the file during processing. In most cases you will leave this option disabled. If this option is selected, then iterative calculations are enabled for the file during the Axiom query refresh process. The iterative calculation settings are fixed at a maximum of 100 iterations and a maximum change value of .001. For more information on iterative calculations, see the Microsoft Excel Help. |
|
Save document after processing |
If selected, then files will be saved after processing. This option is selected by default. This option does not cause a save-to-database to be performed—that option must be selected separately. NOTE: If this option is not selected, then the utility will open the file as read-only and will not attempt to acquire the document lock before processing. |
|
Run Save To Database on plan files after processing |
If selected, then a save-to-database will be performed after processing. This option is selected by default. This option does not cause the file itself to be saved—that option must be selected separately. It is not required to save the file in order to perform a save-to-database. |
|
Process alerts in selected workbooks |
If selected, then alerts in the file will be processed. The file must contain an Alert Control Sheet and one or more alerts must be defined in the file. If Axiom queries are enabled for processing as well, the queries will be run before alerts are processed. |
Pre-Processing Document Variables
This section can be used to pass document variables into the target files before processing. This can impact processing if the files are configured to use the variable values in some way, such as to filter an Axiom query.
For each pre-processing document variable, you can specify a variable name and a variable value. The target file must be set up with GetDocumentInfo functions that return the values for the specified variables.
|
|
To add a variable, click the Add button to add a row to the list. Complete the settings for the variable as described below. |
|
|
|
To remove a variable, select the variable in the list and then click the Remove button. Only one variable can be selected at a time. |
To edit the variable settings, double-click the applicable cell to make the cell contents editable. When you are finished editing, you can press the Enter key or Tab key to exit the cell, or click outside of the cell.
| Item | Description |
|---|---|
|
Variable Name |
The name of the variable. Do not enclose the variable name in curly brackets (you are not using the variable here, you are defining its value). |
|
Variable Value |
The value of the variable. The value can be a "hard-coded" value, or it can be a job variable that will be resolved at time of processing. If you use a job variable to define the value, the job variable must be enclosed in curly brackets. |
The following example screenshot defines the value for the document variable Dept. The value is defined using the value of a Scheduler job variable {Dept}. A value for Dept can be passed into the Scheduler job when the job is started, and then passed into the target file using the document variable.

Pre-Processing Workbook Variables
This section can be used to pass values into the file before processing. This can impact processing if the files are configured to use the values in some way. For each pre-processing variable, you can specify a workbook location to place the value, and the value to be placed.
NOTE: The specified value will be placed in all files listed to process. Therefore, unless all files are set up to use the same location and the same way of deriving the value, you will need to create a separate Process Document List task for each file. If you are not using pre-processing variables, then this does not matter.
|
|
To add a variable, click the Add button to add a row to the list. Complete the settings for the variable as described below. |
|
|
|
To remove a variable, select the variable in the list and then click the Remove button. Only one variable can be selected at a time. |
|
|
|
To change the order of variables, select the variable in the list and then click the arrow buttons to move the variable up or down. |
To edit the variable settings, double-click the applicable cell to make the cell contents editable. When you are finished editing, you can press the Enter key or Tab key to exit the cell, or click outside of the cell.
| Item | Description |
|---|---|
|
Workbook Location |
The location in the workbook for the value to be placed. Any existing value in this location will be overwritten for the duration of the processing. If the file is saved as part of the processing, the value will be saved in the file. The location can be specified using |
|
Formula |
The value to be placed in the specified workbook location. The value can be a "hard-coded" value, or a formula, or a job variable that will be resolved at time of processing. If the value is a formula, the formula is placed into the target cell and calculated in the target file. The formula can be any formula that would be valid within a spreadsheet in the Axiom client. This includes using Excel functions and Axiom functions. The formula can also use job variables, which will be resolved before placing the formula in the target cell. |
Post-Processing Workbook Variables
This section can be used to pass a value from the file back to Scheduler after processing has been performed. This can impact the processing of subsequent tasks in the job if those tasks are configured to use the value in some way. For each post-processing variable, you can specify the location in the workbook to find the value, and the job variable to use that value.
NOTES:
-
If this task processes multiple documents, the resulting variable value will be from the last document processed.
-
If the task is run as a sub-job, then the post-processing variable is not passed back to the "parent" job. The task must be executed as a regular task within the job in order to pass the variable value back to the job.
|
|
To add a variable, click the Add button to add a row to the list. Complete the settings for the variable as described below. |
|
|
|
To remove a variable, select the variable in the list and then click the Remove button. Only one variable can be selected at a time. |
|
|
|
To change the order of variables, select the variable in the list and then click the arrow buttons to move the variable up or down. |
To edit the variable settings, double-click the applicable cell to make the cell contents editable. When you are finished editing, you can press the Enter key or Tab key to exit the cell, or click outside of the cell.
| Item | Description |
|---|---|
|
Workbook Location |
The location in the workbook to find the value to be passed to Scheduler. This value will become the value for the assigned job variable for the duration of executing the current job (unless a later process within the same job overwrites the value for the same job variable). The location can be specified using |
|
Job Variable |
The job variable that you want to use the value in the specified workbook location. Do not enclose the variable name in curly brackets (you are not using the variable here, you are simply referencing the variable name). If the job variable does not already exist in the job (on the Job Variables tab), then it will be created when the job is executed. However, in most cases you will want the variable to be already set up with a default value, so that the job does not have validation errors that prevent saving. |
