AX1642
You can use the File Attachment command on a button to allow users to upload, view, and manage attachments associated with a specified plan file. Users can click the button to open the File Attachments dialog and perform file attachment actions according to their security permissions to the specified plan file.
This feature can be used in any form-enabled plan file. It can be used within the plan file itself as an alternative to using the built-in File Attachments panel in the Web Client Task Bar. It can also be used in a utility file or a report file to provide access to file attachments for one or more plan files.
For example, you might have a report that brings in information for all of a user's plan files in a particular file group, and you want to provide a way for that user to manage attachments for all of those plan files without needing to individually open each plan file. You can use a Button tag on each row of the Formatted Grid component, where the tag opens the File Attachments dialog for the current row's plan code.
Requirements and limitations
-
You can allow users to upload, view, and manage attachments for a specified plan file by using a button with the File Attachment command. The command can be used on a Button component or on a Button tag for a Formatted Grid component.
-
The File Attachment command opens the Web Client File Attachments dialog for the specified plan file. This dialog displays attachments and attachment actions in a similar manner as the File Attachment panel in the Web Client Task Bar. The actions available in the dialog vary depending on the user's security permissions to the specified plan file.
-
When the File Attachment command is used on a button, the normal form update cycle does not occur. The button only opens the File Attachments dialog. The command cannot be used with any other commands or any other update options (such as save on submit).
Configuring a Button component to manage attachments
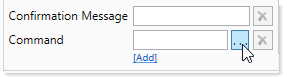
To start off, add a Button component to the Axiom form canvas and then configure the button properties as desired. You will probably want the display text of the button to be something like "Attachments". You can then configure the Command for the component as follows:
-
In the component properties, click the [...] button to the right of the Command box.
-
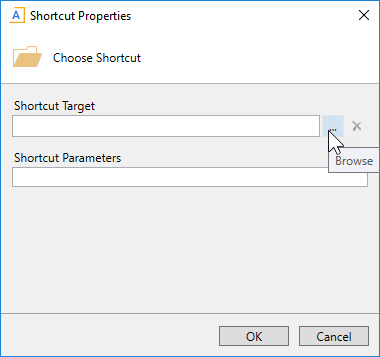
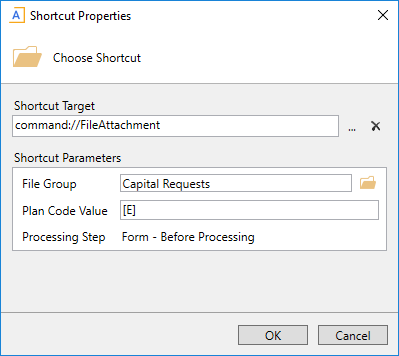
In the Shortcut Properties dialog, click the [...] button to the right of the Shortcut Target box.
-
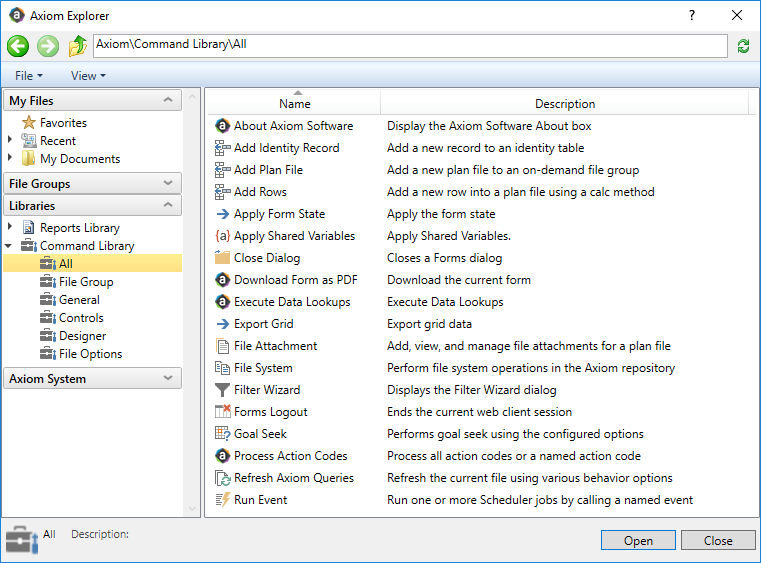
In the Axiom Explorer dialog, select Command Library > All, then select the File Attachment command. Click Open.
In the Shortcut Properties dialog, the File Attachment command is now listed as the shortcut target, and the relevant shortcut parameters are now available.
-
In the Shortcut Parameters, complete the following settings:
Item Description File Group
The file group for the command. Click the folder icon to select a file group. You can select any file group or file group alias.
If you are using the command in a file that belongs to a file group, then an additional option is available at the top of the file group list: Use Current File Group. This option means that the command will always point to the file group where the file is currently located, even if you clone the file group or copy the file to a different file group. This is the recommended option when using this command in a file that belongs to a file group.
Plan Code Value
The plan file for which to open the Web Client File Attachments dialog. You can specify the plan code value directly, or use a bracketed cell reference to read it from a cell in the file. For example:
[SharedVariables!D12]Processing Step
Specifies when the command will be executed during the Axiom form update process. This option is set to Form - Before Processing and cannot be changed. Remember that the form update cycle does not occur when using this command—the command is executed before processing begins and then the update process is aborted.
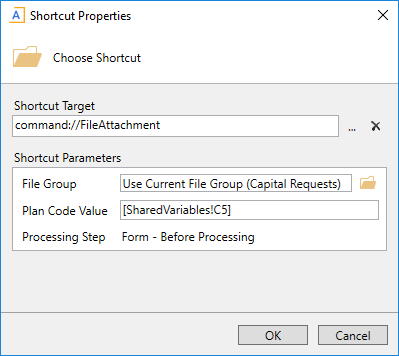
Example shortcut properties for File Attachment command
-
Once you have finished configuring the Shortcut Properties, click OK to close the dialog and return to the component properties.
Using a Button tag in a Formatted Grid component
Button tags in thematic Formatted Grid components can also be configured to run this command. In this case, use the Command parameter within the tag to assign the command to the button. The easiest way to do this is to use the Tag Editor dialog or the Data Source Assistant to create the tag and edit the tag parameters. When using these helper dialogs, you can select the command and configure the shortcut parameters using the same method described previously for the Button component.
When using a Button tag, you can use either a bracketed cell reference or just a column letter in brackets within the Plan Code Value property. If using a column letter, such as [J], then the plan code value will be read from the specified column on the current row of the grid.
Example shortcut properties using column-only syntax for Plan Code Value (Button tag)
User experience
When a user clicks the button with the File Attachment command, the File Attachment dialog opens:
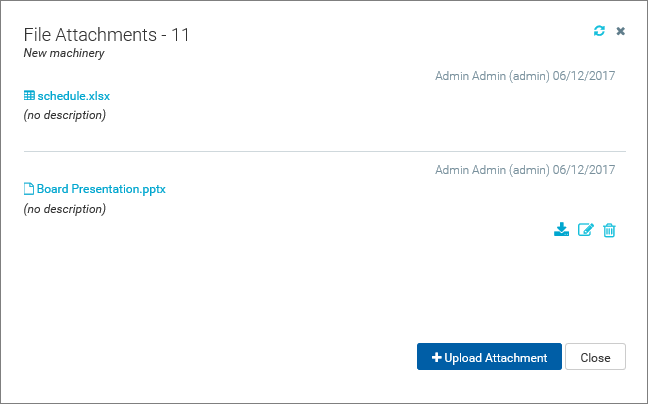
Existing attachments are listed in "blocks" with the attachment name on the left and the actions on the right. To view the actions for a particular attachment, hover over the attachment block.
-
Users with read / write access to the plan file can open (download) the attachment, edit attachment properties, and delete the attachment. These users can also upload new attachments using the Upload Attachment button.
-
Users with read-only access to the plan file can open (download) the attachment. The other actions do not display in the dialog.
