AX1031
Managing calculated fields using Save Type 4
Using Save Type 4, you can create, edit, or delete calculated fields by using save-to-database within a spreadsheet, instead of using the Edit Table dialog.
Save Type 4 depends on the placement of save-to-database tags within the sheet. There are three components:
- The primary SaveStructure2DB tag, which defines the locations of the save-to-database control row and control column, and specifies the desired operation.
- Column tags in the save-to-database control row, to specify the columns which hold the calculated field properties.
- Row tags in the save-to-database control column, to determine the action to take on the calculated field (save or delete).
| Tag Type | Tag Syntax |
|---|---|
|
Primary tag |
[SaveStructure2DB;Axiom.CalculatedFields;CustomSaveTag=Name] |
|
Row tags |
[Save] [Delete] |
|
Column tags |
TableName ColumnName ColumnID SequenceName CalculationTypeName |
NOTES:
- Save Type 4 must be enabled for the sheet on the file's Control Sheet in order for the save process to occur.
- The user performing the save must be an administrator or have the Administer Tables security permission.
Placing the primary save-to-database tag in the sheet
To define the save-to-database process, place the following tag in any cell in the sheet, within the first 500 rows:
[SaveStructure2DB;Axiom.CalculatedFields]
The row containing this tag becomes the control row for the process, and the column containing this tag becomes the control column for the process.
You can also optionally use the custom save tag parameter. For example:
[SaveStructure2DB;Axiom.CalculatedFields;CustomSaveTag=SaveField]
NOTES:
-
The primary SaveStructure2DB tag must be located in the first 500 rows of the sheet.
-
The SaveStructure2DB tag can be placed within a formula, as long as the starting bracket and identifying tag are present as a whole within the formula.
Defining the calculated field properties in the control row
Within the control row for the save-to-database process, specify the columns that define the calculated field properties. These properties can be placed in any column:
| Column Tag | Description |
|---|---|
|
TableName |
The name of the table for the calculated field. |
|
ColumnName |
The name of the calculated field. |
|
ColumnID |
The database ID of the calculated field. NOTE: This item should be left blank when creating a new field. |
|
SequenceName |
The name of the sequence for the calculated field. |
|
CalculationTypeName |
The name of the calculation type for the calculated field. |
The column tags can be placed to either the right or the left of the SaveStructure2DB tag. All of the column tags except ColumnID are required, and must be placed somewhere in the save-to-database control row. ColumnID is only required if you want to change the column name.
The control row must be dedicated to containing only valid column names for the Save Type 4 operation to the target table. Any invalid entries in the control row will cause an error when saving.
Flagging the rows to be saved or deleted
Within the control column for the save-to-database process, mark each row that you want to be processed with the appropriate row tag:
| Row Tag | Description |
|---|---|
|
[Save] |
Creates or updates the calculated field with the properties specified in the spreadsheet. NOTE: If you have defined a custom save tag in the SaveStructure2DB tag, then you must mark the rows with that tag instead of the default tag. For example, if your primary tag is |
|
[Delete] |
Deletes the calculated field. |
Only rows that are marked with a valid tag are processed; all other rows are ignored, even if there is content in the property columns. If a row contains a valid tag but no content exists in the property columns, a save error will occur.
When the save-to-database occurs, delete actions are processed first, followed by save actions.
NOTE: The row tag can be placed within a formula if desired. For example, you might want to use a formula to determine whether a particular row should be saved or deleted.
Populating the calculated field properties in the spreadsheet
You can manually type the calculated field properties within the spreadsheet, or you can use an Axiom query to populate the spreadsheet with the fields that are currently defined in the database. Once you have the current list of calculated fields as a starting point, you can adjust them as necessary, and then save the changes back to the database.
For example, imagine that you want to update calculated fields for the GL2015 table. You can:
- Create an Axiom query to bring in the current calculated fields for that table, by querying Axiom.CalculatedFields and filtering the results to just that table.
- Set up the save-to-database tags so that the fields to be saved line up with the information brought in by the Axiom query.
- If you want to edit the properties of existing calculated fields, you can change the properties and then place a
[Save]tag in the save-to-database control column. If you want to delete an existing calculated field, you would use a[Delete]tag. - If you want to create a new calculated field for that table, you can enter the field properties (leaving ColumnID blank), then place a
[Save]tag in the save-to-database control column.
When you perform the save-to-database, the calculated fields will be created, updated, or deleted as appropriate.
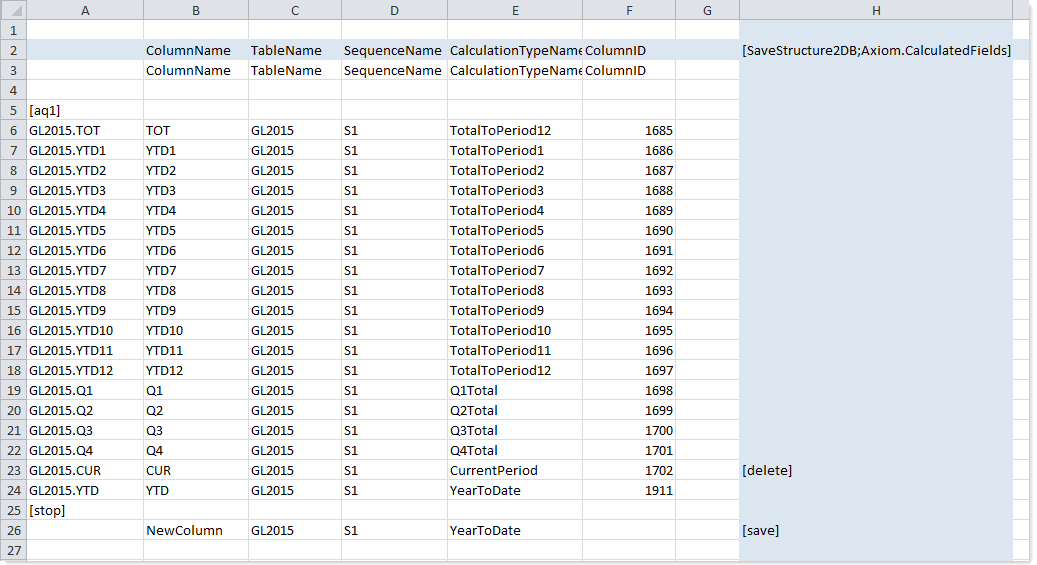
Example Save Type 4 to Axiom.CalculatedFields
In this example an Axiom query is used to bring in the calculated fields for the GL2015 table (with the field definition on row 3). The save-to-database control row is row 2, and the save-to-database control column is column H. The save is currently set up to delete the existing calculated field listed in row 23, and to create a new calculated field defined in row 26.
