AX2431
Importing from one or more source files
You can import data into Axiom Software from a file, using either a delimited file or an Excel file. You can import from a single file, or from multiple files that use the same file structure.
File requirements
When using a delimited file, the file must meet the following criteria:
-
Delimiters can be any character. You specify the delimiting character in the import settings.
-
The first row of the file can optionally contain column header names.
-
Numeric values cannot be in scientific notation or formatted with extraneous characters such as currency signs or parentheses.
When using an Excel file, the file must meet the following criteria:
-
The file format must be XLS or XLSX. XLSM files cannot be imported.
-
The first row can optionally contain header names.
-
Each column in the Excel file translates to a column in the destination table. Each row in the file translates to a data record in the table. Blank columns and rows are ignored.
-
The data in the spreadsheet must match the designated data type for the destination column. For example, if numeric values in the spreadsheet are prefixed with a quotation mark, then Excel considers those values to be strings instead of numbers. This will cause an error if attempting to import these string values into a numeric column.
Source configuration
To import data from a file, complete the following configuration settings on the Source tab of the Import Wizard.
General settings
The following settings are always present at the top of the tab.
| Item | Description |
|---|---|
| Import type |
Select File to import data from a file. |
|
Remote Data Connection |
If your Axiom Software system is hosted on the Axiom Cloud Service, and you are not using the Prompt for path during execution option to allow the user to select a file, then you must specify a remote data connection so that the cloud service can read the file located on your network. You can select any remote data connection defined in your system, or you can enter an import variable name. For example, you can enter the built-in system variable Remote data connections are defined in Scheduler. If no remote data connections have been defined in your system, then this setting does not apply and will not display. |
File import options
The following settings are present when File is selected as the import type.
| Item | Description |
|---|---|
| File type |
Select one of the following to specify the type of file to use as the import source:
|
|
Source path |
Select one of the following to specify the location of the source file:
For more information, see Design considerations for the source path. |
|
Import from |
Select one of the following:
|
|
File path or Source folder |
This setting applies when Use specified path is selected for the Source path. Specify one of the following, depending on whether you are importing a single file or multiple files:
Once the path is specified, Axiom Software will validate whether the application server or the cloud integration service can access the file or folder, and will display an error if not. If the path is to a network location, it must be a UNC path (i.e. \\servername\foldername\filename). If you enter a mapped drive, the entry will automatically be converted to a UNC path. Import variables can be used in the path. See Using variables in imports. NOTE: If a remote data connection is specified, then by default the file/folder navigation dialog shows the folder structure of the server where Axiom Cloud Integration Service is installed. If you need to point to a different location, you can either manually type the file or folder path, or you can temporarily set Remote Data Connection to <None>. |
| Default folder |
Optional. This setting applies when Prompt for path during execution is selected for the Source path. Specify a folder path to use as the default location when prompting the user to select a file. You can type the folder path or click the folder icon to navigate to the folder. If a folder is specified, then when the user is prompted to select a file, the file selection dialog will open to this folder by default. The user can still browse to a different location. Import variables can be used in the path. See Using variables in imports. |
File options (Excel)
The following options are present if the File type is Excel file.
| Item | Description |
|---|---|
|
First row has column names |
Select this option if the first row of the file contains column names. If the first row of the file contains data, leave this option unchecked. |
|
Sheet name |
The sheet in the Excel file to import. Leave this blank to use the first sheet in the file. Only one sheet can be imported. Variables can be used to specify the sheet name. See Using variables in imports. |
File options (Delimited)
The following options are present if the File type is Delimited file.
| Item | Description |
|---|---|
|
First row has column names |
Select this option if the first row of the file contains column names. If the first row of the file contains data, leave this option unchecked. |
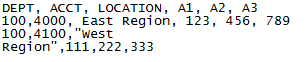
| Import file has multi-line values |
Select this option if the import file has data where a field value splits across rows (within the text qualifier). For example:
If this option is selected, then the split value will be read as a single import value. |
|
Delimiter |
In the box to the right of the option, enter the delimiting character used in the source file. For example, if the delimiter is a comma, enter a comma into the box.
If the delimiting character is a space or a tab, place your cursor in the box and press the space bar or the tab key. The character will be indicated in parentheses to the right of the box (since the character is not visible in this case).
|
|
Text Qualifier |
By default, the text qualifier is double quotation marks ("). If desired, you can enter a different character as the text qualifier, or you can clear the field if you do not want to use a text qualifier. The text qualifier is used when values in the source file may contain the delimiting character. For example, if the delimiting character is a comma, but the source file contains values such as full names that also contain a comma (for example: "Doe, Jane"). In this case, the comma within the quotation marks is considered part of the field value instead of starting a new field. |


The following options are present if Import from is set to Multiple files.
| Item | Description |
|---|---|
|
Import order |
Select one of the following to specify the order in which multiple files are imported:
|
| File filter |
Optional. Specify a filter to determine the files to import within the specified source folder. If the filter is left blank, then all files in the folder are imported. You can use wildcard characters (* or ?) to include groups of files that share naming conventions. For example: NOTE: The import attempts to process all files in the folder allowed by the file filter, regardless of whether those files meet the specified file type for the import (delimited or Excel). You should make sure that the folder only contains valid file types, or set the filter appropriately so that invalid file types will not be imported. |
| Archive folder |
Specify a target folder in which to archive source files after they have been imported. You can type the folder path or click the folder icon to navigate to the folder. After the data in a file has been imported successfully, the file is moved from the original source folder to the archive folder. Files are not moved when running the import in preview mode. Import variables can be used in the path. See Using variables in imports. NOTE: If a remote data connection is specified, then by default the file/folder navigation dialog shows the folder structure of the server where Axiom Cloud Integration Service is installed. If you need to point to a different location, you can either manually type the file or folder path, or you can temporarily set Remote Data Connection to <None>. |
| Add timestamp prefix to file names when archiving successful import files |
Optional. Select this option if you want to add a timestamp to the file names in the archive folder.
|
Design considerations for the source path
There are two options to specify how the import obtains the source file: Prompt for path during execution and Use specified path. When deciding which option to use, you should consider the following to determine which option is most appropriate.
Prompt for path during execution
- File permissions
-
The file must be accessible by the user’s file system permissions.
- Data flow
-
- A copy of the file is streamed from the client machine to the application server, then from the application server to the database server.
- The file copy on the application server is deleted after the import is complete.
- Ramifications / Limitations
-
- Slower performance (file is copied multiple times)
- Only available when running the import interactively
- Limited to files less than 100MB
Use specified path
- File permissions
-
- The file must be accessible by the application server or the cloud integration service.
- The file path must be a UNC path, not a mapped drive (meaning \\servername\foldername, not I:\foldername).
- Data flow
-
The file is streamed from the file source to the database server for import.
- Ramifications / Limitations
-
- Faster performance
- No practical limit to the file size
- Can be used in Scheduler
How multiple-file imports work
When the import is configured to use multiple source files, the import works as follows:
-
When the import begins, Axiom Software inspects the source folder and compiles a list of all files found in that folder. If a file filter is specified, the list is limited to only those files that match the filter. If any files are added to the folder after this list is compiled, those new files will not be imported during the current import execution.
If no files are found, the import stops. The absence of files to import is not an error condition.
-
The files in the list are then imported sequentially, in the configured order (either alphabetical by file name, or by creation date). For each file, the following occurs:
- Data is copied from the source file into the temp table.
- Transform statements are run.
- Data is saved to the destination table.
- The source file is moved from the source folder to the archive folder.
Each file must complete this import process successfully before moving on to the next file.
NOTE: If the import uses import variables, these values are set once, before the file list is created. The import variables will remain the same for each file that is imported. However, transform variables are set by transform statements. Since the transform statements are run per file, it is possible that transform variables could resolve differently per file.
-
If any file fails to import successfully, the import stops and the import status is set to Error. No further files are imported. Currently, it is not possible to configure the import to ignore the error and continue processing other files.
-
If all files in the list import successfully, the import stops and the import status is set to Success.
Because all of the files are imported sequentially, if multiple files contain data for the same set of key values, the data in the last-processed file will be saved in the database (overwriting any previously saved data for the same keys). It is not currently possible to batch and aggregate the data from multiple files before saving.
