On this page
If users are interacting with plan files as Axiom forms, then limited functionality is available to allow Axiom form users to insert new rows using calc methods. However, the "change calc method" functionality is not available in Axiom forms.
There are two ways to configure an Axiom form to allow end users to insert calc methods:
- You can set up a Button component to use the Add Rows command. The user clicks on the component in the Axiom form to insert the new row.
- You can set up a cell in a Formatted Grid component to trigger inserting rows. For spreadsheet-formatted grids, you can use the AddRows content tag. For thematic grids, you can use the Button content tag with the Add Rows command.
As normal, the user must have the Allow Calc Method Insert security permission for the file in order to perform this action.
Requirements and limitations
To use calc method insert functionality in an Axiom form, your template and calc methods must be set up as follows. This applies regardless of which method is used to allow insertion within the Axiom form.
-
An InsertCMColumn must be defined, and the tag must have a defined header label. Dynamic insertion controls are not supported in Axiom forms.
For example:
[InsertCMColumn;CMInsert] -
An InsertCM tag must be placed on the row where you want to allow insertion. This tag must have a defined insertion point label, and must allow insertion. You can specify one or more calc methods or groups to allow for insertion, or you can leave those parameters blank to allow any calc method.
For example:
[InsertCM;InsertNewRow;New Row] -
In most cases, the calc method to be inserted should contain both a
[row]tag and a[save]tag in the appropriate columns, so that the newly inserted row displays in the Formatted Grid component, and so that the data for the newly inserted row gets saved to the database. Remember that the source file itself is not saved when the Axiom form triggers a save, so the newly inserted row will not be retained in the source file, only its data can be saved.NOTE: Neither of these tags are strictly required if you have a use case where you want to insert a row that does not subsequently display in the Axiom form, or does not get saved to the database. For example, perhaps the data for the new row impacts another component, or the data gets summed and saved from a different row.
-
Only one instance of the calc method can be inserted at a time within Axiom forms. The Axiom form environment does not provide an option to insert multiple instances of the calc method at a time. The MaxInsertCount parameter on the InsertCM tag will be ignored.
-
If the calc method uses calc method variables, the user can only set the values of these variables once, when the calc method is originally inserted. If you need the user to be able to edit these values after insertion, then the target cells must be configured as editable (unlocked). Keep in mind that if you use a Related Column Value variable, the related value will not be automatically updated if you allow the user to edit the parent value after insertion.
For more information on setting up calc method controls—meaning the InsertCMColumn and InsertCM tags—see Setting up calc method controls for a sheet.
The Add Rows command is always executed on the form, at the After Updating Values processing step of the form update process. For more information on how processing steps fit in with the form update process, see Axiom form update process. Note that if the Add Rows command causes a calc method dialog to display (either to select the calc method to insert, or to select variable values for the calc method), then no other commands will be executed after the Add Rows command.
Setting up calc method insertion using a button
To allow users to insert new rows from the Axiom form, you can use a Button component that is configured to run the Add Rows command shortcut. This is the same command that is available for use in task panes.
NOTE: In a thematic Formatted Grid component, you can use a Button content tag that is configured to run the Add Rows command. When creating the Button tag, the setup of the Add Rows command is the same as described in the following steps. For more information on creating a Button tag in a thematic grid, see Using buttons in Formatted Grids.
To start off, add the Button component to the Axiom form canvas and then configure the properties as desired. You will probably want the button text to be something like "Insert New Row". You can then configure the Command for the component as follows:
-
In the component properties, click the ... button to the right of the Command box.
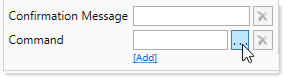
-
In the Shortcut Properties dialog, click the ... button to the right of the Shortcut Target box.
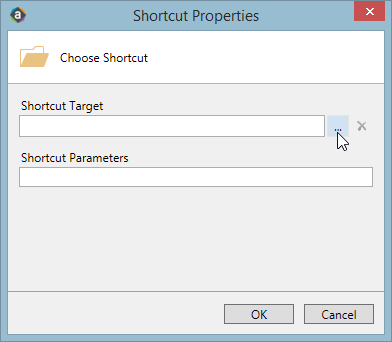
-
In the Axiom Explorer dialog, select the Command Library, then select Add Rows, then click Open.
The Add Rows command is now listed as the shortcut target, and the relevant shortcut parameters are now available. All three parameters are required.
-
Complete the shortcut parameters as follows, then click OK to close the Shortcut Properties dialog.
- Target Sheet: Type the sheet name where the calc method is to be inserted.
- Column Label: Type the header label defined in the InsertCMColumn tag.
-
Row Label: Type the insertion point label defined in the InsertCM tag. This is where the calc method will be inserted.
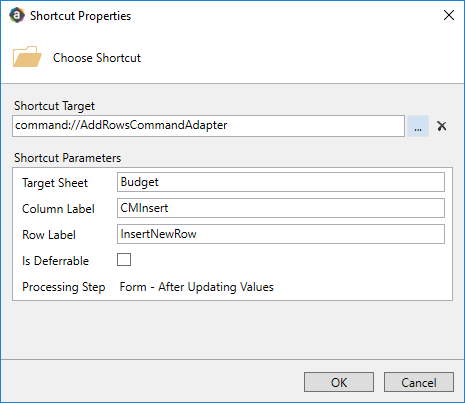
Example Shortcut Properties dialog
Using Is Deferrable
The Is Deferrable option on the Add Rows command is intended for cases where you have multiple Add Rows commands on a single button. If some insertions use calc method variables and others do not, you can defer the execution of the insertions without variables until all variable values have been selected. If the user cancels a variable selection and therefore cancels that insertion, the deferred insertions will also be canceled.
To do this, set up the button commands as follows:
- List the Add Rows commands that use variables before the commands that do not use variables, so that the insertions with variables are executed first.
- Enable Is Deferrable for all of the Add Rows commands that do not use variables, so that insertions without variables are deferred and dependent on the completion of the insertions with variables.
Whether an Add Rows command uses calc method variables depends on the calc methods allowed by the InsertCM tag for the specified Row Label. Deferred insertions must be assigned a single calc method that does not use variables, because deferred insertions must be able to be processed without user input.
Setting up calc method insertion using an AddRows tag
To allow users to insert new rows from the Axiom form, you can use content tags within a Formatted Grid component. The AddRows content tag will display as a clickable hyperlink when the file is viewed as an Axiom form. Users can then click on the hyperlink to add a new row.
NOTE: The AddRows content tag is only supported for use in spreadsheet-formatted grids, for backward-compatibility. Thematic grids should use the Button tag instead, and configure that tag to use the AddRows command.
The syntax for the AddRows tag is as follows:
[AddRows; Sheet=SheetName; Column=ColumnLabel; Row=RowLabel; Text=DisplayText; Foreground=color; Background=color]
Parameters can be listed in any order after the AddRows tag. You do not need to indicate omitted parameters with an "empty" semi-colon.
| Parameter | Description |
|---|---|
|
Sheet |
The sheet name where the calc method is to be inserted. |
|
Column |
The header label defined in the InsertCMColumn tag. |
|
Row |
The insertion point label defined in the InsertCM tag. This is where the calc method will be inserted. |
|
Text |
The display text for the hyperlink that displays in the formatted grid. Users will click this hyperlink to insert the new row. |
| Foreground |
Optional. The foreground color to use for rendering the cell contents (text, symbol, etc.). This parameter only applies to spreadsheet-formatted grids. It will be ignored by thematic grids. By default, the text uses the font color defined for the cell in the spreadsheet. If you want to override this formatting and specify a color in the tag itself, you can use the Foreground parameter. The advantage of this approach is that the color can be made dynamic using a formula. The color can be specified using either the color name (i.e. "yellow") or the hexadecimal code for the color (#FFFF00 for yellow). For example, see a list of colors here: http://www.w3.org/TR/css3-color/#svg-color. When using the Data Source Assistant / Tag Editor, you can click the arrow button to the right of the box to bring up the color selector. You can select from the displayed colors, or you can enter a RGB value or a hexadecimal code. The selected color will be inserted in the tag using its hexadecimal code. To clear the selected color, click the Clear color Alternatively, you can use a bracketed cell reference to read the color from the referenced cell. This approach is useful if you want to dynamically determine the color, because then the formula can be in the referenced cell instead needing to construct the tag using a formula. For more information, see Referencing cells in content tag parameters. |
| Background |
Optional. The background color to use for the cell in the grid. This parameter only applies to spreadsheet-formatted grids. It will be ignored by thematic grids. By default, the grid cell uses the fill color defined for the cell in the spreadsheet. If you want to override this formatting and specify a color in the tag itself, you can use the Background parameter. The advantage of this approach is that the color can be made dynamic using a formula. The color can be specified using either the color name (i.e. "yellow") or the hexadecimal code for the color (#FFFF00 for yellow). For example, see a list of colors here: http://www.w3.org/TR/css3-color/#svg-color. When using the Data Source Assistant / Tag Editor, you can click the arrow button to the right of the box to bring up the color selector. You can select from the displayed colors, or you can enter a RGB value or a hexadecimal code. The selected color will be inserted in the tag using its hexadecimal code. To clear the selected color, click the Clear color Alternatively, you can use a bracketed cell reference to read the color from the referenced cell. This approach is useful if you want to dynamically determine the color, because then the formula can be in the referenced cell instead needing to construct the tag using a formula. For more information, see Referencing cells in content tag parameters. |
This tag works in the same way as the Add Rows command in the Command Library. When the user clicks on the hyperlink, Axiom will create an Add Rows command string using the parameters listed here, and then perform the Add Rows action.
To create the tag, you can manually type it within a cell, or you can use the Data Source Assistant / Tag Editor. For more information, see Creating and editing content tags in Formatted Grids.
For example:
[AddRows;Sheet=Budget;Column=CMInsert;Row=InsertNewRow;Text=Click here to add row]
When a user views the file as an Axiom form, this will display as a hyperlink that says "Click here to add row". When the user clicks on the hyperlink, a calc method will be inserted on the specified sheet, using the specified column and row labels to determine the location.
The following screenshot shows an example of how the AddRows tag might look in the spreadsheet:

When this file is viewed as an Axiom form, the tag will be rendered in the form as a clickable hyperlink:

NOTES:
-
Use of this tag to perform an Add Rows action automatically triggers a refresh of the Axiom form. First, updated values will be submitted from the form to the source file. Then, the Add Rows action will occur in the source file. Lastly, the source file will be refreshed and then the Axiom form will be updated.
-
Remember that the insert location is not necessarily the row that contains the AddRows tag; it is whatever location is specified by the Sheet / Column / Row parameters (which can be the current row but does not have to be). In other words, this tag does not behave like the GetCalcMethod function for Axiom files (which always inserts on the current row).
Add Rows behavior
Within the Axiom form, the user can click the button or the hyperlink to perform the Add Rows command. Within the source file, the command identifies the designated sheet, column, and row, and then inserts the calc method as specified in the InsertCM tag.
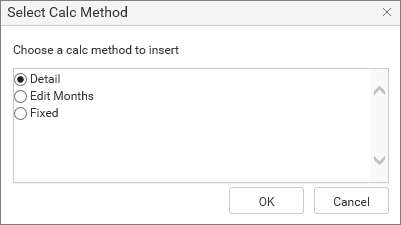
If multiple calc methods are allowed for insertion, then the user is first prompted to select which calc method to insert.
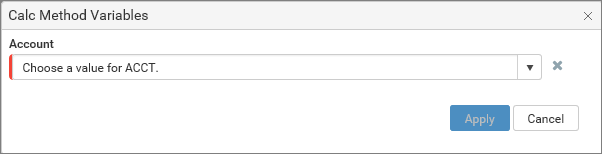
If the calc method has calc method variables, then the user is prompted to specify values for those variables before the calc method is inserted.
Assuming the inserted row is configured to display in the formatted grid, the new row will display in the Axiom form after the form update process is complete. The user can then complete any inputs associated with the new row.
|
Get more information and training resources: www.kaufmanhall.com |
Was this topic helpful? calc_methods_with_forms.htm |
