On this page
AX3301
Executing import utilities
When you execute an import utility, data is queried from the source database or file, import steps are processed, and the resulting data is saved to the destination table. For more information on what occurs when an import is executed, see About imports.
NOTES:
- By default, only administrators can execute import utilities. Non-admin users can be granted permission to execute specific imports, as defined on the Files tab of Security.
- You can also use Scheduler to execute import utilities, using the Import ETL Package task.
To execute an import:
- On the Axiom tab, in the Administration group, click Imports > ImportName > Execute.
-
In the Execute Import dialog, review the import description for any important information about the import, and then adjust the Import Options as desired.
For more information about the import options, see Execute tab. If you are testing the import, you may want to enable either or both of Allow pauses and Preview only.
IMPORTANT: When an import is executed in preview mode, all of the steps in the Transforms tab are performed, including any steps that modify tables other than the temptable. If you do not want these steps to occur as part of a preview, you should edit the import to disable the step on the Transforms tab.
- Click Execute.
- If the import uses variables, the Variables dialog opens for you to define values for the variables. For each variable, you can select a value from the drop-down list. Some variables may also allow you to type in a user-defined value.
-
If the import uses a source file, you may be prompted to specify the location of the source file. In the Open dialog, navigate to the file that you want to use and then click Open.
In this case, a copy of the specified file is uploaded to the application server for processing. Once the import is complete, the temporary copy of the file is deleted.
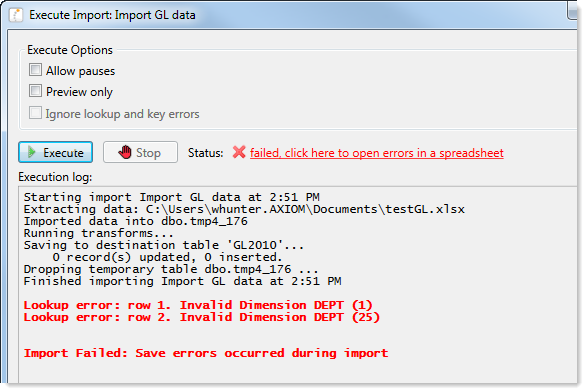
As the import is processed, status messages display in the Execution log at the bottom of the dialog. If an error occurs, the error message displays in the log and the import is stopped. If necessary, you can copy and paste the text in the execution log; for example, to send the error to Axiom Software support. Right-click inside the log and choose Select All and then Copy.
TIP: If an import experiences an error and you need more information on the error, try running the import in preview mode. The error messages in preview mode may contain more detail.
If you want to stop the import while it is executing, click Stop. The import stops after completing the step in process. You cannot restart the import at the same spot—when you click Execute, the import starts over from the beginning.
When the import is complete, click OK to close the dialog.
If the import experiences import validation errors, then those errors will be logged to a separate CSV file in addition to being displayed in the Execution log within the dialog. You can open this file separately to see exactly which rows of data were invalid within the context of the import data. This error file includes the following:
- Lookup validation errors from Axiom Software's built-in validation against lookup columns.
- Validation errors from any Custom Data Validation steps in the transforms.
- Key validation errors such as blank keys or duplicate keys.
You can open the file from the Execute Import dialog by clicking the link in the Status area. The status will be either "failed" or "warning," followed by the text "click here to open errors in a spreadsheet." The status type depends on whether the option to Ignore lookup and key errors is selected.
The CSV file contains the import data, followed by one or more validation columns. Validation columns are labeled as follows:
- Lookup and key validation messages are in a column named LookupColumnName Lookup Error. For example: "Acct Lookup Error" when looking up against the ACCT column.
- Custom Data Validation messages are in a column named AXTRANSFORM_StepNumber, where StepNumber is the number of the associated transformation step. For example: "AXTRANSFORM_5" when the associated transform is step 5 in the list.
The error CSV files are placed in a system-maintained folder in the Imports Library named Import Errors. Access to the error files is automatically managed based on access to the import. You can access the error file directly later by using the Explorer task pane or Axiom Explorer.
Each execution of an import that results in a lookup error will generate a unique error file (differentiated by a date/time stamp). These error files are not automatically deleted; you must manually delete them when you are finished investigating the error.
|
Get more information and training resources: www.kaufmanhall.com |
Was this topic helpful? executing_imports.htm |
